What Is Dithering in Audio?
In this piece you’ll learn what dithering is, why you need to dither, how it improves dynamic range, and why dithering isn’t masking anything.
Dithering is an important yet often overlooked technique used in digital audio production. Dithering is the process of adding a small amount of random noise to a digital audio signal in order to reduce the distortion caused by quantization error. This technique is crucial for maintaining audio quality during the conversion process from analog to digital, and it can greatly improve the overall sound of a digital recording.
In this blog, we will explore the basics of dithering, the benefits it provides, and some tips for using it in your audio production workflow.
What is audio dithering?
Audio dithering is the intentional application of low level noise to an audio file. The process of audio dithering helps to remove quantization distortion that occurs when reducing the bit depth of an audio file.
Dithering is typically applied as the final step of mastering, but it should also be used any time you reduce the bit-depth of your audio. You should dither your master when bouncing down to lower bit-depth audio for the purposes of meeting compatibility requirements of different playback formats. Some playback formats, like CD and certain streaming services, can only handle smaller file sizes which means you’ll need a lower resolution audio file. However, lowering the bit-depth of audio results in quantization distortion that you can solve by applying dither.
To better understand dithering, let’s dive into why quantization distortion happens during the analog-to-digital conversion process and how dithering helps to improve the overall sound quality of a digital audio recording.
What is quantization?
Quantization is the process of converting an analog audio signal into a digital signal. Quantization digitizes a continuous waveform into a series of individual amplitude levels—it converts audio into a format a computer can understand.
To accomplish that, an analog-to-digital converter (ADC) captures individual snapshots of an audio signal at a specified sample rate and bit depth. The higher the sample rate and bit depth, the higher the audio resolution.
Think of audio sampling as a process similar to how video cameras capture video. A video camera reconstructs a continuous moment in time by capturing thousands of consecutive images per second, called frames. The higher the frame rate, the faster the motion you can capture, and the smoother the movie.
In audio, sample rate is the number of times per second a waveform's amplitude levels are captured. The more snapshots per second, the higher the frequencies you can capture.
So far so good. The problem we face next is that an analog waveform could be at any amplitude level in each snapshot, but we only have a fixed, finite number of steps that we have to snap vertically to. The number of steps is determined by the bit-depth—256 for 8-bit audio, 16,777,216 for 24-bit—and the process of snapping the analog waveform to the nearest step is what’s known as quantization.
Why reduce the sample rate and bit depth of audio?
When mixing a project, applying effects, and mastering, it's always advantageous to work at the highest sample rates and bit-depths possible on your system. This allows for greater resolution in all mixing and effects, and results in fewer roundoff errors and artifacts. However, there are times when you’ll need to adjust the sample rate and bit depth of your audio so it’s compatible with the intended audio playback format.
The process of reducing the bit-depth of audio (i.e. downsampling) however, results in quantization errors and distortion.
What is quantization distortion?
Quantization distortion is signal noise and distortion that results from the difference between an analog signal and the nearest quantization level. As you reduce the sample rate and bit-depth of digital audio, you are reducing the number of values available to measure the amplitude of any given sample. In other words, you now have less values to describe the dynamic range. As a result, certain values that no longer exist will be forcibly truncated and rounded up or down to the closest quantization value.
When you reduce the bit depth from 24-bit audio to 16-bit audio, for instance, there are fewer steps, or snapshots available to reconstruct the original waveform’s amplitude values. As you downsample to 16 bits, quantization distortion starts to get rather noticeable in reverb tails, fade-outs, and quiet moments.
So how do you deal with quantization errors and distortion that result from downsampling? Dithering.
What does audio dithering do?
Dithering actually improves the audio quality of lower resolution audio by removing quantization distortion and replacing it with white noise. By applying noise, dithering turns the harsh, inharmonic distortion of quantization errors into a low-level, analog-like hiss. The noise in the signal slightly randomizes the amplitude levels of the original signal, thereby removing the distortion and actually retaining very low signal levels which otherwise would quantize to pure silence.
Let's take a look at dithering in action. In the video below, we’ll start by generating a sine wave in iZotope RX that fades from -84 down to -120 dBFS. Then we’ll truncate it to 16 bits without dither. Notice all the tonal distortion products that pop up, and also that the signal cuts to complete silence—effectively 100% distortion—once it drops below -96 dBFS.
Then, we’ll undo our truncation, and reduce to 16 bits with noise shaped dither. Notice that now, rather than tonal distortion products, we have a smooth, even noise floor and that moreover the sine wave level is retained above the noise floor down to nearly -120 dBFS. That’s a 24 dB improvement!
When to dither audio
Dithering should always be off unless you're bouncing audio to lower bit depths. Ideally, you should only dither audio once during the final stage of audio mastering when exporting a file to a lower bit depth (e.g. from 32-bit to 24-bit, or 24-bit to 16-bit). However, almost all modern digital audio workstations operate at 32-bit floating point or higher internally, so if you’re exporting a 24-bit WAV file for mastering, you should also dither.
Generally, you should only dither audio when bouncing down to 24-bits or less. You don’t have to worry about dithering if you’re exporting a 32-bit floating-point file or higher because it’s a high enough resolution that produces no audible quantization distortion.
How to dither audio with Ozone
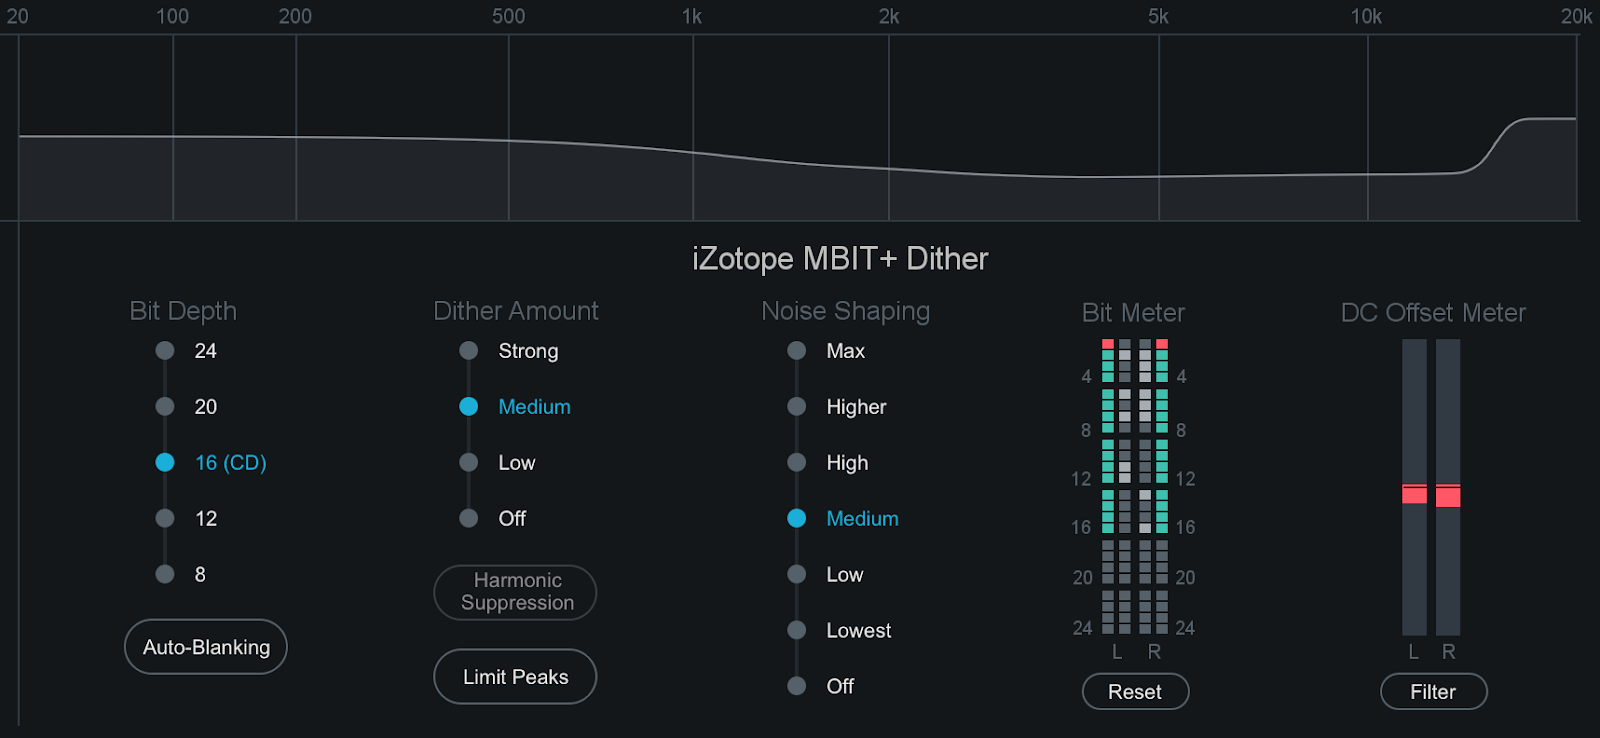
Ozone contains a comprehensive set of dithering tools that allows you to prepare studio-quality audio for CD and other formats by effectively converting and dithering audio to 24, 20, 16, 12, or 8 bits.

iZotope Ozone dithering tools
Taking all of the basics of digital audio into consideration, here's an example workflow to take you through the last stages of mastering and audio dithering.
- Use Ozone to master your track, and mixdown to a high-fidelity format. Be sure any dithering features in your DAW are disabled. You only want to dither when bouncing down to lower resolution audio.
- When you’re ready to convert to CD or streaming format, convert your high-fidelity mastered audio file to 44.1 kHz, but leave your bit depth alone for now—i.e. it should remain at 32-bit.
- Now open your 44.1 kHz mix in your DAW, and load Ozone as an effect.
- Enable Ozone's Dither. Access the Dither panel by clicking on the Dither button below the I/O meters. Enable or disable Dither by clicking the power button to the left of the Dither button.
- Choose the dithering settings for your mix. When mastering for CD, for example, you would want this set to 16 bit.
- Output the final product as a 44.1 kHz, 16-bit audio file.
For dithering to work, it must be the absolute last edit performed on an audio file, except for the final conversion to 16-bit depth. Only dither once. This means that any effect applied after dithering, even a slight gain adjustment, or a sample-rate conversion, can undermine the positive effects of your dithering.
For this reason, it's important to make sure that no changes are made to your mix between dithering and the conversion to 16-bit format, and that nothing changes this file afterwards.
Other dithering considerations
Before we wrap up, there are a few specific cases, along with a couple pernicious myths, that I’d like to address.
- Self-dither: From time to time you may hear someone mention that you don’t need to apply dither if you’re using this or that plug-in, because it will self-dither. While technically this can be true in some very specific cases, it’s a risky assumption to make. Believe it or not, all noise is not created equal, so unless the device you’re using has a specific dither setting, you should be adding dither if you’re reducing bit depth.
- 24-bit and noise-shaping: One thing we haven’t really touched on is noise-shaping. In a nutshell, it’s basically like applying EQ to the dither noise to make it less audible. At bit depths of 8 or 16 bits, this can make an appreciable difference. At 24 bits though, the dither noise is so quiet that at normal listening levels it’s inaudible, even without noise-shaping. Still, it will remove quantization distortion which, due to its tonal nature, has a much higher chance of being audible. As such, a flat, TPDF-type dither is really fine.
- Bouncing, flattening, freezing: No, we’re not talking about some obscure food preparation method. Different audio workstations operate in different ways, but most offer some method to commit a complex audio effects chain to a file. If you’ve not explored the options for doing this in your DAW, it may be time to give them a look. When possible, 32 or 64-bit floating-point are your best options, but if you’re forced to use 24-bit, check to see if there’s an option to enable dither.
Start using dithering in your digital audio
Hopefully this helps you understand why dither is so crucial to digital audio, how and why it works, and when it should be applied. Now, you’ll never have to dither about dithering again. If you’re reducing bit depth, whether from 64 or 32-bit floating-point to 24-bit fixed point, or from 24-bit down to any lower fixed-point value, add dither! It will always do more good than harm.
If your interest has been piqued and you want to dive even further into the topic, we have a full dithering guide pdf. It references some older products, but the fundamentals haven’t changed and the information is as good today as it ever was. For our full guide on mastering, check out How to Master a Song from Start to Finish.


