The Importance of Monitor Gain in Audio Mastering
Learn how to correctly set your monitor gain for audio mastering, and why doing so will help you achieve more consistent, tonally balanced results.
Monitor gain. So deceptively simple, yet so powerful—and for a mastering engineer, an essential part of the toolkit. Think for a moment about how you usually use your volume control. If you’re thinking, “Ian, that’s obvious. I turn it up and down depending on what I’m working on and how loud I need things to be,” you’re not alone. After all, this is the relationship most engineers have with their volume control.
But for a mastering engineer, things are a little different. The volume control—or monitor gain, as we’ll refer to it from here on out—is a precisely calibrated part of the playback system, and one which helps ensure consistent results song after song. So buckle up, and let’s take a look at how and why to calibrate your monitor gain.
Before we dive in, be sure to watch the Are You Listening? mastering series episodes on limiting, and loudness. In this piece you’ll learn:
- How SPL (sound pressure level) affects our perception of tonal balance
- How to choose and calibrate your mastering monitor gain
The marriage of level and tonal balance
We’ve touched on the interplay between level and tonal balance before, pointing out that our perception of the amount of bass and treble present in the signal, relative to the midrange of the spectrum, increases as the sound pressure level increases. In other words, all else being equal, a song played back at a higher SPL will sound brighter and bassier than the same song played back at a lower SPL. The anatomical reasons for this are complex, but the results have been described in many scientific studies over the years.
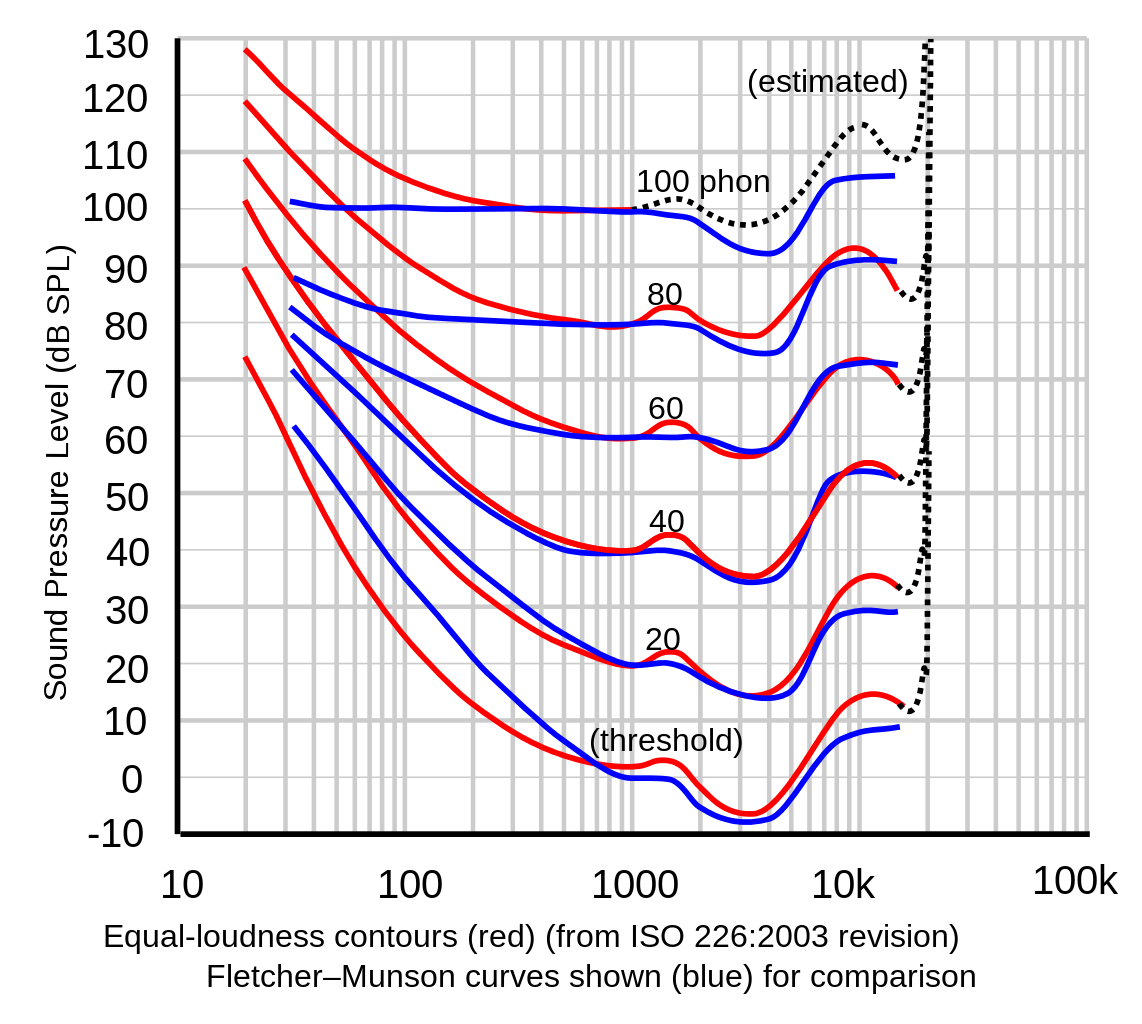
Most famous among these is likely the work carried out by Harvey Fletcher and Wilder Munson in the early 1930s, which resulted in the famed Fletcher-Munson curves. They can be a bit confusing if you’ve never studied these before, so let’s break down exactly what the Fletcher-Munson curves show us.
What are Fletcher-Munson curves?
Fletcher-Munson curves, also known as equal-loudness contours, plot the human perception of loudness, measured in “phons,” against the corresponding sound pressure level required to produce that perceived loudness at a given frequency. 70 years later, their research was updated and codified in ISO 226:2003—though the modern research largely agrees with their earlier studies. Given the advances in both sound reproduction and measurement technology over the 70 years between these studies, it’s amazing that Fletcher and Munson didn’t have a higher margin of error.
Below is an image comparing the current ISO 226:2003 curves with the earlier Fletcher-Munson curves.

Comparison of Fletcher-Munson and ISO 226:2003 equal loudness contours
Let’s look at an example. At 1000 Hz, the 80 phon line crosses the 80 dB SPL line, meaning 80 dB SPL sounds like 80 phons at 1000 Hz. However, if we follow that line down to 100 Hz, we see that it crosses at about 90 dB SPL, meaning that at 100 Hz, it takes 90 dB SPL to sound like 80 phons. Compare this to the 40 phon line and you’ll see that discrepancy increase to over 20 dB.
Something these equal-loudness curves don’t tell is inherent variation from person to person. Always remember––these curves illustrate averages of many different test subjects, and as such, they only broadly represent how an individual hears different frequencies at different levels. The important takeaway here, and I can’t reiterate it enough, is that as sound pressure level changes, so does our perception of tonal balance.
Choose ONE monitor gain, and stick with it!
For a mastering engineer aiming to achieve consistency in tonal balance, the important conclusion is that we should choose a monitor gain setting and stick with it. Doing so ensures two things:
- A consistent monitor gain—and the associated level reading in your workstation—allows you to develop an instinctive sense of how loud things should be and instantly know when they’re too loud or too quiet. If this is new to you, a metering suite like
 can help you develop these instincts.
Insight 2
Insight 2 is a comprehensive metering and audio analysis plug-in that is a core component of award-winning post production houses, music studios, and broadcast facilities. - Once the loudness of your song is adjusted, it gives you a personally calibrated tonal balance reference that you’re accustomed to. This means you won’t be tempted to make EQ adjustments just because you’re listening a few decibels softer or louder than you were the day before.
This leaves three big questions: how do you calibrate your monitor gain, what position should you calibrate it to, and am I really saying you can never touch your monitor gain again after you get it set?
How to calibrate your monitor gain for mastering
The main tool you’ll need is an SPL meter. In the old days, you used to run down to Radio Shack and grab one for about $35, but now you can find many app-based SPL meters for your phone, and even some for free. These may not be precision instruments (depending on the phone’s mic, results can vary quite a bit), but they’re generally good enough to help you get your monitor gain set. Try to find one that supports C-weighting and “slow” response times.
Next, put on some music mastered to a loudness that you like. Get together a small collection of songs from the genre(s) you work in most frequently—lossless is great, but not essential here—and load them into your DAW. Be careful not to choose songs that are too loud, as this will lead you to try to push tracks in later sessions to that loudness, possibly to the detriment of the music. With the music playing, put the SPL meter in your listening position and adjust your monitor gain until the loudest parts of each song all hover around 84–86 dB SPL C-weighted.
Your monitor gain is now calibrated. Don’t touch it—at least not yet.
Depending on how you control your monitor gain, the next step may vary a little. If your audio interface or digital-to-analog converter has a monitor gain control with a numeric readout or numbered positions, simply write down the setting for future reference. On the other hand, if it’s an analog-style control without any markings or steps, a few pieces of gain-labeled tape can do the trick.
Advanced calibration tips
Once you have your main calibrated level, you may find it useful to add a few additional calibrations—one or two at higher monitor gains, and one or two at lower monitor gains. Having these handy and recallable provides a few benefits.
On one hand, if you’re working on a project or genre that needs less loudness or sustained level, a higher monitor gain will allow you to retain more transient motion while still listening at the level you’re accustomed to. Conversely, if you’re working on a project that needs higher consistent level and loudness than you usually go for, a lower monitor gain will allow you to achieve that without excessively high playback levels—although you’ll have to work harder for it.
Conclusion
With your calibrated settings marked, you can now feel free to adjust your monitor gain when you want to temporarily listen at a higher or lower level. Whenever you intend on making loudness or EQ decisions about a song you’re mastering though, return your monitor gain to its marked, calibrated position to guarantee you’re working to your personal tonal balance reference.
While it can take time and practice to develop consistency in your results, this method will surely help fast-track that process. Knowing you have one less variable to worry about while mastering will also lighten your mental load, allowing you to make faster, more intuitive decisions.
So bust out that SPL meter app, load up some of your favorite music, get calibrated, and start mastering!


