Mastering vocals: 5 techniques for a pro sound
Learn how to make vocals sound professional in mastering using tools like mid/side EQ and compression, along with the new vocal stem mastering tools in Ozone.
Vocal mastering isn’t usually something you do on its own. Sure, if you’re working on an acapella version of a mix, a choral recording, or narration like a podcast or audiobook, technically you’re mastering vocals. However, more often than not vocals are just a piece—albeit an important one—of the whole mix. That said, the vocal is often the star of the show, so any impact that the mastering process has on it is likely to be viewed through a microscope.
In this article we’ll dive into the world of vocals as pertains to mastering, and look at how we can make them sound fuller and more professional in the process. We’ll also take a look at some of the new technology in Ozone that lets us work on vocals during mastering in ways previously only dreamed of. So without further ado, let’s get started.
Follow along with Ozone 11, the ultimate mastering plugin with AI-powered workflows and professional processing.
Get Ozone 11
Why master vocals?
In the event you’re truly mastering vocals as in one of the scenarios outlined above—an acapella version of a mix, a choral recording, a podcast or audiobook, etc.—the goals are broadly the same as when mastering anything else: ensure translation across playback systems by adjusting the tonal balance and overall levels to be consistent and appropriate, and provide QC—quality control—to ensure that nothing unwanted or unintended sneaks through.
The specific levels and tonal balance curves are likely to be very different than they would be for a full musical production though, so here are a few guidelines to keep in mind in those scenarios.
Acapella mix: If you’re mastering an acapella mix of a song, it’s entirely appropriate to use the exact same processing chain that you did for the main mix. QC for clicks, ticks, and pops, is crucial as always, but you’re likely to find many more little artifacts to clean up with RX since the vocal is so exposed.
Choral recording: A choral recording is less likely to have the extreme low and high frequencies that a full production will, so be careful about boosting the lower and upper limits of the frequency spectrum simply by looking at something like Tonal Balance Control without setting up a reasonable target curve from a good reference recording first. Don’t shy away from a little compression or limiting if it helps, but it’s probably not appropriate to chase the same kind of integrated level you would for a full production. Something in the range of -18 to -12 LUFS is likely to sound just fine.
Podcasts and audiobooks: Mastering narration is more akin to mixing vocals in a lot of ways, but level considerations are where things diverge. Most audiobook platforms have specific deliverable guidelines, so if you’re submitting to something like ACX, be sure to follow their requirements. For podcasts an integrated loudness of -16 LUFS tends to work well across most platforms.
How do vocals fit into the mastering process?
Let’s switch gears back to mastering full music productions that contain vocals and think about how they fit in and how mastering is likely to impact them.
Since vocals are often one of the most important parts of a mix, it’s natural that they’re also one of the loudest individual elements, particularly in the midrange. Because of that, any adjustments we make in mastering are likely to get magnified by the vocals. For that reason it’s vitally important to listen to the changes you're making in the context of the vocals.
Of course you have to listen to the big picture too, but if a change you’re making is favorable to everything else in the song, but unfavorable to the vocals, it’s unlikely to fly. Bear that in mind as we start to look at some specific techniques.
Does mastering make vocals sound better?
Does mastering always make vocals sound better? For the reasons discussed above, no, not necessarily. Can mastering make vocals sound better though? Absolutely. It can help add presence and brilliance, glue them into the mix, or even help them stand out from the instruments around them. Achieving these sorts of things in mastering takes practice and careful use of some specific techniques, but Ozone also has some new technology built in that can make certain aspects of dealing with vocals in mastering easier than ever.
What dB should vocals be before mastering?
There’s no one number I can give you here, simply because the level of your vocals is entirely dependent on the level of your mix—which could have quite a range depending on how you’ve set up your gainstaging and utilized headroom—and even be tied to genre. That said, aim for balance. Make sure the vocals can be clearly heard and understood, but that they don’t overpower other important elements.
If you’re still feeling uncertain about your vocal level though, the new Assistive Vocal Balance technology in Ozone can help you achieve the clear, perfectly-balanced vocals that will bring out the emotion in your music. Through analyzing hundreds of top songs, our Master Assistant learned how to sit the vocals in the mix, and with our new AI Vocal Checker, you never have to worry about levels again.
Tips for mastering vocals
Next we’ll look at both a few general tips for working with vocals during mastering as well as a few that are specific to the new version of Ozone. While we will mainly be focusing on the impact our changes have on the vocals, don’t forget to listen to the big picture to hear if other instruments have been affected too.
1. Use stereo EQ
Stereo EQ is one of the most fundamental tools in mastering, and for good reason. By carefully boosting or cutting the right mid-range frequencies you can effectively move the vocals forward or backward in the mix. Of course, a stereo EQ will affect all elements of a mix in the chosen frequency range, but since vocals are often the most prominent element in that range, the impact will be most noticeable on them.
Here are some examples of how different frequencies can manipulate the impression of the vocal. First, here’s the mix with some basic mastering on it.

Four key frequencies for stereo EQ vocal presence
Next, here’s the same excerpt with EQ moves in four different frequency ranges. These each accentuate the vocal in different ways. In the first example I’ve boosted 550 Hz which brings out the body of the vocal.
In the next example, I’ve boosted 800 Hz. This stays below the presence range, but doesn’t make the vocal quite as warm as the 550 Hz boost.
Next up, we have a boost at 1.3 kHz. This is starting to get into the presence range, but avoids making the vocal overtly brighter.
Lastly, we have a boost at 2.5 kHz, which starts to border between presence and brightness for this particular vocal.
These examples have all showcased boosts to help bring the vocal forward in different ways, but cuts at similar frequencies could work equally well to move a very forward vocal back a bit.
2. Use mid/side EQ
Mid/side processing is an undeniably powerful mastering technique, but it, and M/S EQ in particular, are often misunderstood. Too many times I’ve heard it described as affecting the center and edges of the stereo image separately, but it’s really quite a bit more nuanced than that. In fact, it’s probably better thought of as frequency-selective width control.
It is true that by using an EQ in mid/side mode you’re altering the tonal balance, but you’re also doing it in a way that simultaneously alters the width in the EQed region. We won’t get too into the weeds here, but don’t be fooled into thinking you’re just EQing things at the edges or the center of the stereo field.

One approach to mid-side EQ
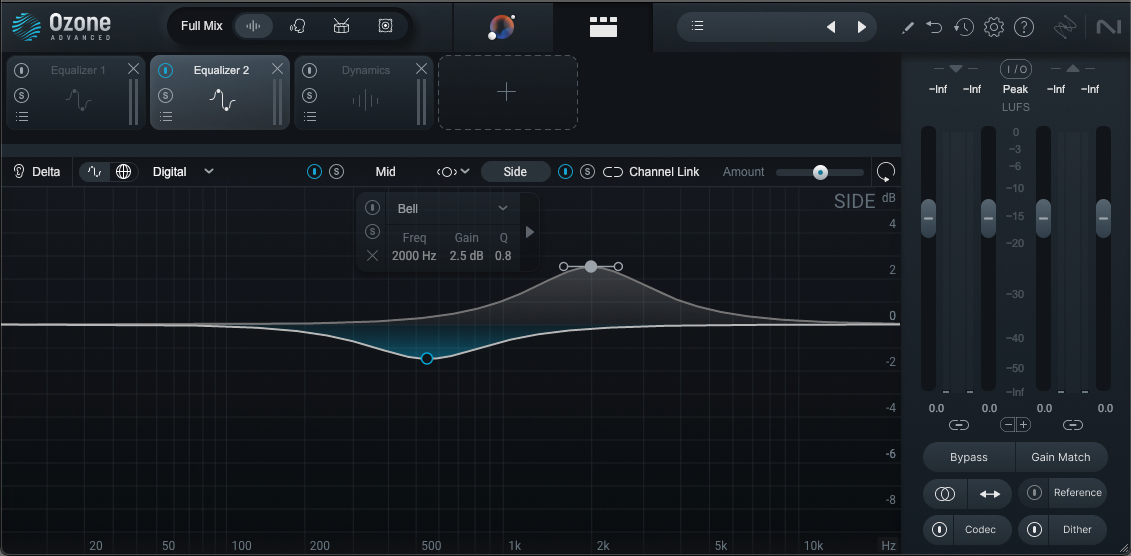
That said, simultaneously manipulating width and tonal balance can be just the thing to draw a vocal out or settle it back into the mix. Narrowing a frequency range can help draw attention to the elements that are center-panned, while the tonal shift can serve a similar function as it does with stereo EQ. On the other hand, widening a particular area can shift energy and attention away from the center.
Here are the five basic principles of mid/side EQ to keep in mind when working with it:
- A boost in the mid channel narrows that frequency while also making it more prominent.
- A cut in the side channel narrows that frequency while making it less prominent.
- A boost in the side channel widens that frequency while making it more prominent.
- A cut in the mid channel widens that frequency while making it less prominent.
- Minimum and linear phase responses—also known as analog and digital modes in Ozone—have different impacts on the stereo imaging. Linear phase—or digital mode—will be truest to the source, while minimum phase—or analog mode—can smear and spread sounds out, sometimes in an interesting or desirable way.
So, with those tenets in mind, here are a few examples of using mid/side EQ.
What to listen for: A slight narrowing and accentuation around the lower body of the vocal, pulling the fundamental of the piano toward the center slightly.
What to listen for: A similar narrowing around the lower body of the vocal, pulling the fundamental of the piano toward the center slightly, but this time de-emphasizing the piano rather than accentuating the vocal.
What to listen for: A slight widening in the presence range of the vocal, accentuating some of the upper piano embellishments and other ear candy, pulling some attention away from the vocal.
What to listen for: A similar widening in the presence range of the vocal, this time de-emphasizing the vocal slightly and shifting the focus to some of the upper piano embellishments and other ear candy.
3. Use mid/side compression
Just as we reframed mid/side EQ as frequency-selective width control, mid/side compression can be thought of as dynamics-selective width control. Compressing the mid-channel will widen the soundstage any time gain reduction occurs, while compressing the side-channel will have the opposite effect, narrowing the sound stage when gain reduction occurs.
Thus, mid-channel compression can be useful to settle a very dynamic vocal back into a mix, while side-channel compression can help prevent very dynamic panned elements from overpowering or distracting from a vocal. If you couple this with either filtering the internal sidechain, or with multiband compression, you can start to get some truly powerful results. Just be careful to work in moderation and not take things too far! Loudness-matched A/B comparisons are crucial here.

Using the internal sidechain filter to shape mid channel compression
Let's listen to the differences between mid channel compression and side channel compression.
Using mid channel compression, you should hear a more controlled vocal, particularly in the high end, but a noticeable shift in overall width during moments of compression, particularly around esses and tees.
Using side channel compression should result in a slight reigning in of the more dynamic panned elements. Listen particularly to the high piano before and behind “but the light in the lobby,” and how it’s pushed back slightly, not stealing as much of the spotlight.
Mid Channel Compression vs.
Side Channel Compression
4. Use Assistive Vocal Balance in Ozone
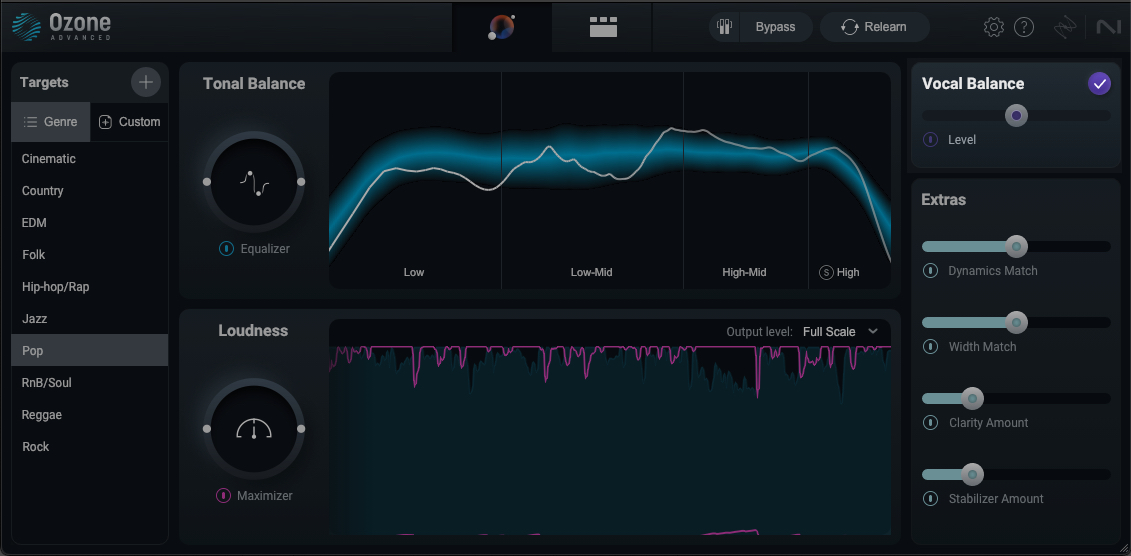
In the latest version of Ozone, Master Assistant has gotten smarter and can now help you balance your vocals perfectly, even in a stereo master without stems. By analyzing hundreds of songs across numerous genres, the new AI Vocal Checker was trained on how to set the Master Rebalance module to perfectly sit your vocals in the mix.
To get started simply run Master Assistant on the loudest part of your song. When it’s done, look for the Vocal Balance macro at the upper right corner of the interface. If you’ve already nailed your vocal level, Master Assistant will show you a purple check mark with the macro controls grayed out. If the vocal level could use a little tweak however, Master Assistant will recommend a starting point which you can then tweak—or disable completely if you prefer.

Good grades from the AI Vocal Checker
5. Use Stem Focus in Ozone
The new version of Ozone also features a Stem Focus processing mode that utilizes the AI driven source-separation technology previously only available in RX and Master Rebalance. Now, you can choose from the vocal, drums, or bass stems and use any of Ozone’s modules to affect just that stem.
Of course, this shouldn’t be a replacement for changing things in the mix when needed—and available—but when a mix revision simply isn't possible, this feature can open doors previously only dreamed of.
For our purposes here, this means we can get our hands on the vocals as if we had stems to make any EQ, compression, saturation, or other adjustments we desire. I know I’ve stressed this a few times, but this is powerful stuff. Listen carefully before and after to elements other than the vocals to ensure there aren’t any unintended consequences.
Stem Focus EQ
To get started with Stem Focus, select the Vocal Focus mode in the stem selector. Now, Ozone will only process the vocal stem of your audio! Next, let’s add an EQ module so we can start reshaping the vocal a little.

Applying EQ to the vocal stem only
The original vocal has a slightly filtered and “telephone-y” quality to it, but by boosting near the fundamental—around 300 Hz—and up a round 2 kHz, and also pulling a bit out around 1 kHz, we can give it a slightly fuller sound.
Stem Focus compression
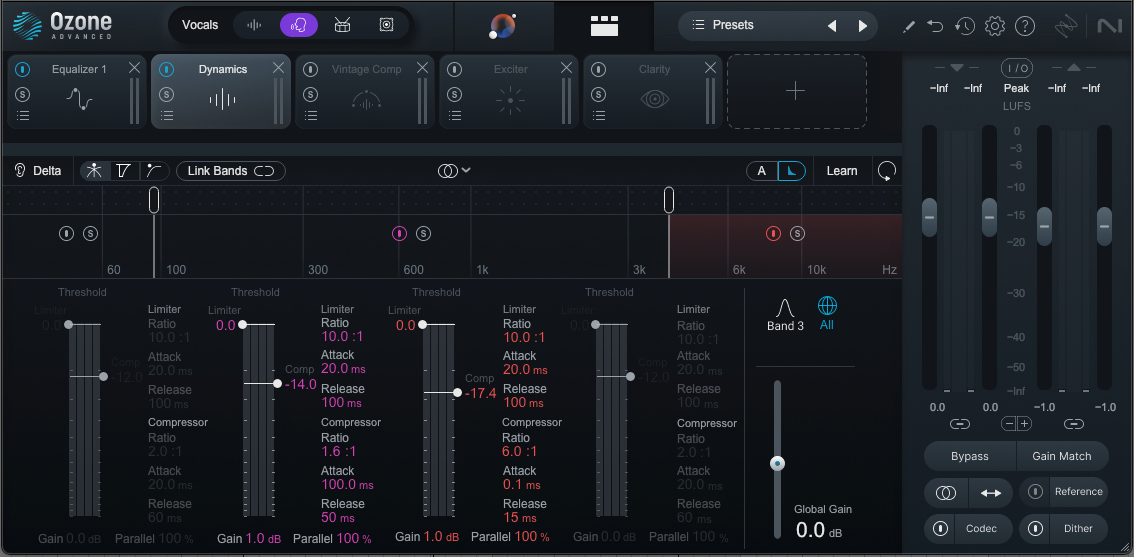
If you’re working with a vocal that’s a little uneven dynamically, Ozone’s compressors coupled with Vocal Stem focus can allow you to smooth them out in ways that seem almost magical. Here, I’ve used Dynamics to gently control the vocal’s midrange while also doing some de-essing. Notice how much more controlled the “esses” and “tees” are.
I’ve followed that up with Vintage Comp to give the vocal a polished, even feel. Already, this vocal is feeling a lot more dialed in.

Vocal stem multiband compression

Vocal stem vintage compression
Stem Focus saturation
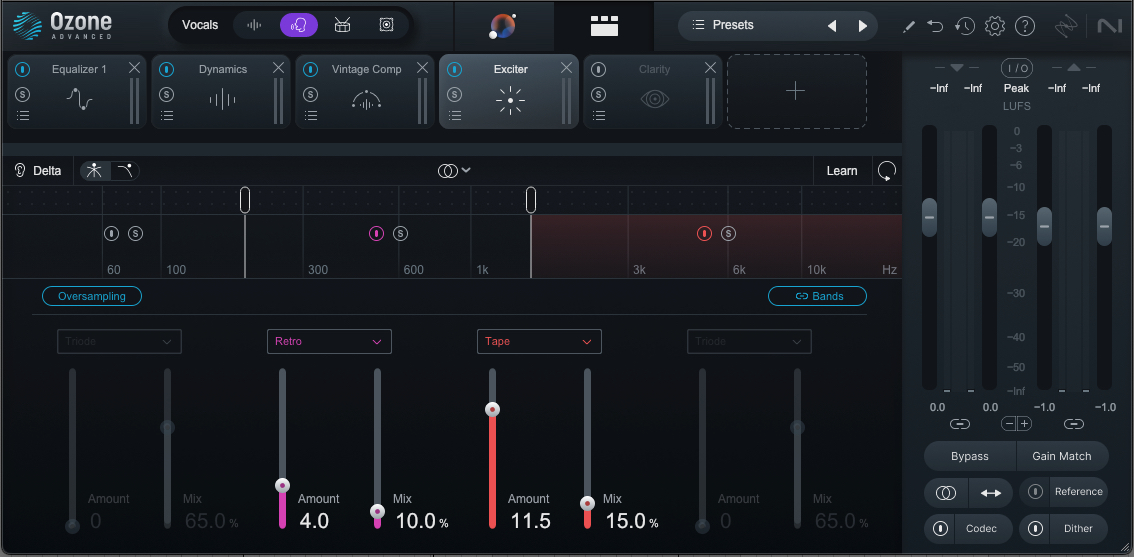
We could also use Exciter to add some sheen and sparkle to the vocal. By using multiple bands, and by virtue of the fact that Exciter only has to deal with the vocal, we can mitigate some of the usual pitfalls of saturation on a whole mix, namely intermodulation distortion and aliasing. This means we can potentially get away with a bit more saturation—if we want.

Applying Exciter to the vocal stem only
Stem Focus Clarity
As a final example, I’m going to use just a touch of the new Clarity module on our vocal stem processing. This will help bring out some fine detail in the vocal presence and intelligibility ranges, while also helping control some of that remaining sibilance. With everything that’s come before it we don’t need much, but it does add just a little, well… clarity to the vocal.

Enhancing the vocal stem with a little Clarity
Finally, let’s listen to the before and after from our vocal stem mastering chain, all applied to a 2-channel mix. This result might be beyond the remit of normal mastering duties, but if someone came to me with this mix and said, “I’ve done all I can, but I’d really just like my vocals to sound a little more polished and pop-y,” it could also save the day.
Vocal Stem Mastering Chain
Start getting pro vocals in mastering
As you saw and heard, there are a great many ways we can influence vocals during mastering. Whether using traditional techniques or the cutting edge technology in Ozone, we can apply everything from subtle finesse to radical reshaping. As always, just be mindful to “do no harm,” especially when you’re working on someone else’s music. If you are new to mastering other people’s music, we’ve got an article just for you about mastering tips.
As with most things in mastering, it’s rare that you’ll need all of the techniques—or even all of the Stem Focus based ones—outlined in this article. Very often one may be enough. However, don't be afraid to combine them in different ways. Sometimes that may allow you to use just that little bit less of each that will maintain the transparency of what you’re doing. Good luck, and have fun making those vocals shine!