
How to produce background vocals that complement a lead
Learn how to elevate your background vocals using intuitive plugins and discover tips on how to mix background vocals that help support the lead vocal and let it shine.
It's no secret that the presence of good background vocals can really make a vocal sound professional. Whether you're crafting lush harmonies or subtle supporting layers, good background vocals can take your music to new heights.
In this tutorial, we'll be walking through how to create and mix outstanding backing vocals, delving into some tips on how to ensure they not only complement the lead vocals but also sit seamlessly in any track, providing important depth and texture to your sound like this:
Mix with Background Vocals
Follow along with a free demo of the new Nectar 4 vocal mixing plugin. It has a ton of new features that can make your vocal mixing process easier and faster, including a new Vocal Assistant, AI-powered background vocal processing, and more.
Remember the role of background vocals
It’s important to remember the role background vocals are meant to play in any song. Background vocals are there to support and enhance the lead vocal, not steal the show. After all, nobody’s ever said, “Wow, those background vocals were so expressive and powerful!” So, when it comes to mixing background vocals, don't worry if they’re in the…well…background.
Before you start messing around with any background vocals, it helps to have at least a rough mix of the lead vocal and instrument tracks to work with. That way you can make decisions that fit the vibe of the whole mix and make sure the background vocals are sitting nicely in context. For example, you’ll want to keep things pretty simple on an intimate piano ballad, but you can spring for a much bigger group vocal in a busy mix.
Knowing where, when, and why you’re throwing additional vocals into a mix is crucial to being able to produce a background vocal section that serves a purpose. So if you’re in the recording studio laying down vocal tracks, make sure to plan out the background parts before you hit the record button. Otherwise you may just waste time and end up with a bunch of unnecessary takes that don't quite fit.
At the end of the day, backup vocals are kind of like the wingmen of the music world. They exist only to hype up the leads and improve the overall arrangement of your track. So, keep that in mind as we dive into some more technical tips for how to create and mix background vocals.
How to create background vocals
Before we dive into how to mix background vocals, you need to have some backup vocals to work with. There are a few different ways you can create background vocals for a track, so let’s take a look at the options.
1. Record your own background vocals
The first option for creating background vocals to record your own! For this, you could have the lead vocalist record duplicates of the lead vocal (known as “vocal doubles”) while they’re still in the recording booth.
Depending on the needs of your track, you could also have them lay down a few harmonies or some adlibs to throw into the mix.
Another option is to have an additional vocalist (or two) sing the doubles, harmonies, and adlibs. It all really depends on the vibe you’re trying to accomplish.
Regardless of how you run your recording session, you’ll want to make sure each final background vocal is perfectly in line with your lead vocal. If different vocals start and end at drastically different times, it’ll muddy up the mix, ruin the intelligibility of the lead vocal, and give you an odd echo effect that is not pleasing on the ears. So make whatever timing adjustments are necessary to keep those background vocals tightly synced with the lead.
Also, you’ll want to make sure each vocal take is perfectly pitched. For pitch correction, I run all of my vocals through the Pitch module in Nectar. Simply set the key, range, speed, and amount of correction that best suits your track, and you’re good to go!
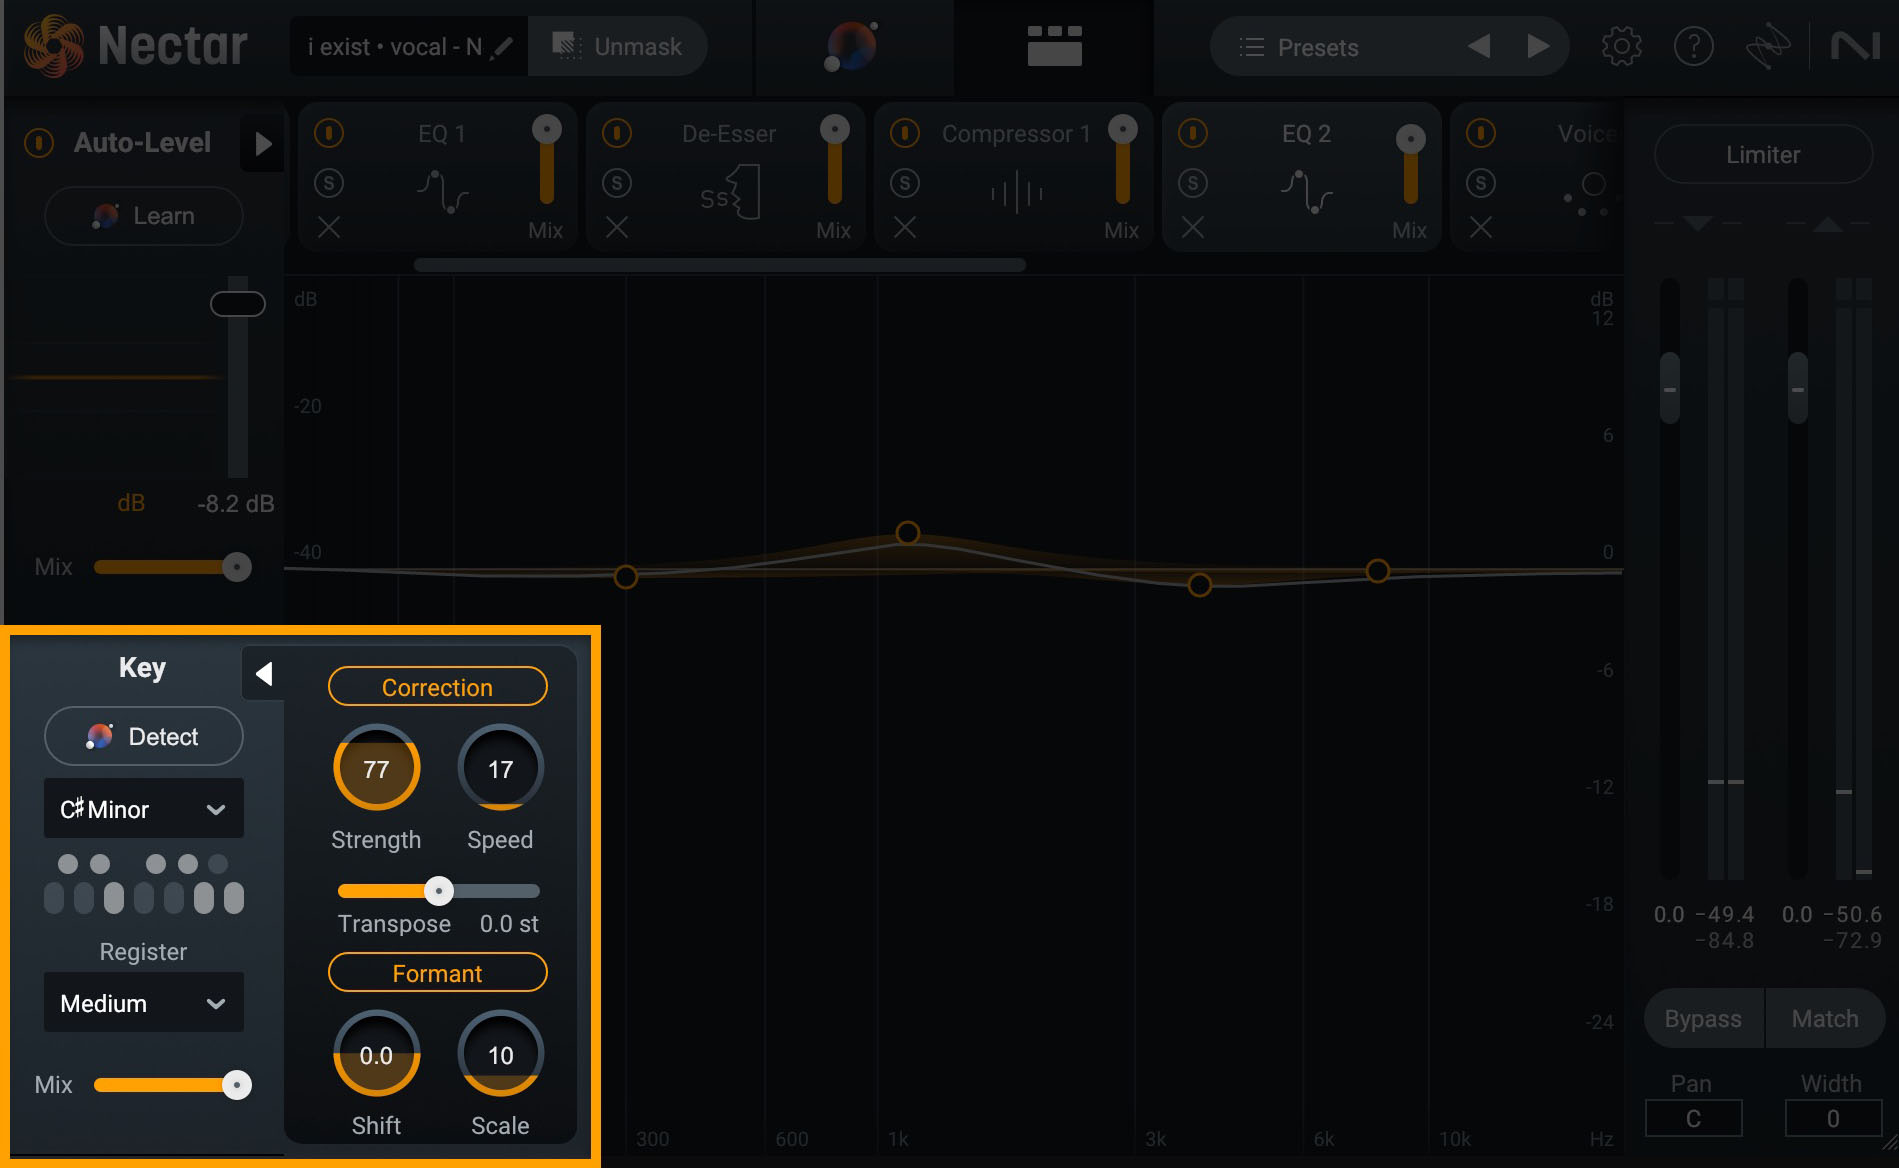
Pitch feature in Nectar
Hear the Pitch module in action in the before and after audio examples below.
Pitch Correction
Now, let’s take that lead vocal and have some fun with it as we explore the next two options.
2. Create textured background vocals with Backer
Let’s say you don’t have a handful of trained backup vocalists on retainer, but you still want the texture of a separate singer for your background vocals. In Nectar, there’s a really innovative new module called “Backer.” The Backer module allows you to quickly and easily create background singers that sit behind your main vocal.

Backer module in Nectar
You have eight different styles to choose from (or you can even use your own tonal profile created with Audiolens). Let’s hear it in action. First, take a listen to my lead vocal from above, along with the rest of my mix.
Now I’m going to add the Backer module to my vocal chain in Nectar and choose one of the eight singer styles (Alex). As you can see in the image below, I cranked the effect to 100%, increased the Tone knob a little (to make it more bright and crisp), and turned down the Formant knob just a bit (to create a deeper sounding background vocal).

Backer in Nectar, Alex
Note that it may sound a bit wonky at times when the effect is cranked up all the way—and it's important to keep in mind the Backer module was designed for the background vocals to stay out of the way of your lead vocal.
Give it a listen with the effect turned down to 25% and notice how the Backer module adds presence and richness to the lead vocal without conflicting or detracting from it.
Let’s try another one of the vocal profiles (Raquel) with the following settings.

Backer settings in Nectar, Raquel
And again, let’s turn the amount of the effect down to 25% to hear it with the lead vocal.
As you can hear, Backer offers a great variety of different background vocal sounds, helping you create background vocals in a snap!
3. Create harmonies with Voices
Now what if you want your backup vocals to sing harmonies (as opposed to singing along with the lead vocal, note for note)? This is where Voices in Nectar comes in handy. With Voices, you can create complex layers of background vocals that stay in perfect harmony with your lead.
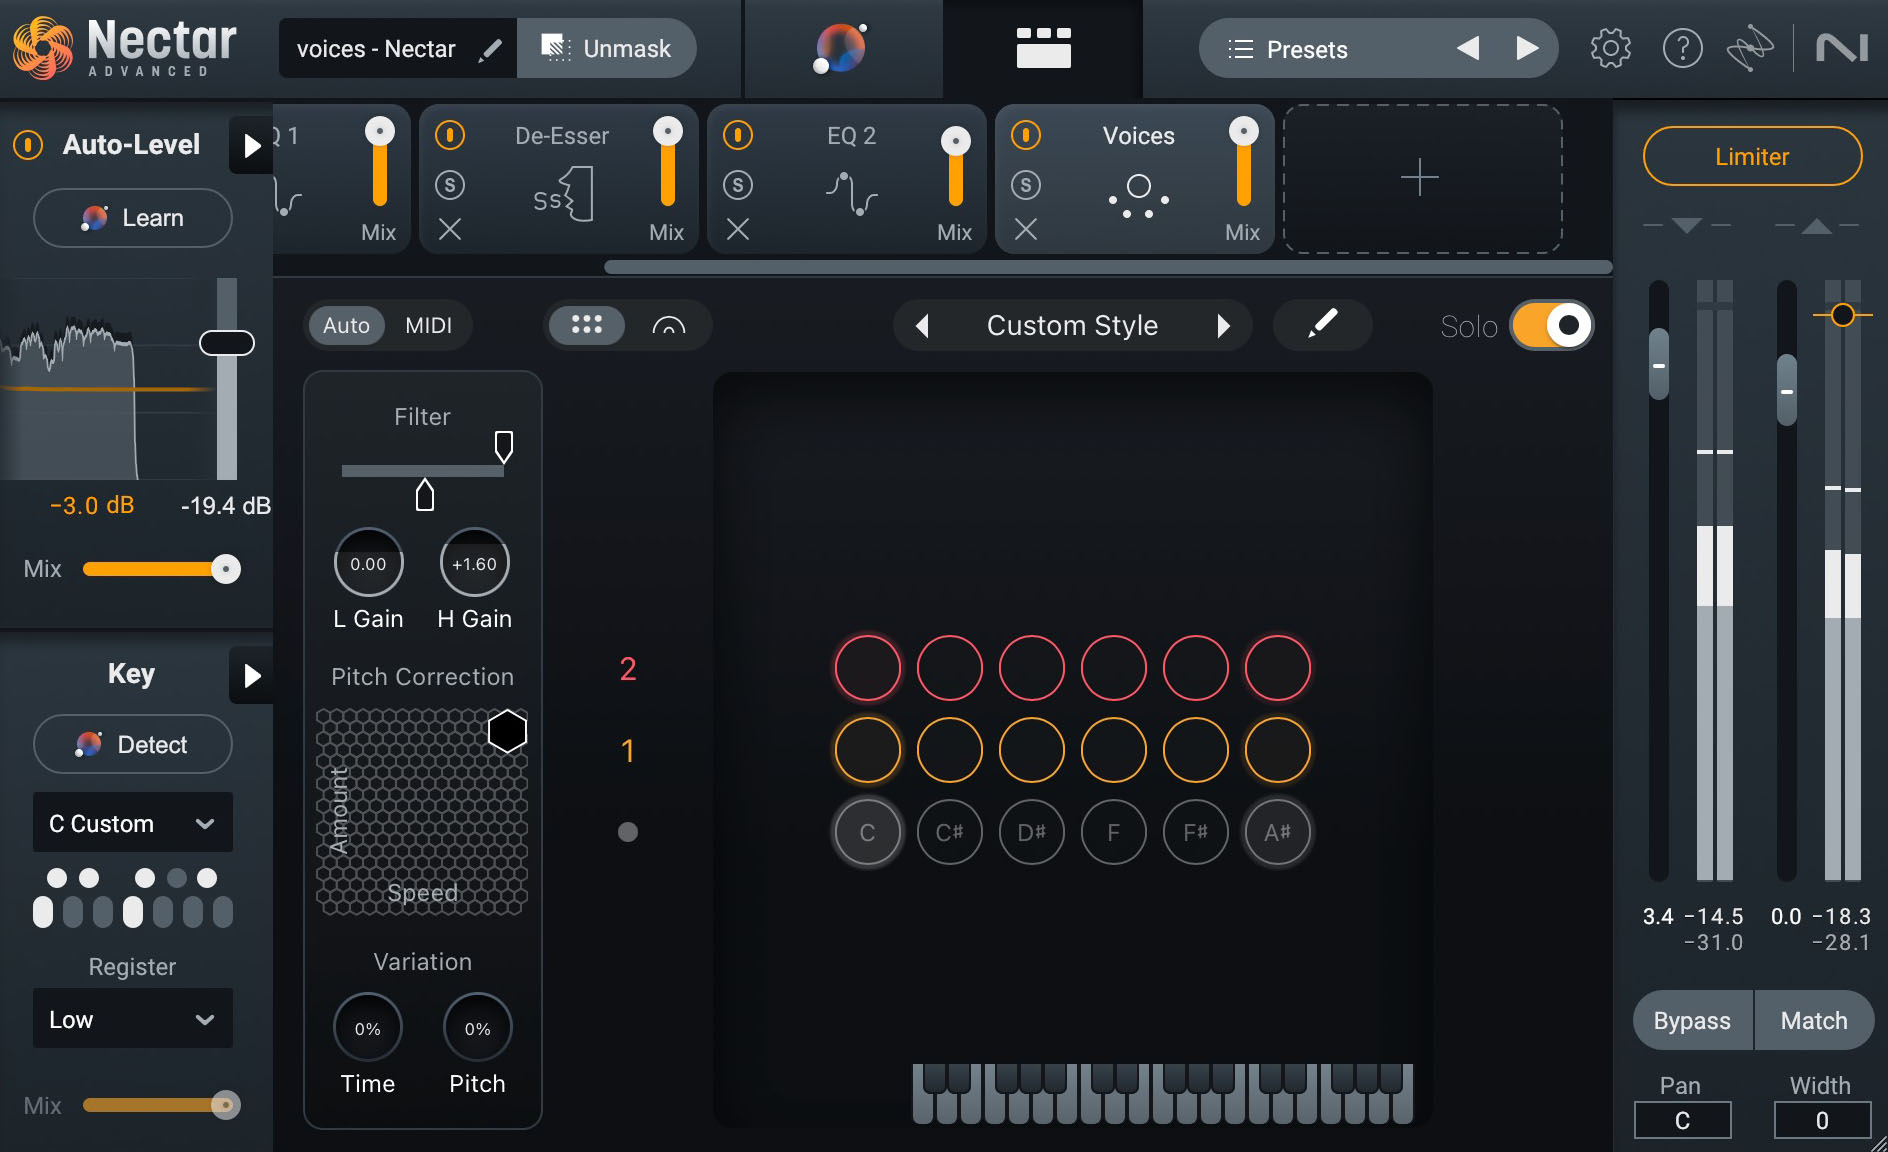
Voices in Nectar
In Voices you can choose to use one of the preset harmony styles, or even craft your own custom style by opening the editor (the pencil icon to the right of the style menu) and adjusting how each voice will respond to every note in the scale.
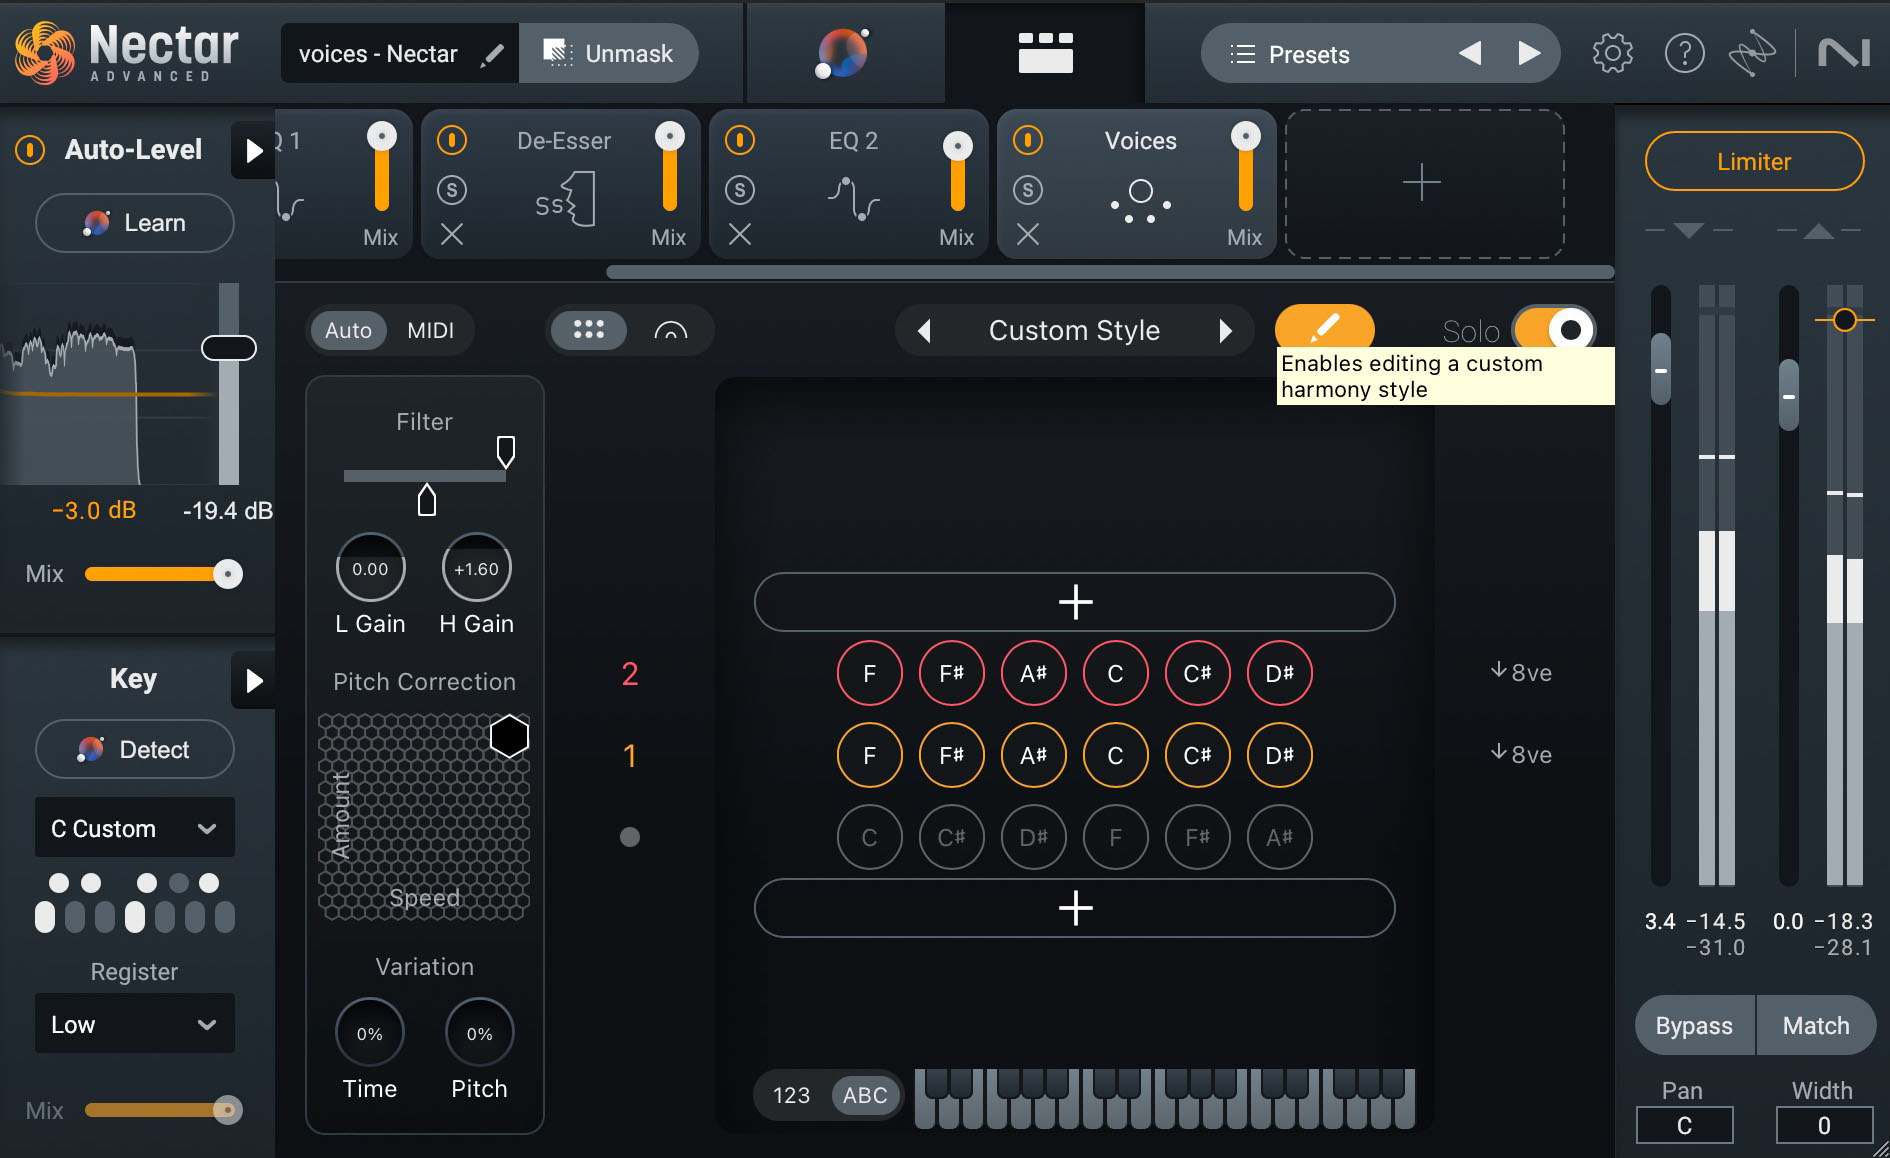
Edit harmonies in Voices to create your own style
Within Voices you can even adjust the placement of each background voice in the stereo field by toggling to the mixer view (the stereo field icon to the left of the style menu).
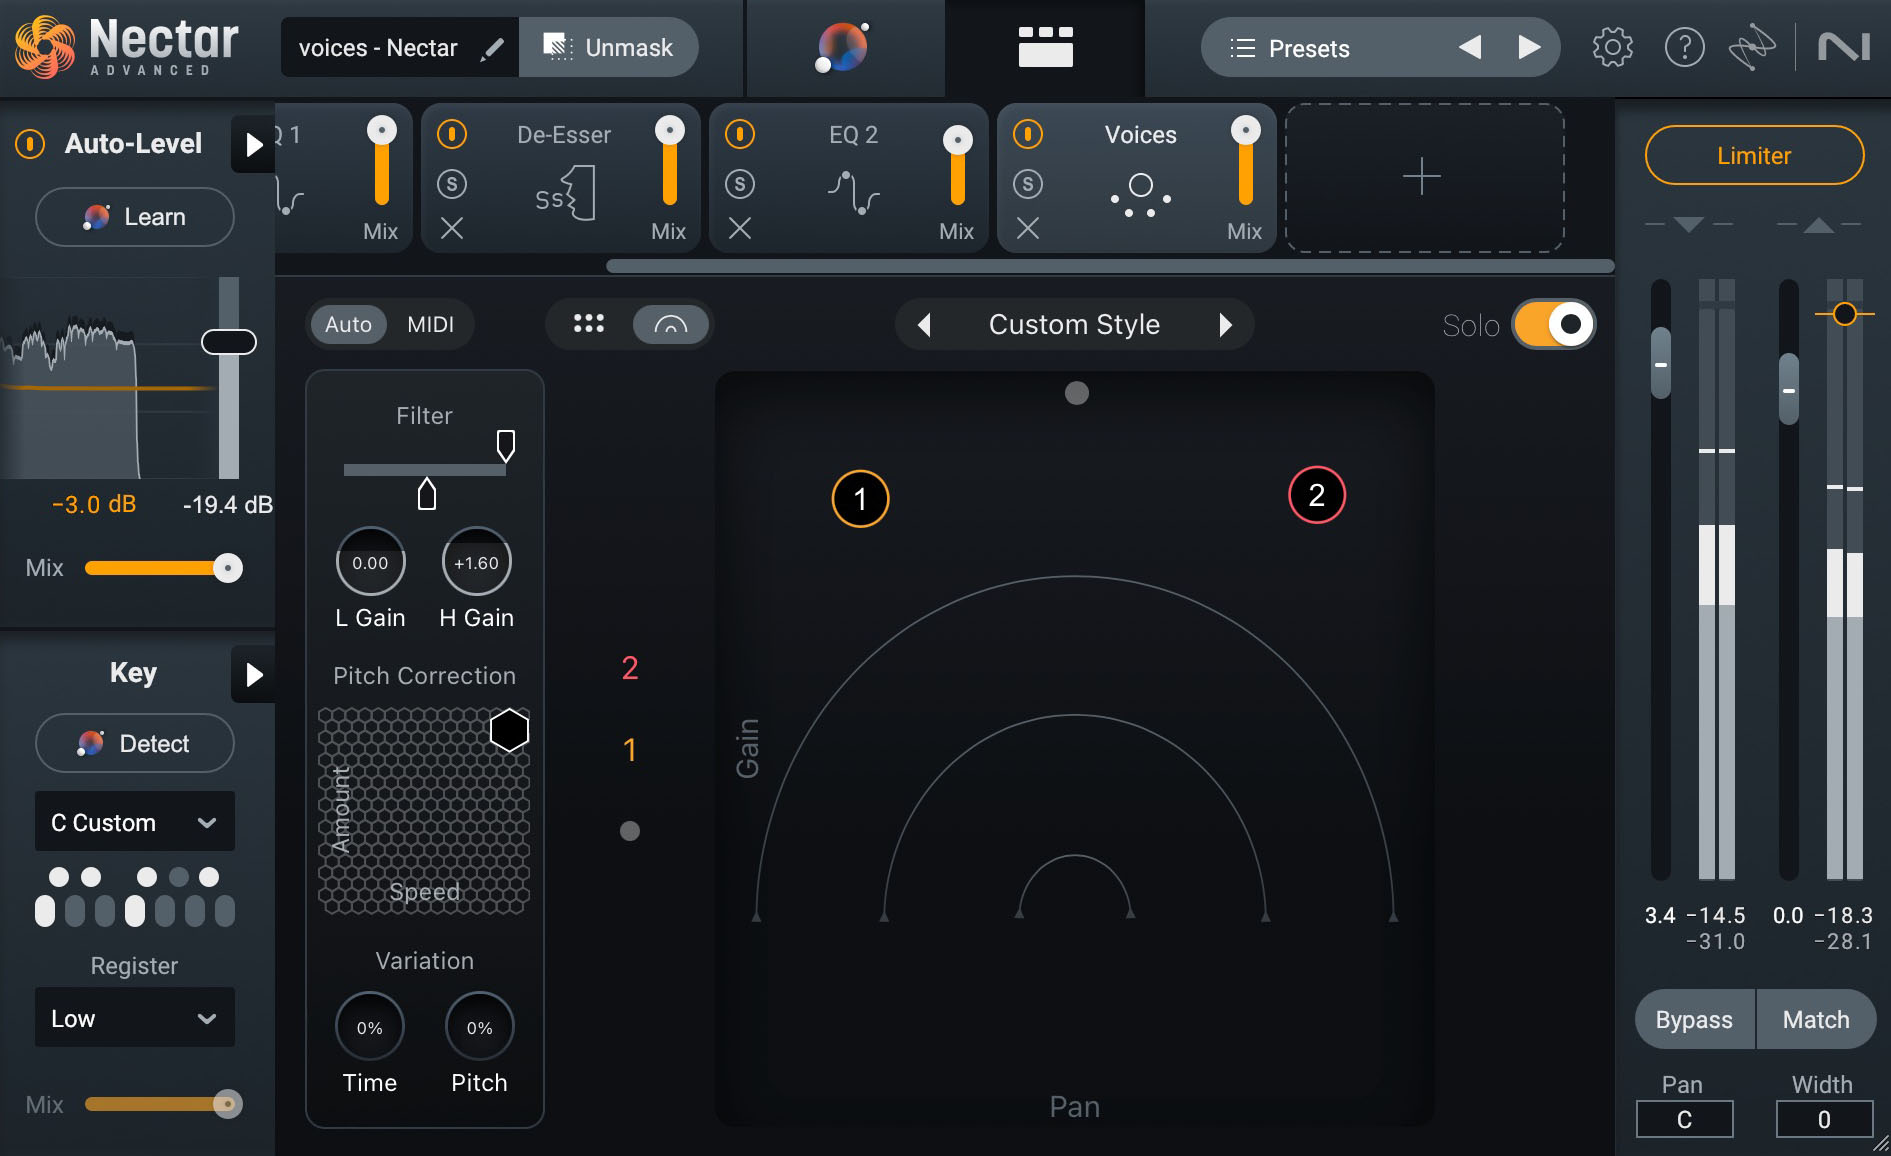
Adjust the placement of background vocals in Voices
With just a few clicks I was able to take my lead vocal and create this custom, 2-part harmony to sing above my lead, followed by those same harmonies played along with the lead vocal.
Custom Harmony vs.
Custom Harmony with Lead Vox
Another powerful feature of Voices is that it gives you the ability to decide if you want your harmonies sung above or below your lead vocal.
In the image below, you’ll see I’ve positioned my two harmony voices (1 and 2) to be below the lead vocal (represented by the • icon) instead of above it.
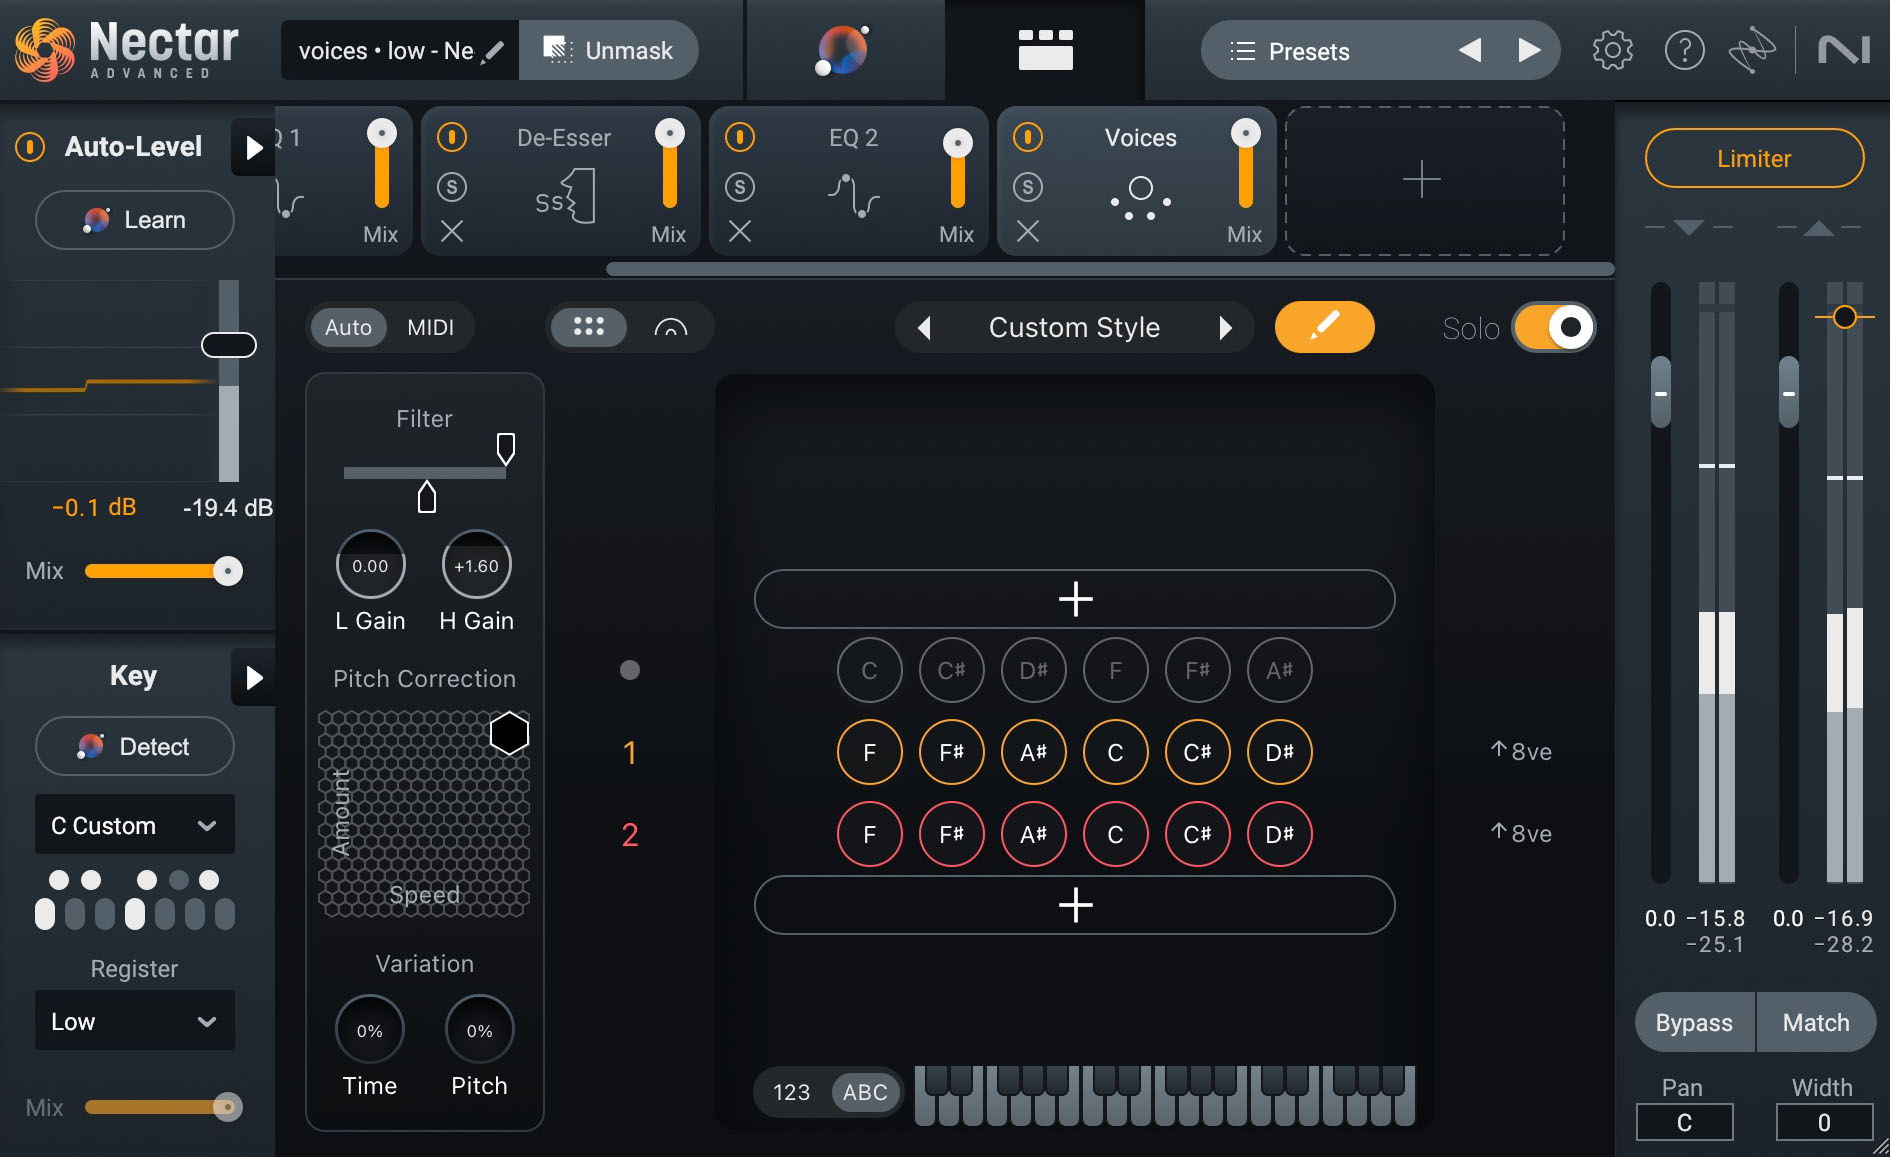
Harmonies sung below lead vocal
Now that we’ve created several different background vocals to work with, let’s dive into some tips on how to mix background vocals so they perfectly complement your lead.
How to mix background vocals
1. Remove breaths and sibilance
Where a little bit of breathiness and sibilance (“s” or “sh” sounds) may be alright for a lead vocal, these become problematic when you’re stacking multiple background vocals in a mix. When mixing background vocals, you’ll want to tone down those breaths and sibilant sounds in order to keep things sounding smooth. For this, you can use the new Tame Noises feature in Nectar.
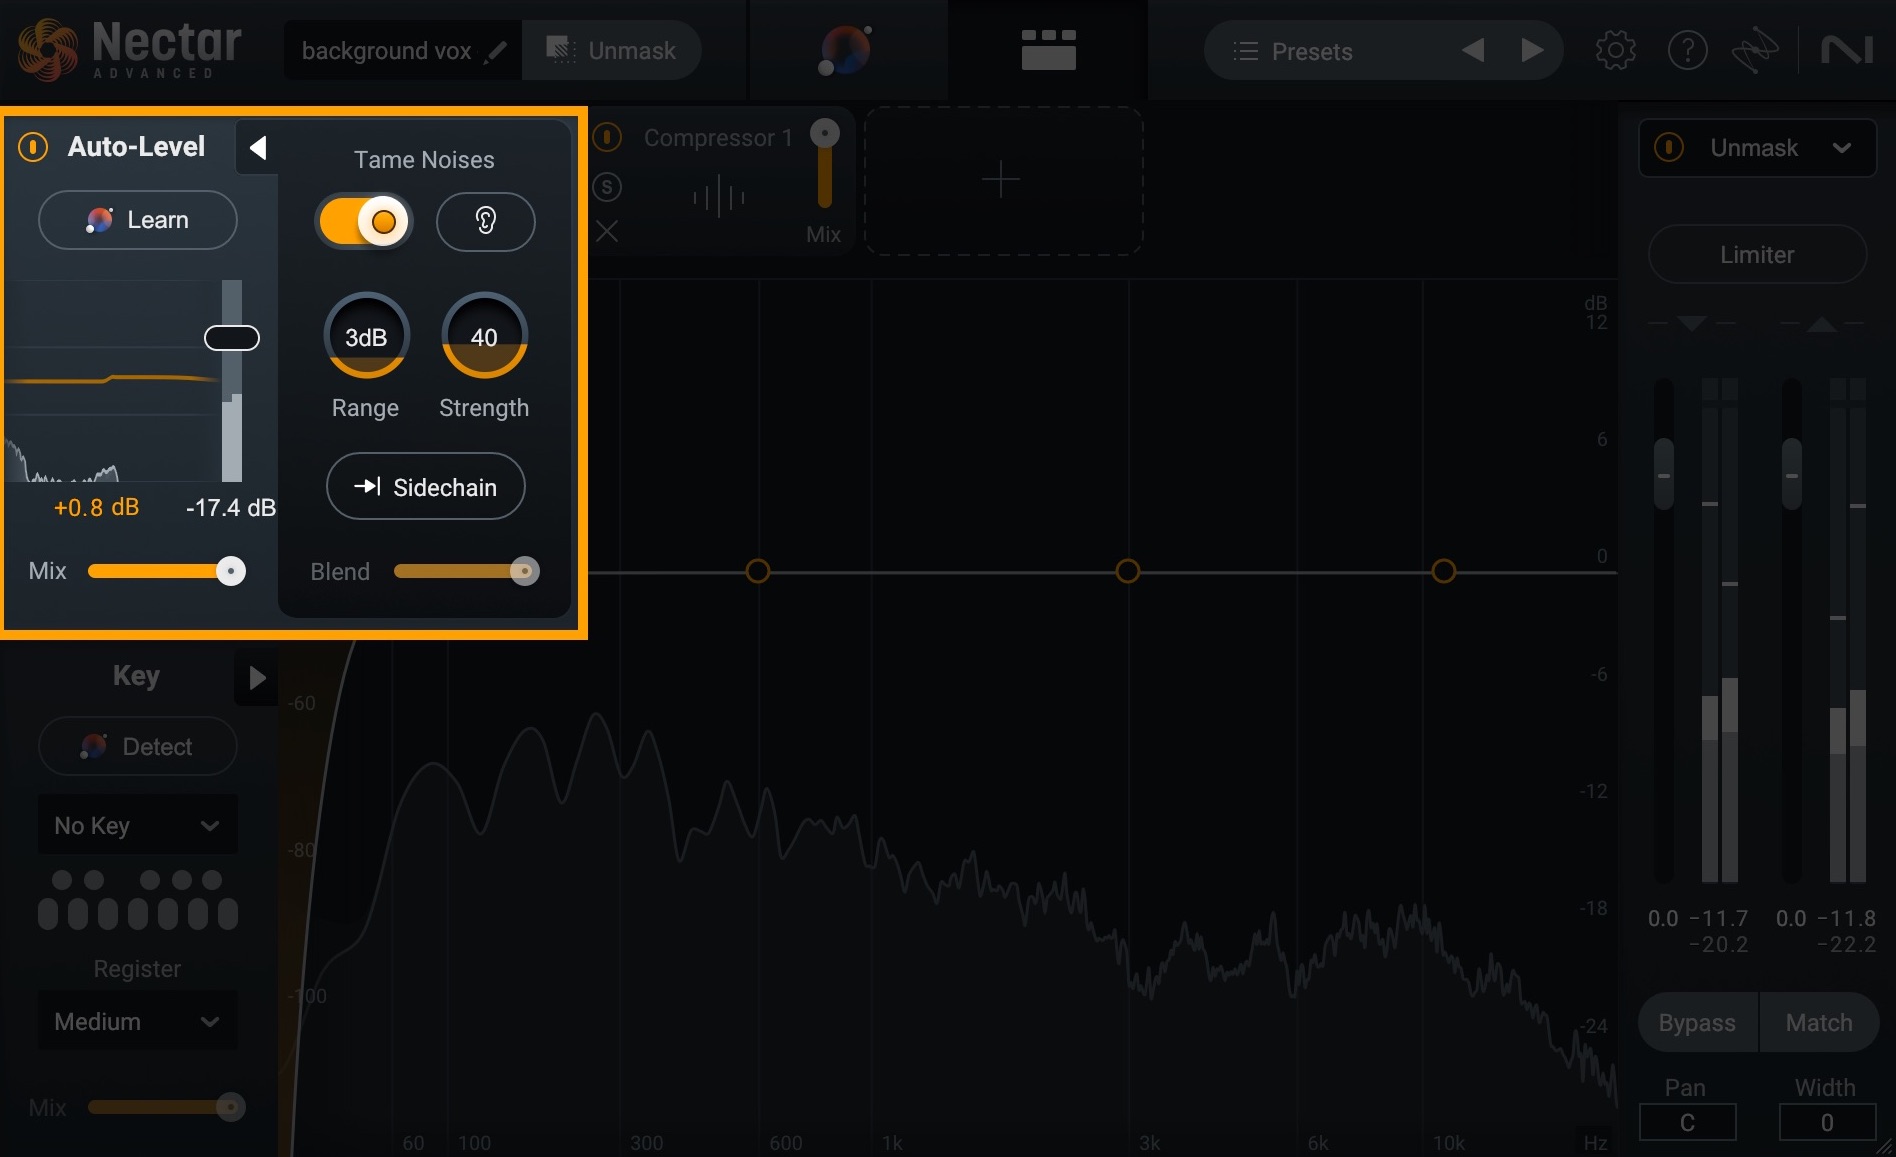
Tame Noises in Nectar
Simply turn on Auto-Level at the top left of Nectar and click the triangle to open up the Tame Noises feature. Turn Tame Noises on and adjust the Range and Strength knobs to your liking. This will remove any unsung noises, leaving your background vocals sounding clean, but without any harsh breaths or sibilance.
Since sibilance can really add up when you’re stacking vocals on top of each other, another way to limit those harsh frequency buildups is to use a de-esser on your background vocal bus.
Simply load the De-esser module in Nectar and play with the Threshold and Frequency Cutoff controls to dial in the amount of sibilance reduction. You can apply more de-essing to background vocals than you would to the lead, as this will also help them stay out of the way even better.
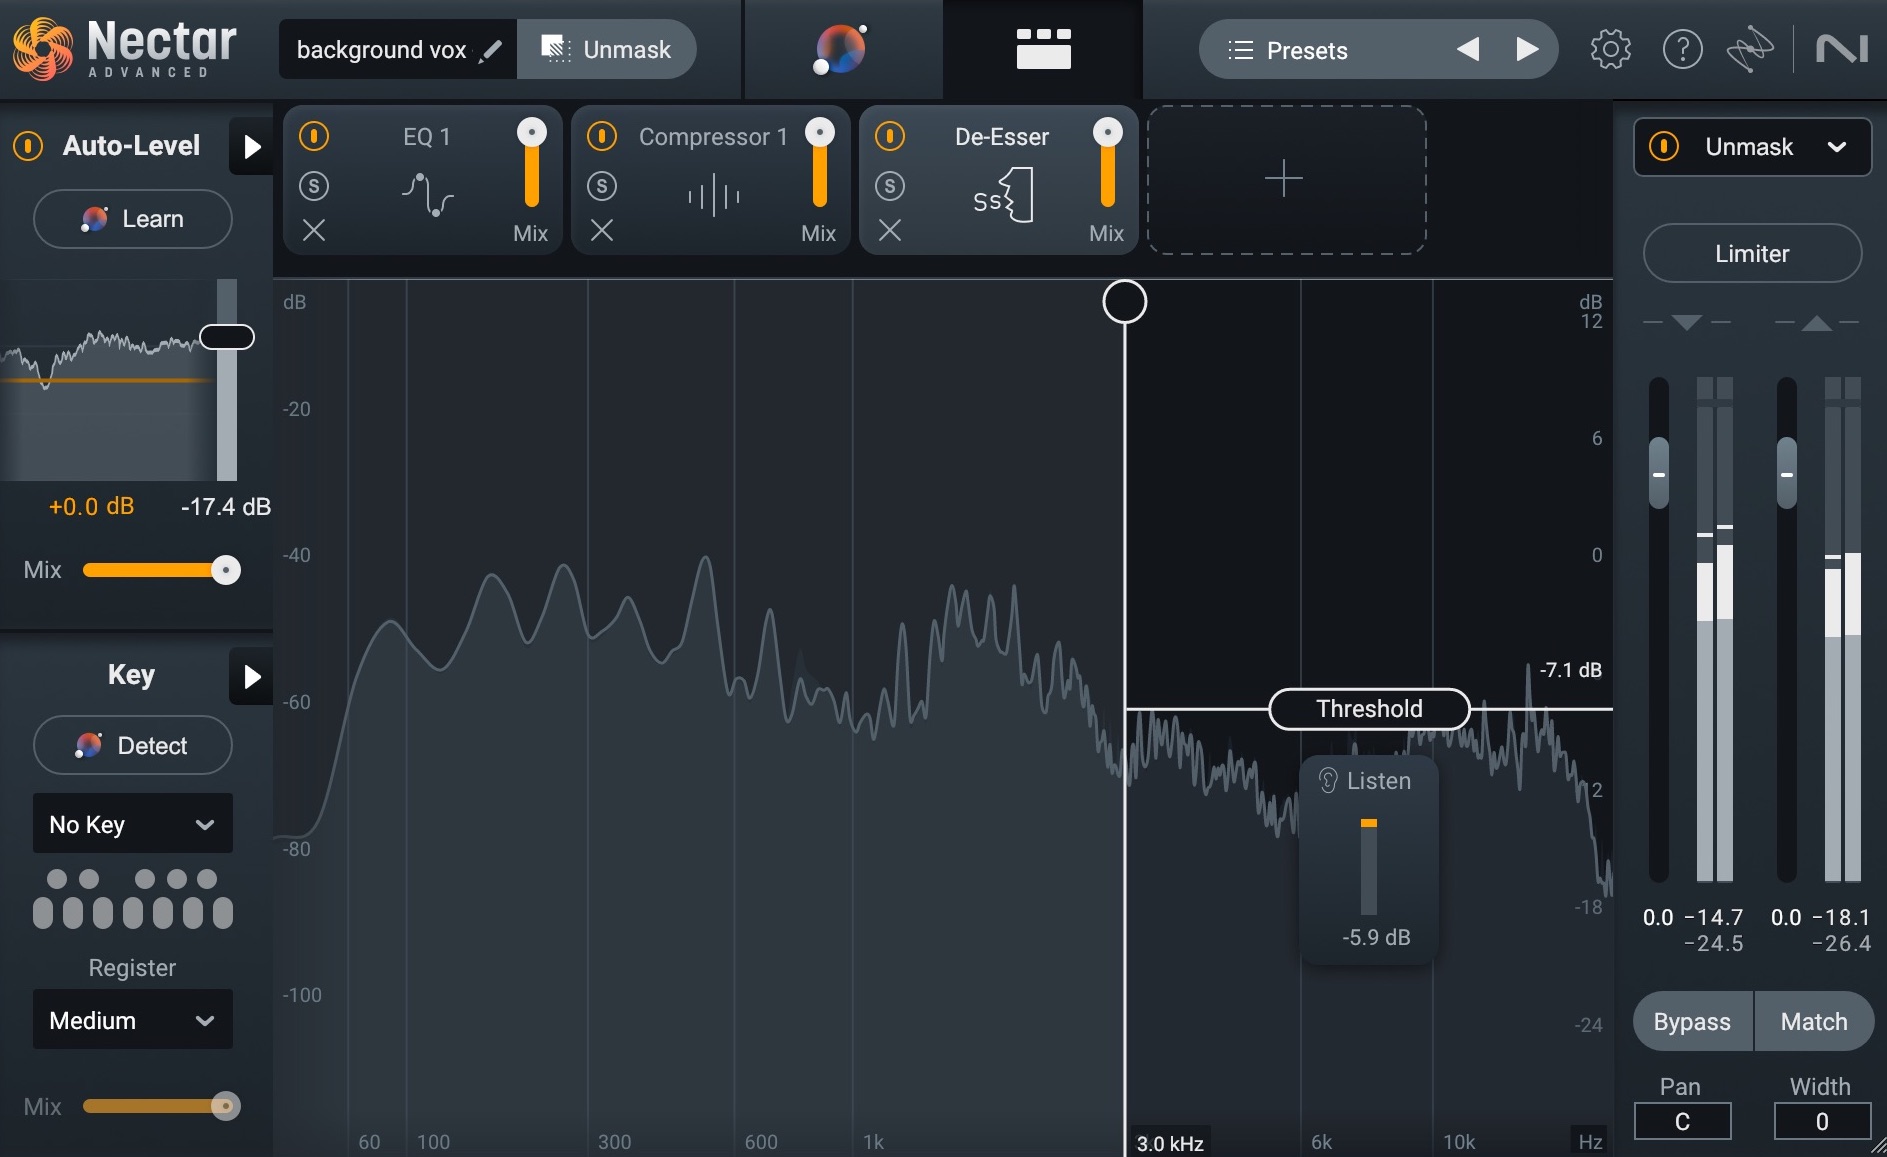
De-esser module in Nectar
Tame Noises & De-esser
2. Unmask your lead vocals and background vocals
The more background vocal tracks you add, the muddier it can get—especially if your background vocals were recorded by the same vocalist that performed the lead. Since you want your lead to remain up front, it can help to do some frequency unmasking. For this, simply use the Unmask feature in Nectar.
Make sure both your lead vocal track and your background vocal track have an instance of Nectar loaded into the signal chain. Then, open up Nectar and click “Unmask” towards the top left of the plugin. Select your background vocal track from the dropdown menu, click next, and then play your track. Nectar will intelligently listen to both tracks and correct any frequency masking issues that may be present.

Unmask in Nectar
Unmasking Vocals
Notice how much more present the lead vocal becomes with just a little unmasking?
3. EQ background vocals
Although the Unmask feature in Nectar does a spectacular job at removing any masking issues present, you may still want to do a bit of EQing to help your background vocals sit nicely in the mix.
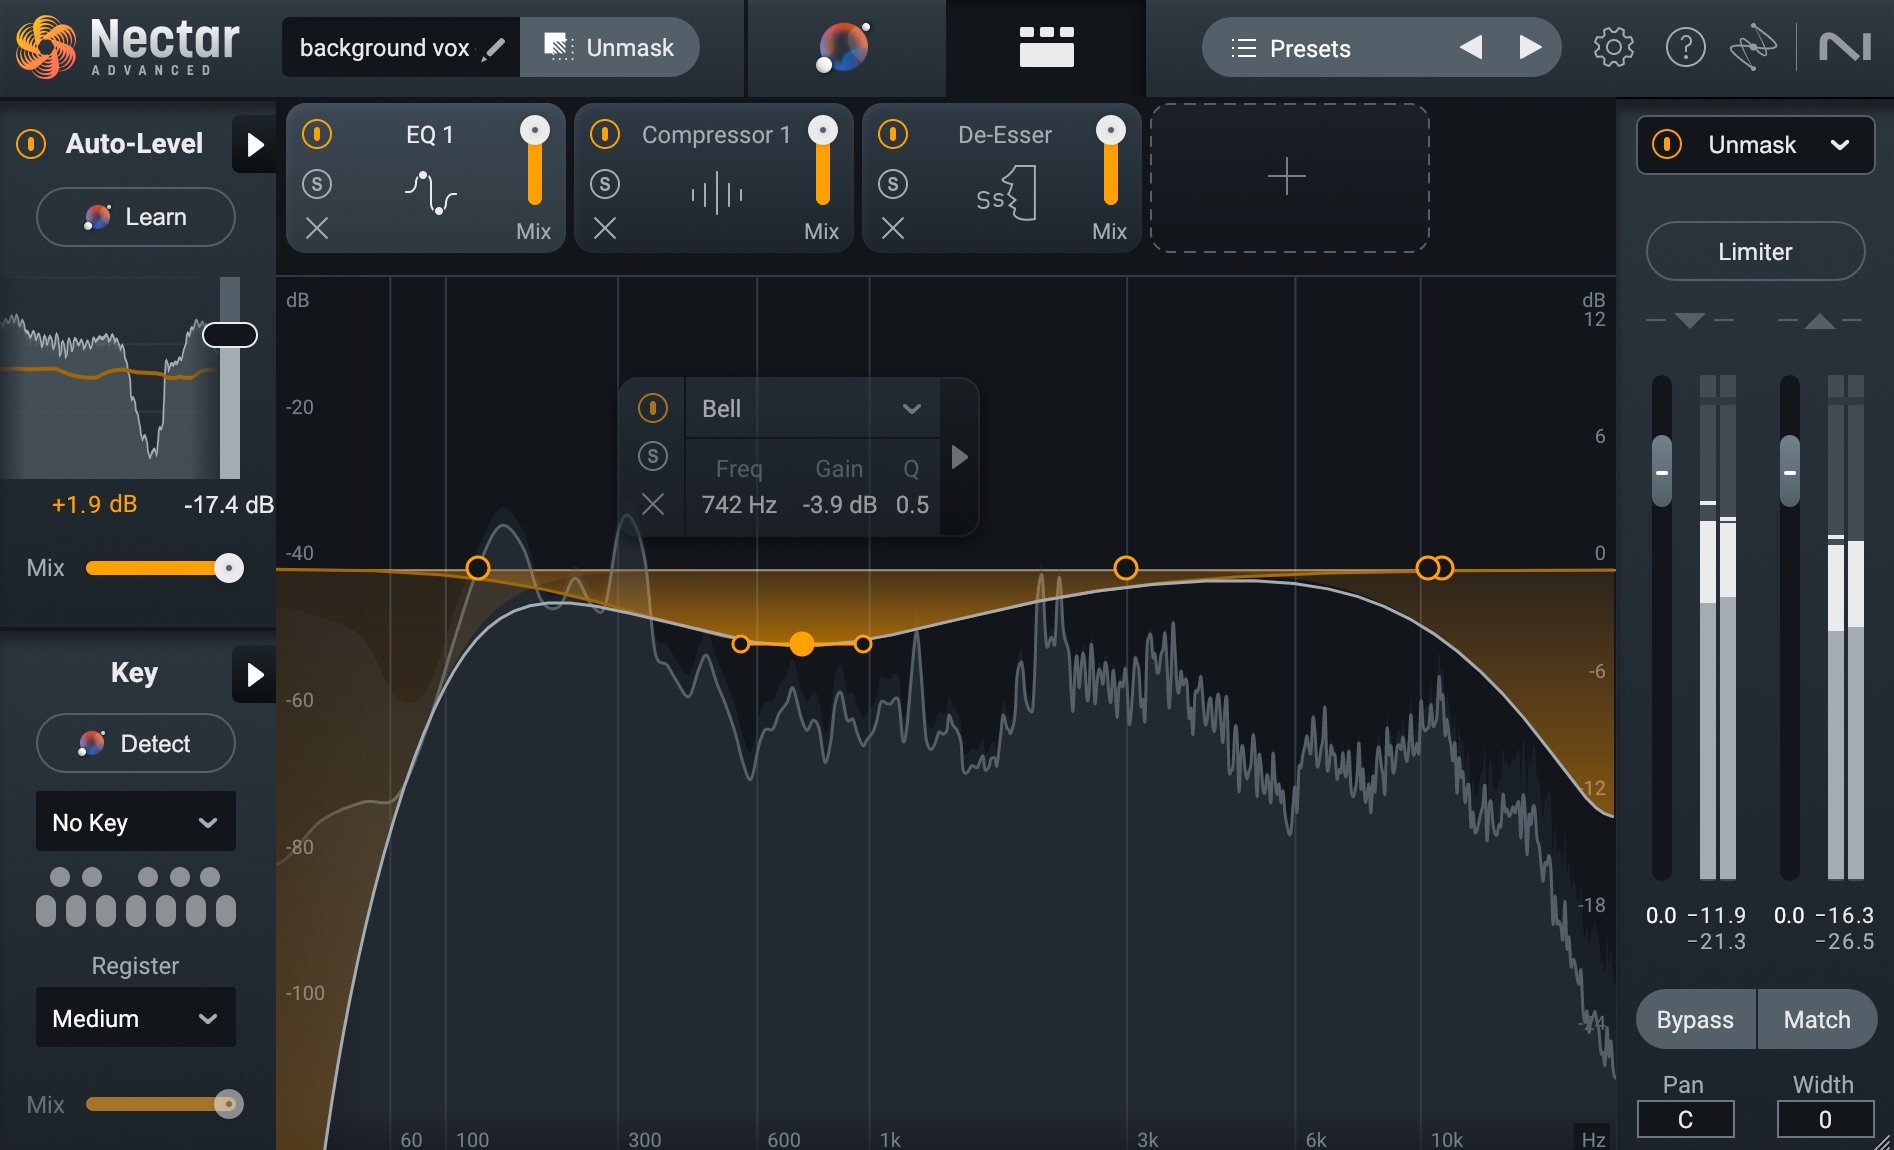
EQ module in Nectar
There’s not really a one-size-fits-all approach for how to EQ background vocals, but here are a few common techniques:
- Use a low-pass filter to remove some of the top end.
- Use a high-pass filter to cut out the lower frequencies.
- Use a bell curve to cut some of the low-mids if the vocal section is too “boomy.”
- Use a bell curve to cut some from the high-mids if the vocals are too “tinny.”
4. Pan your backup vocals
Use panning to spread your background vocals out in the stereo field. There are no strict rules here, but play around with it and see what fits. Try putting your low harmonies wide and your high harmonies narrow—or the other way around? The goal is to get them out of the way of your lead vocal, which should remain front and center.
Take a listen to the difference panning can make in the audio snippets below.
Panning Background Vocals
5. Add creative effects to create a sense of depth
In order to help your background vocals sit apart from your lead vocal, you can play with creative effects. This will help differentiate between the different vocals, but it can also add some extra sonic interest to your mix.
Delay
One common effect to play with is to add a delay using the Delay module in Nectar. I applied the settings seen above in the Delay module to the Alex Backer vocal I created above. Give it a listen before and after.
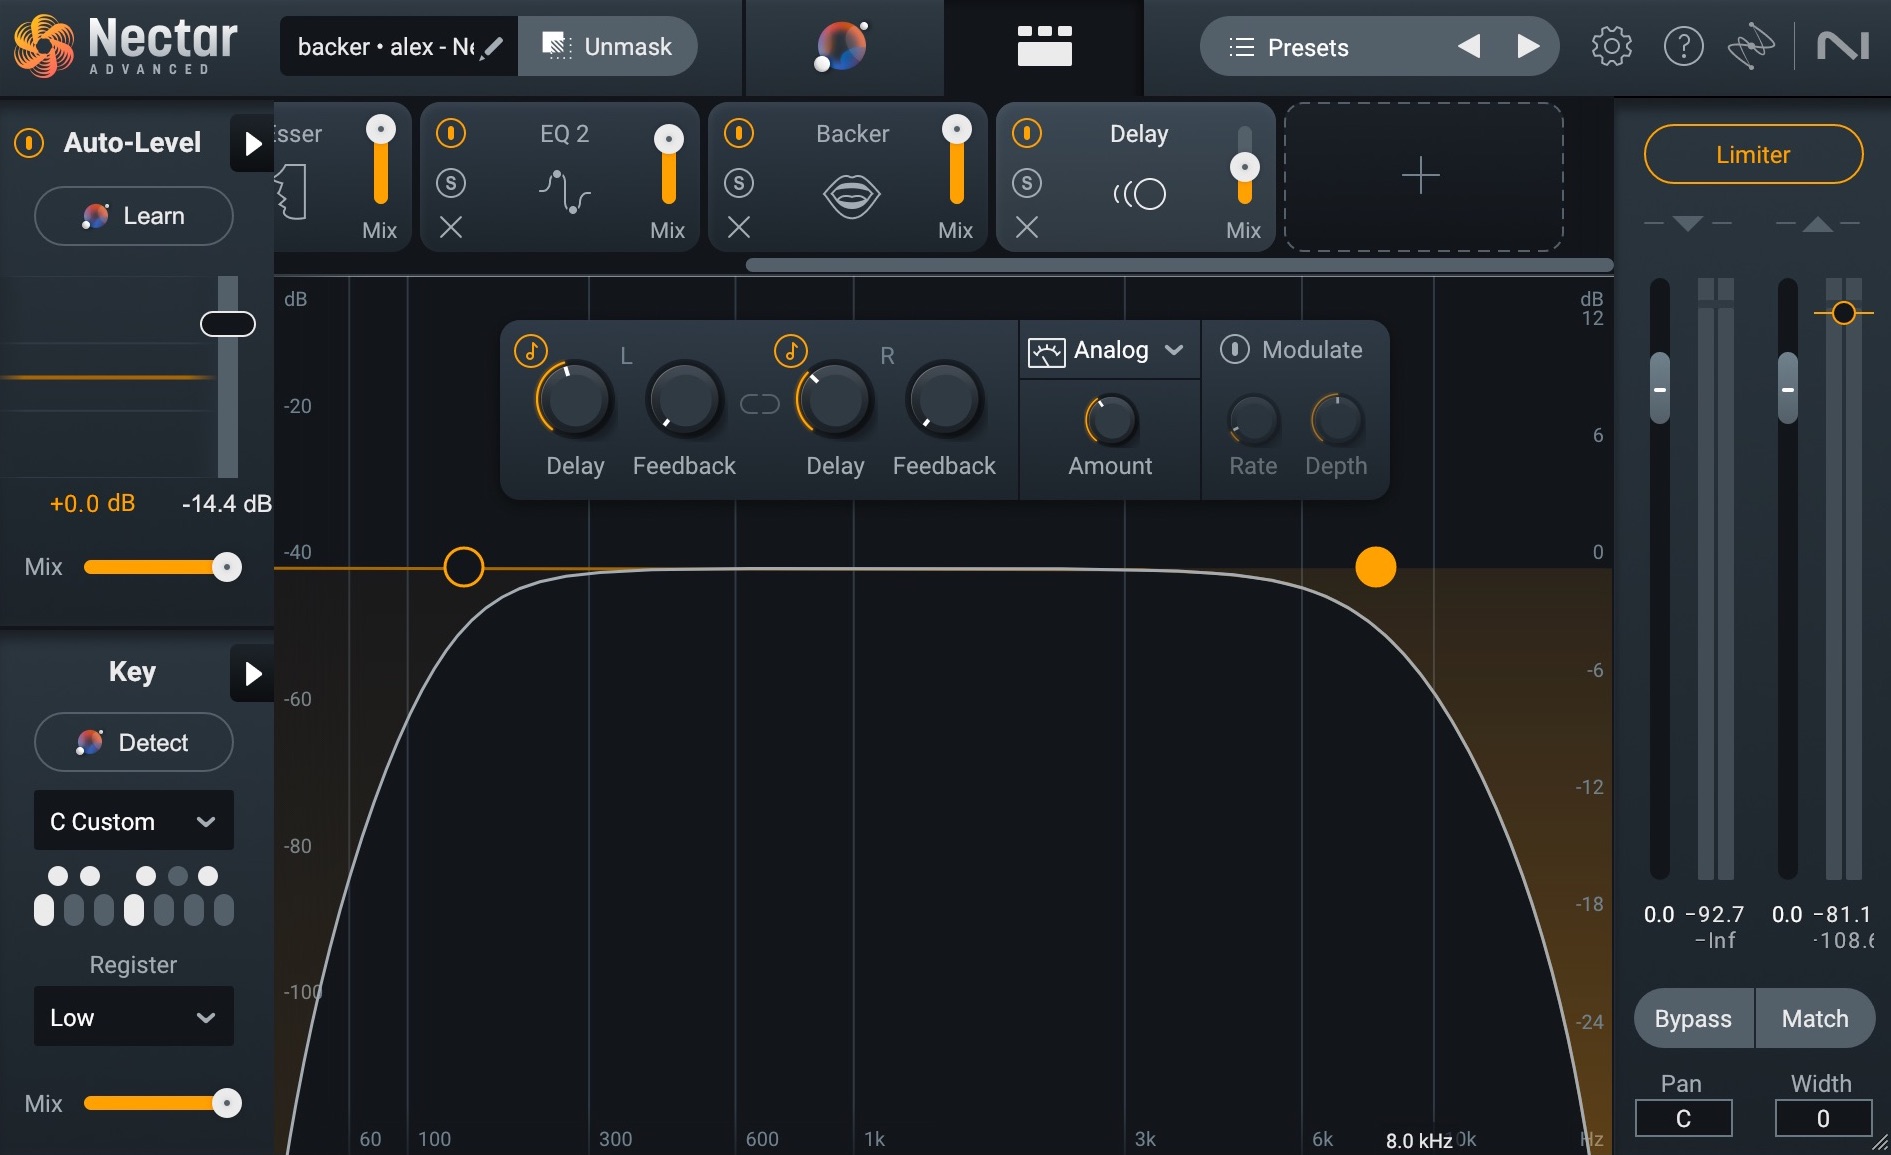
Delay module in Nectar
Delay on Background Vocals
Dimension
You can also play with the various effects found in the Dimension module of Nectar. For the following audio example, I added a Phaser effect (with the settings seen below) within the Dimension module to the Raquel Backer vocal I created earlier.
Give it a listen before and after.
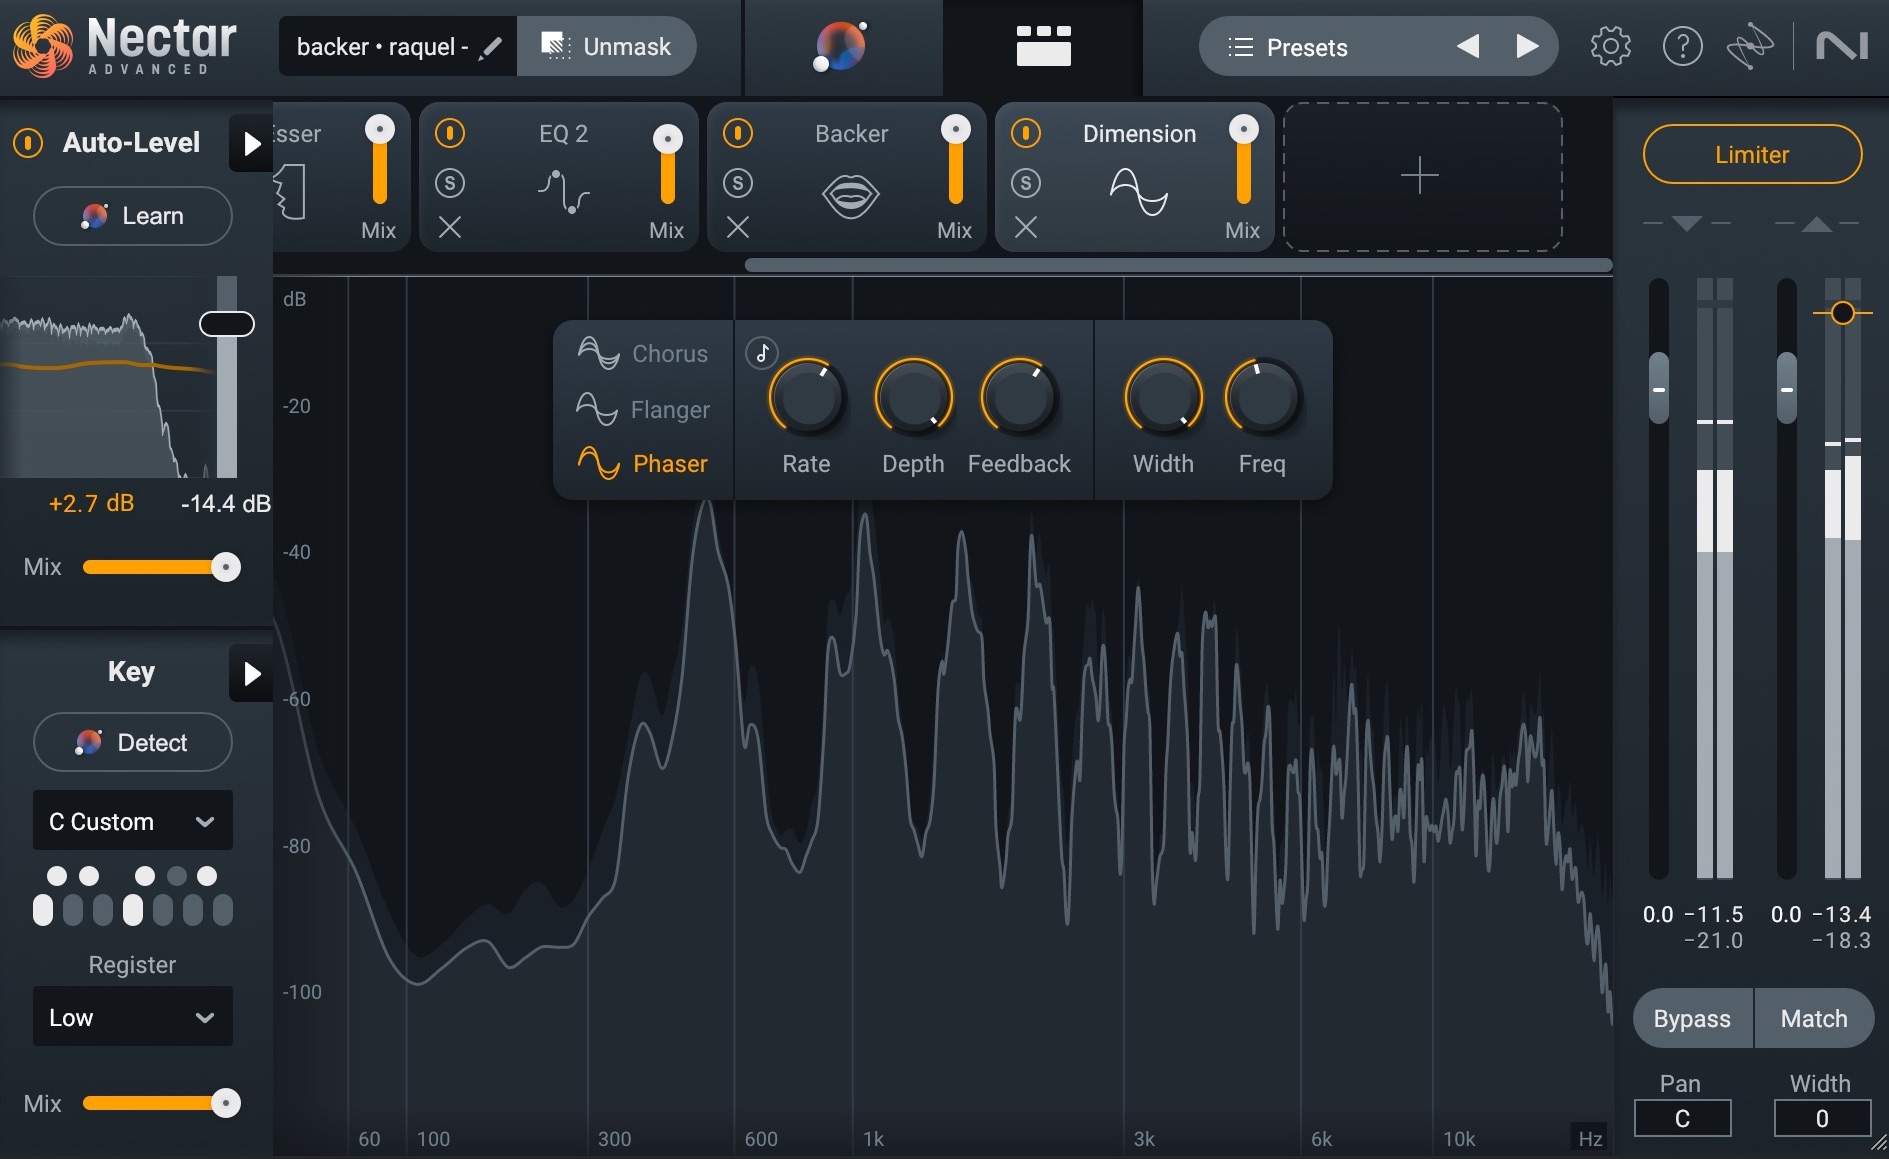
Dimension module in Nectar
Dimension on Background Vocals
Reverb
And, lastly, try adding some reverb using the Reverb module in Nectar. Keep in mind that with vocal reverb, less is typically more. I went ahead and applied reverb (using the settings seen above) to the high harmony I created with the Voices module. Listen to how it adds a sense of space to the vocal section, without detracting from the lead.
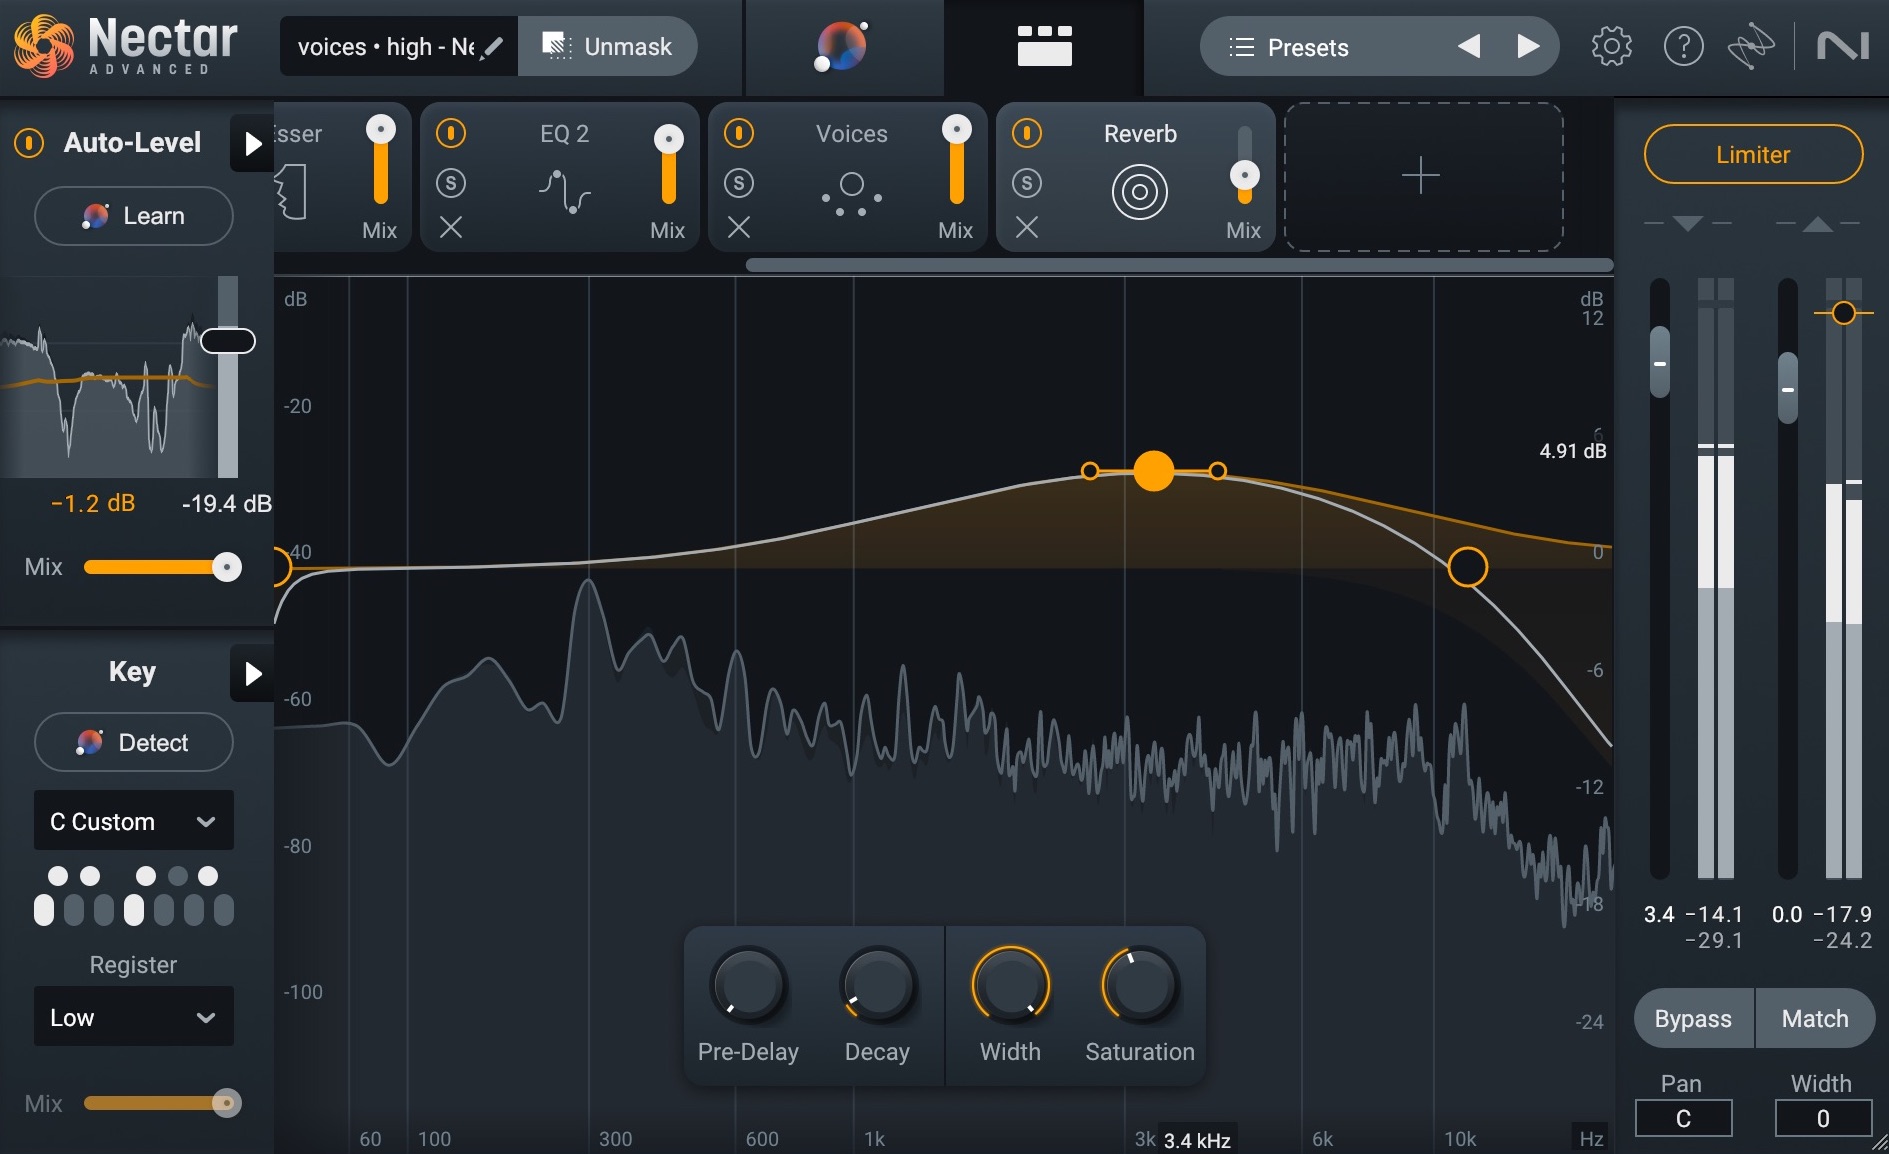
Reverb module in Nectar
Reverb on Background Vocals
Adding creative effects to your backups will help your mix feel like it has layers, and will also help differentiate between your lead vocal and your background vocals.
6. Compress your background vocals
Last step for mixing background vocals: make sure to add compression! When compressing background vocals, don’t be afraid to push it a bit more than you would on your lead vocal. This will help your vocal section to come through hot and punchy. But since you’re adding heavy compression to the background vocals, any potential artifacts left over from the compression shouldn’t even be noticeable in your final mix.
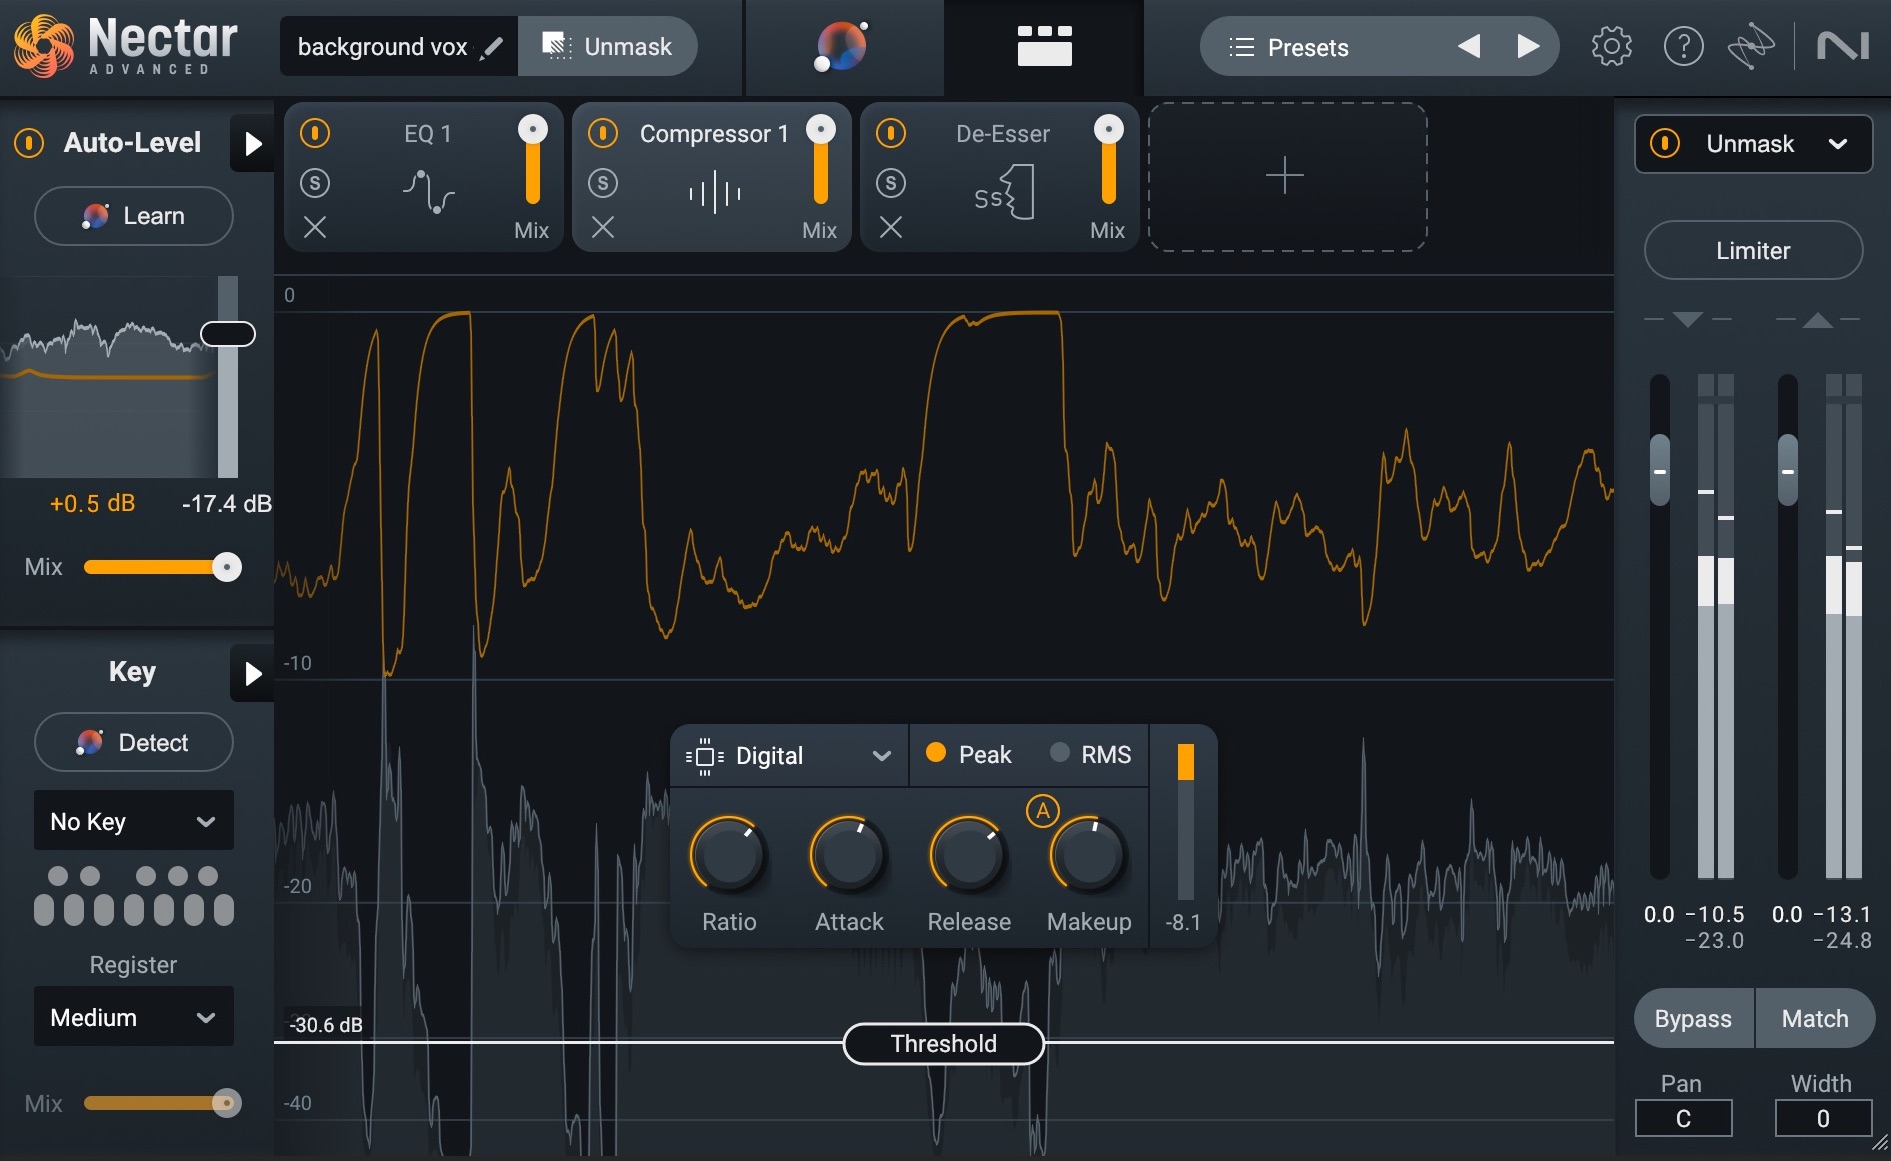
Compressor module in Nectar
Let's listen to what we started with followed by the final mix with all of the background vocals mixed in.
Mixed Background Vocals
Notice how we now have a cohesive background vocal section that helps give depth to the lead vocal without sucking attention from it? Since that’s the goal, our work here is done!
Start producing background vocals
Background vocals are often the unsung heroes of music. They never have their moment in the spotlight, but they do serve the valuable purpose of giving the lead vocal that extra “oomph” it needs so it can demand all the attention.
By now, you should have a pretty good idea of how to mix background vocals so that they beef up the vocal section without getting in the way.
Tools like Nectar 4 make creating and processing background vocals a breeze. Check out this full list of new features available in Nectar 4, and then go out there and start making those background vocals pop! Just not too much.
