Audio Repair: 10 Hidden Features in iZotope RX
Whether you're working on a podcast or music production, learn about these ten “hidden” audio cleanup and background noise removal features in RX that will speed up your workflow.
Whether you're working on a podcast or music production,


RX 11 Advanced
Please note: this video is using an older version of RX. The 

iZotope Music Production Suite Pro: Monthly


RX 10 Advanced
Want to follow along as you learn about these new features? Start your free trial of


iZotope Music Production Suite Pro: Monthly
1. Low end zoom
The spectrogram is the visual canvas for which RX is famous. It allows you to see and then remove or attenuate all kinds of problems. Here’s a trick that allows you to really see the low end information in the spectrogram, where problems like wind bursts, or plosives, or camera handling can often live.
If you want even more visual real estate in the low end, right-click on the y-axis of the frequency scale to change the frequency range display to extended log from mel.
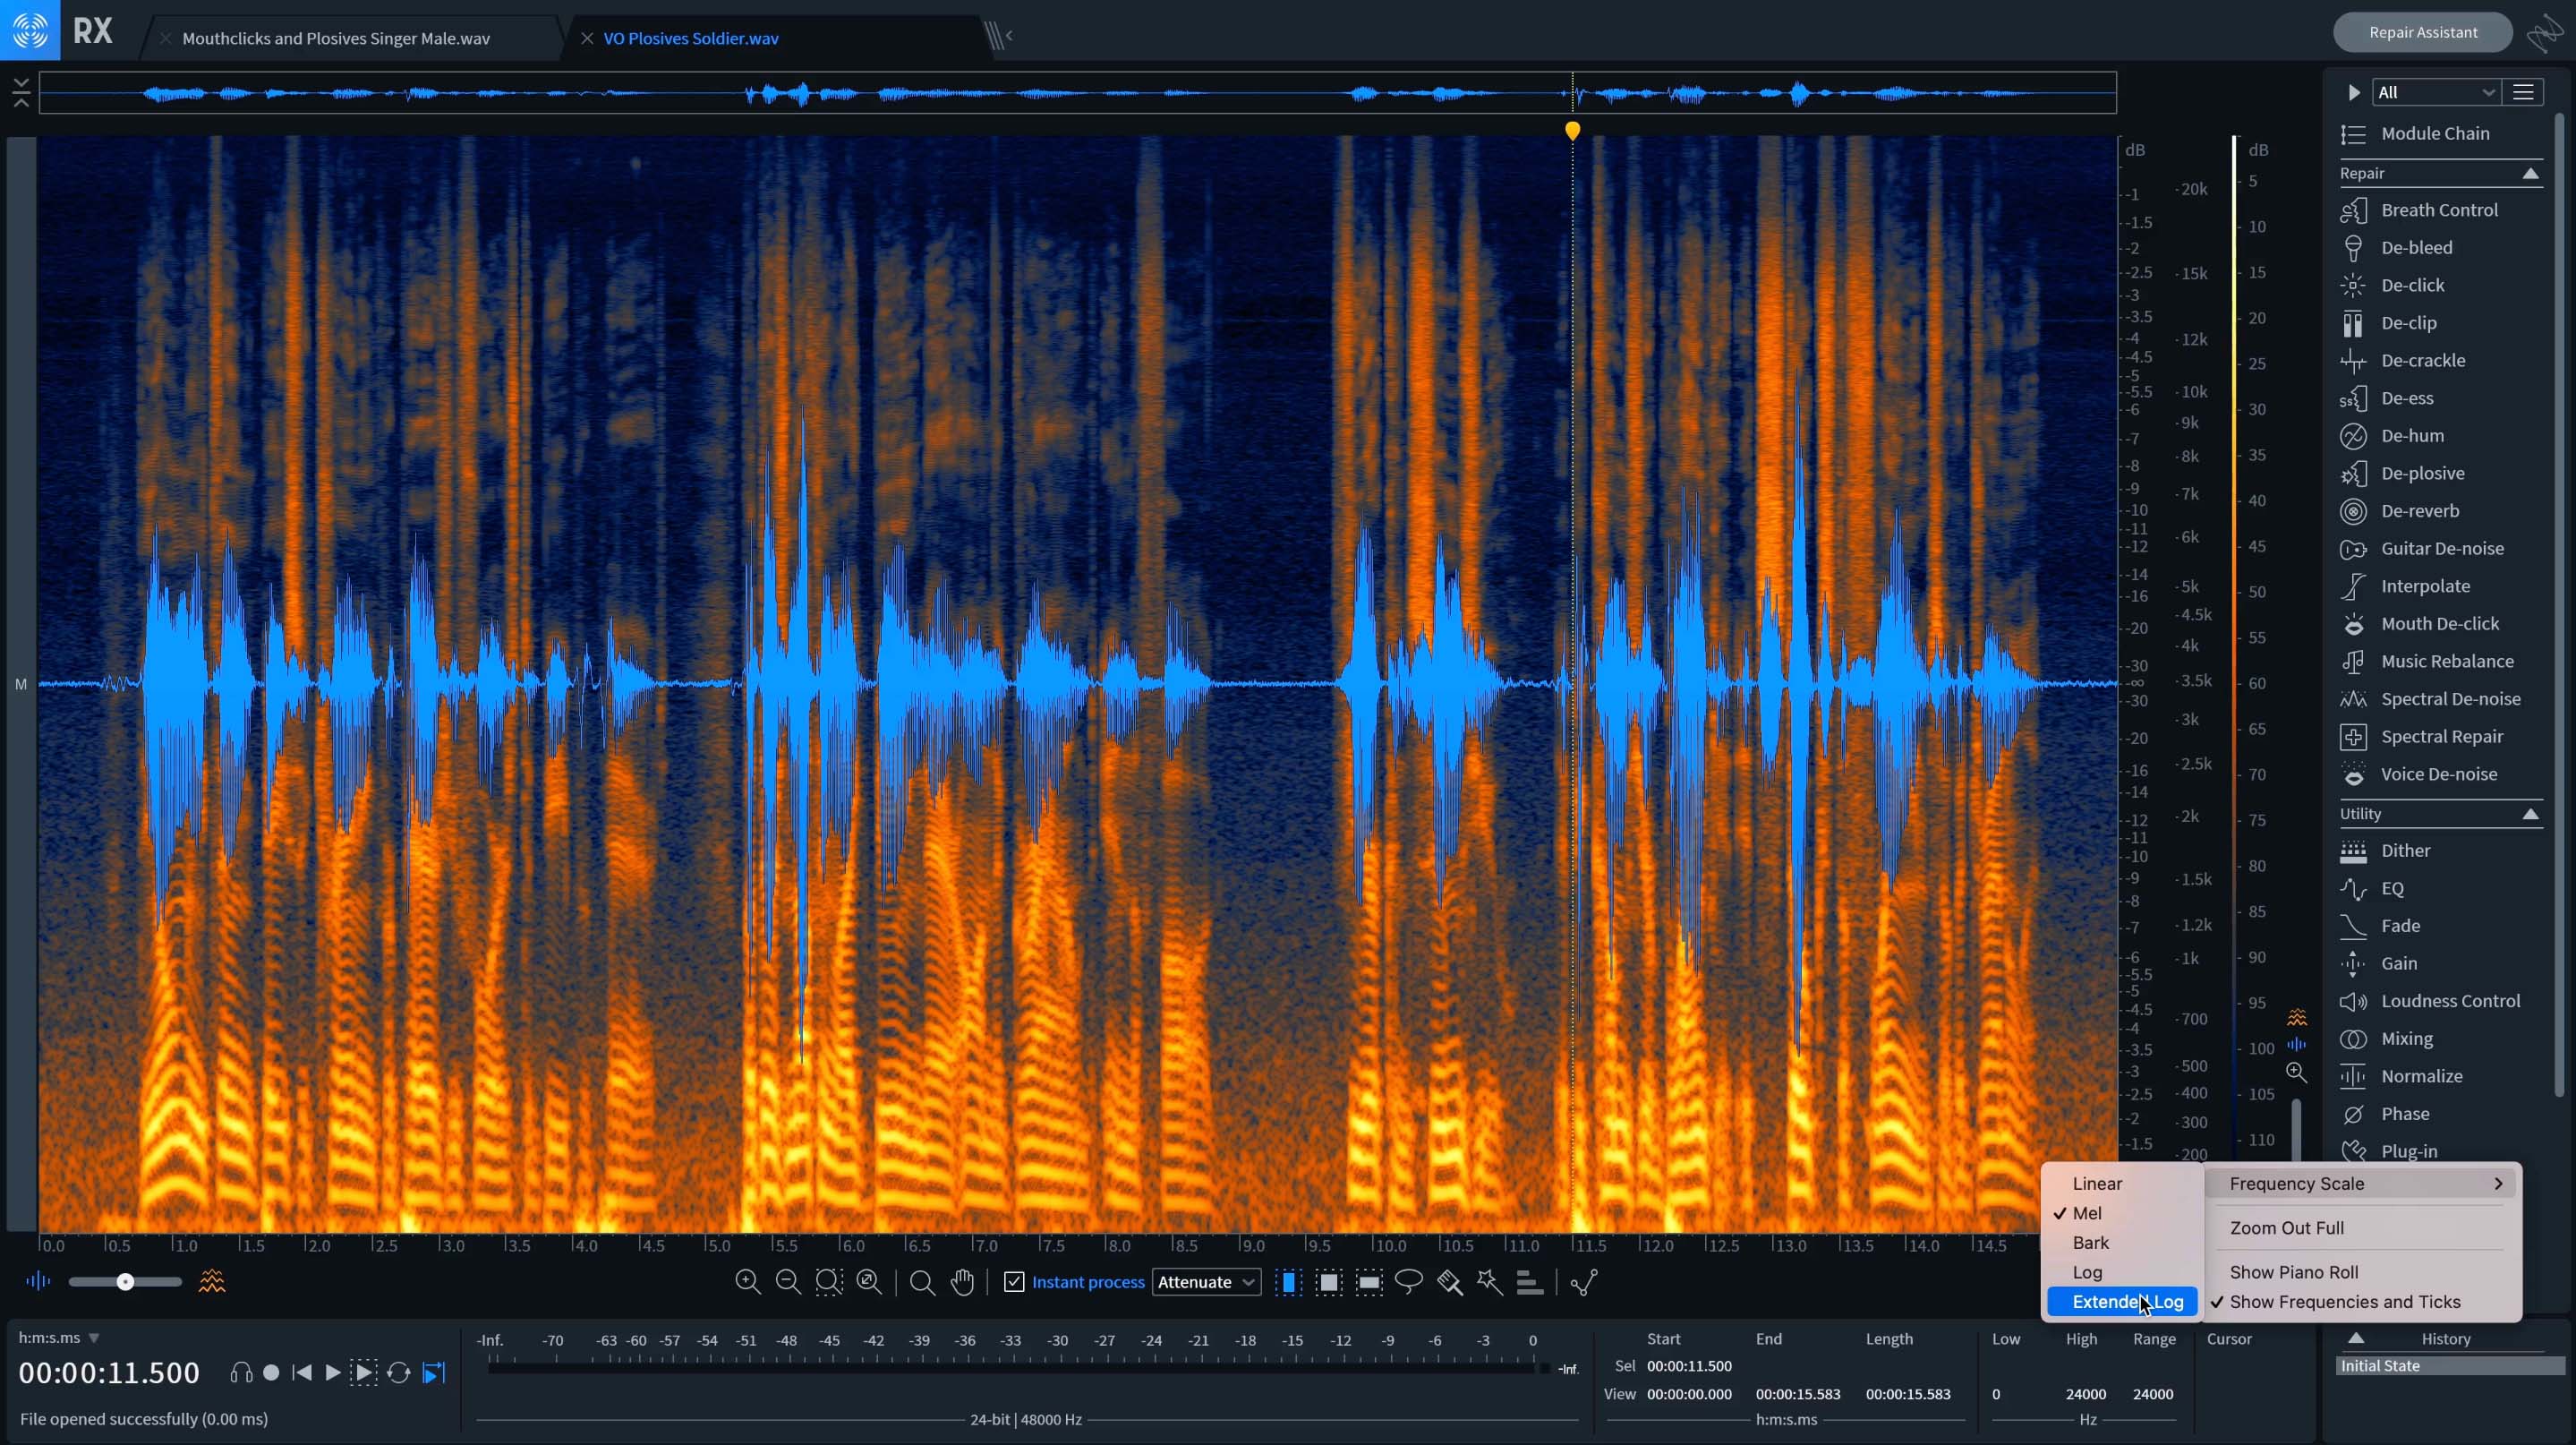
Right-click on the y-axis of the frequency scale to change the frequency range display to extended log from mel in RX
Now you can see way more of your low end. In the original view, we see values below 100 Hz are not easily represented and we can't see too much down there. When we flip back to extended log, so much more information is visible below 100 Hz, and we see Hz increments from 5, 10, 20, 30, 50, 70, and 100, almost like we're shining a black light on the low end.
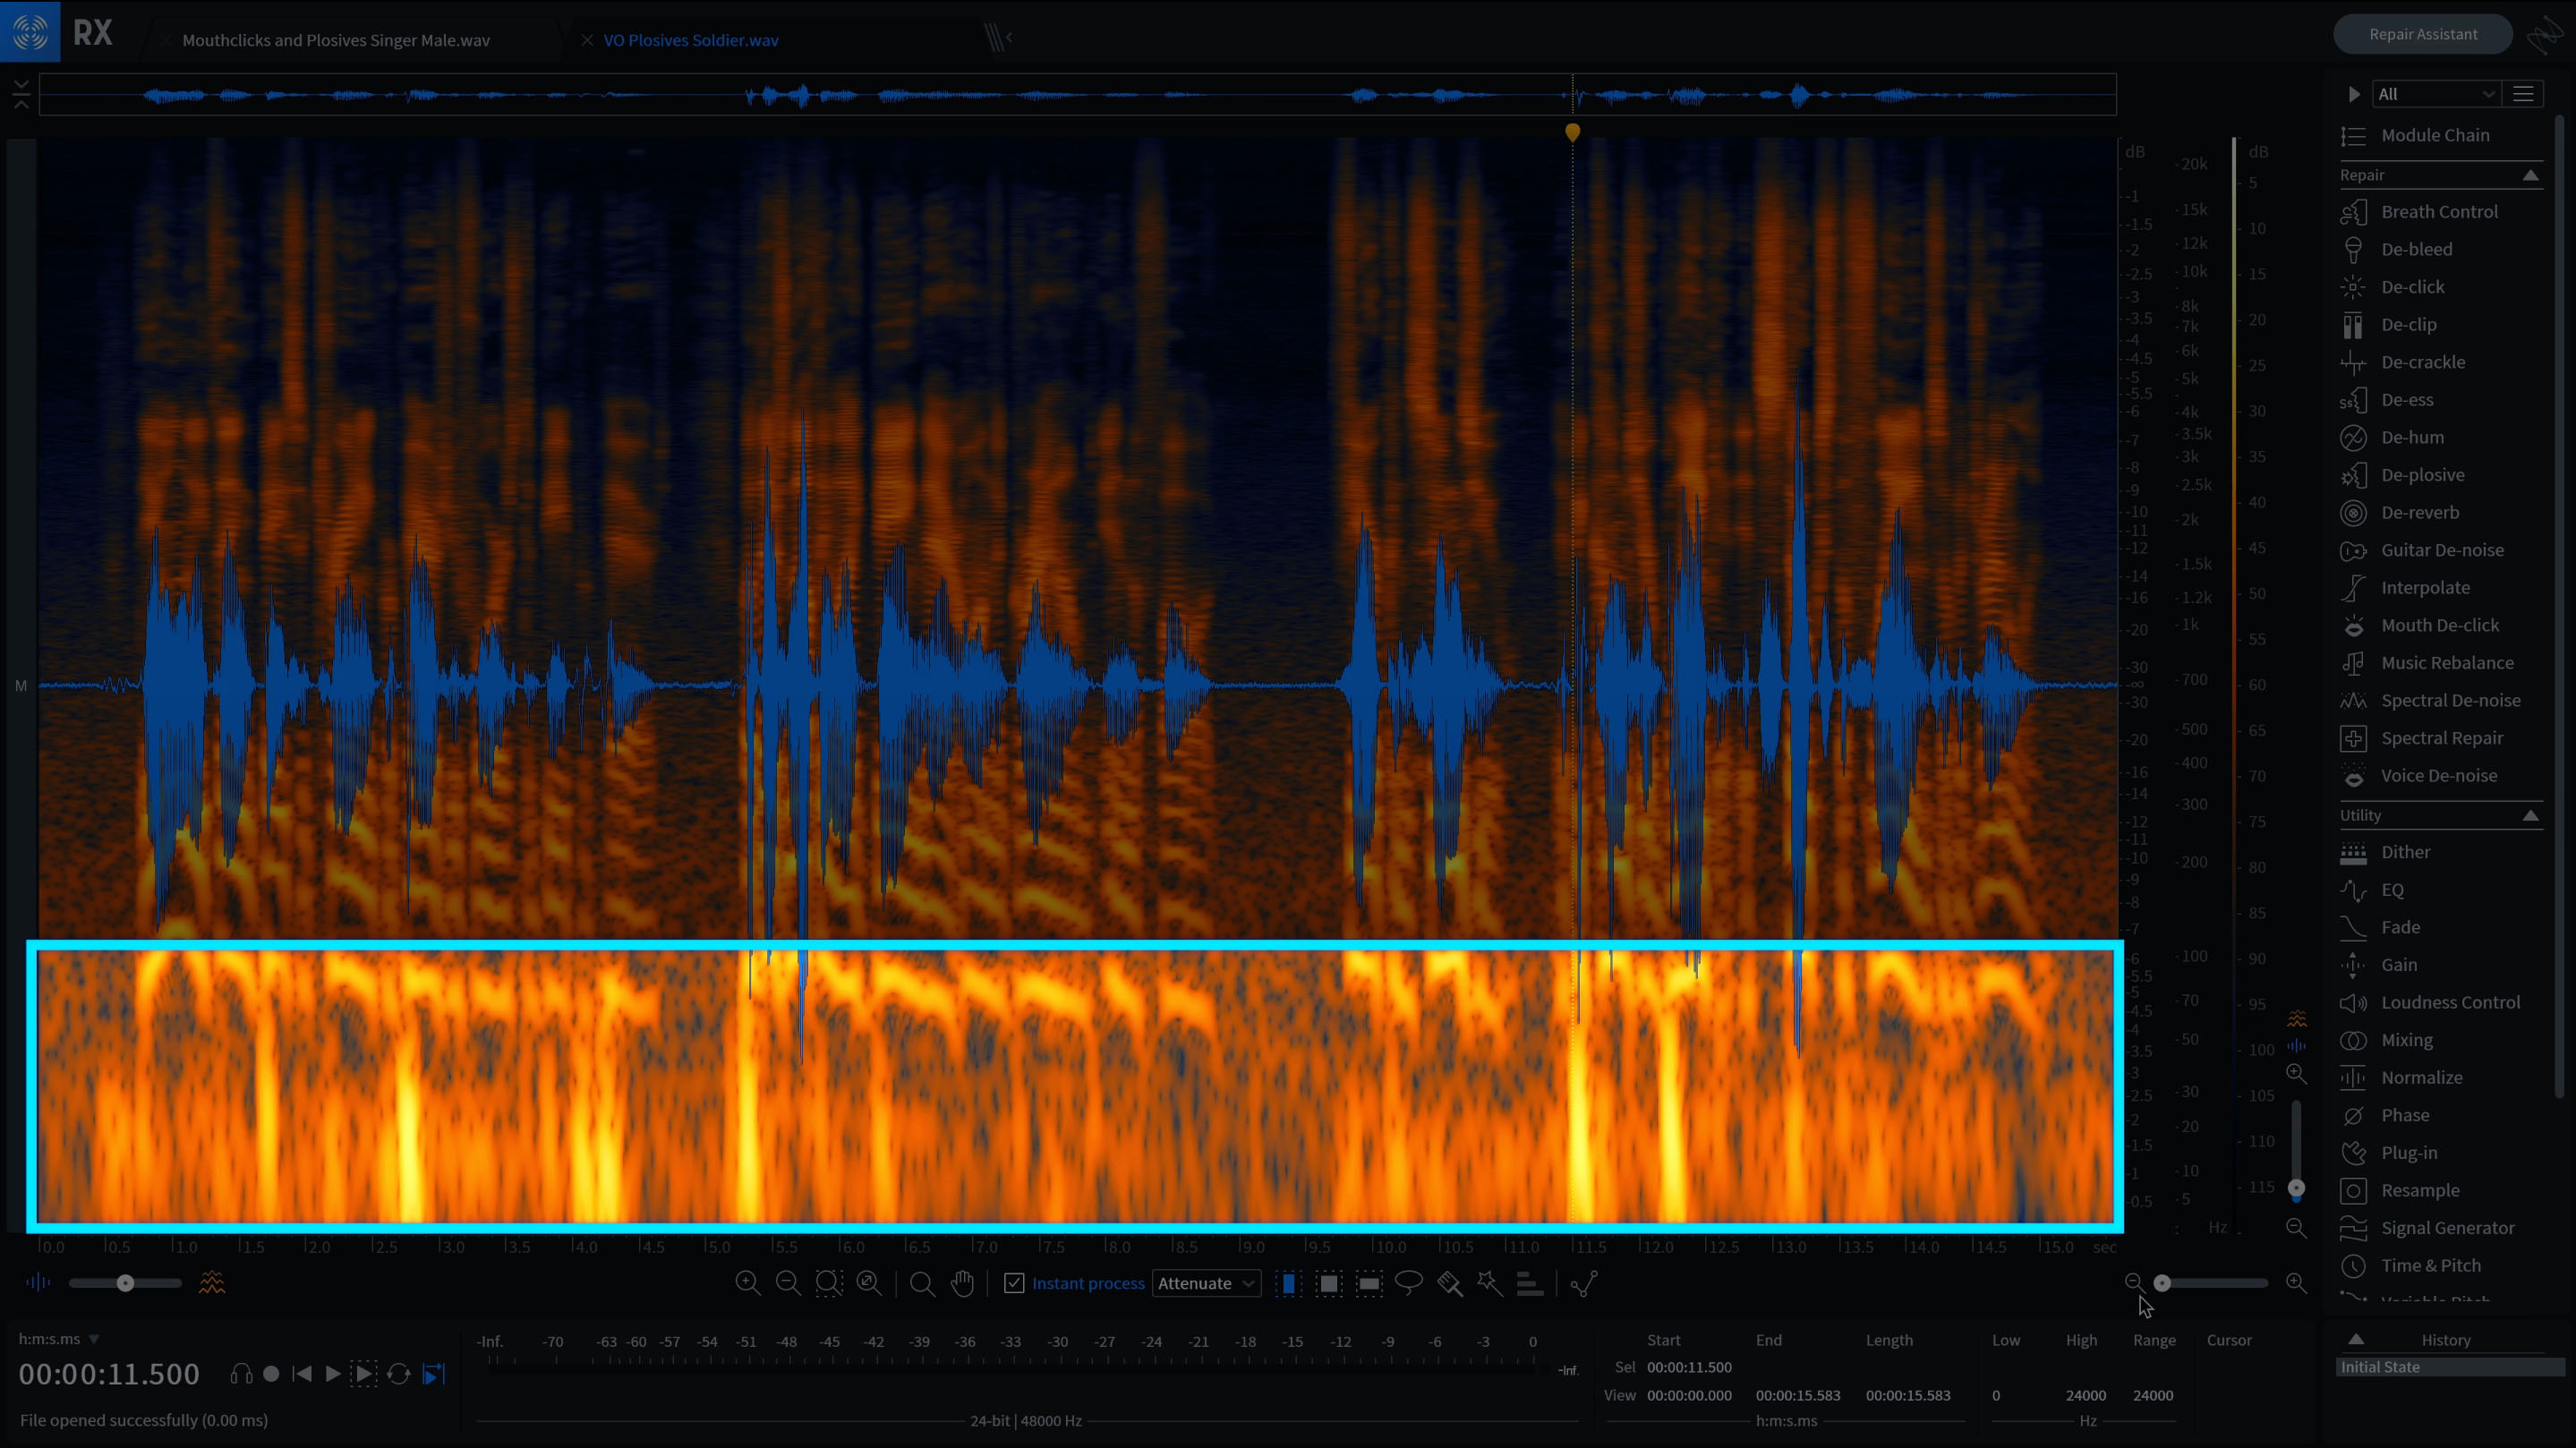
See your low end more clearly, with information below 100 Hz
And here's a bonus tip: typing in values into the selection and view boxes will allow you to achieve specific zoom levels or selection ranges. Just double-click on the y or x-axis to return the views to default.
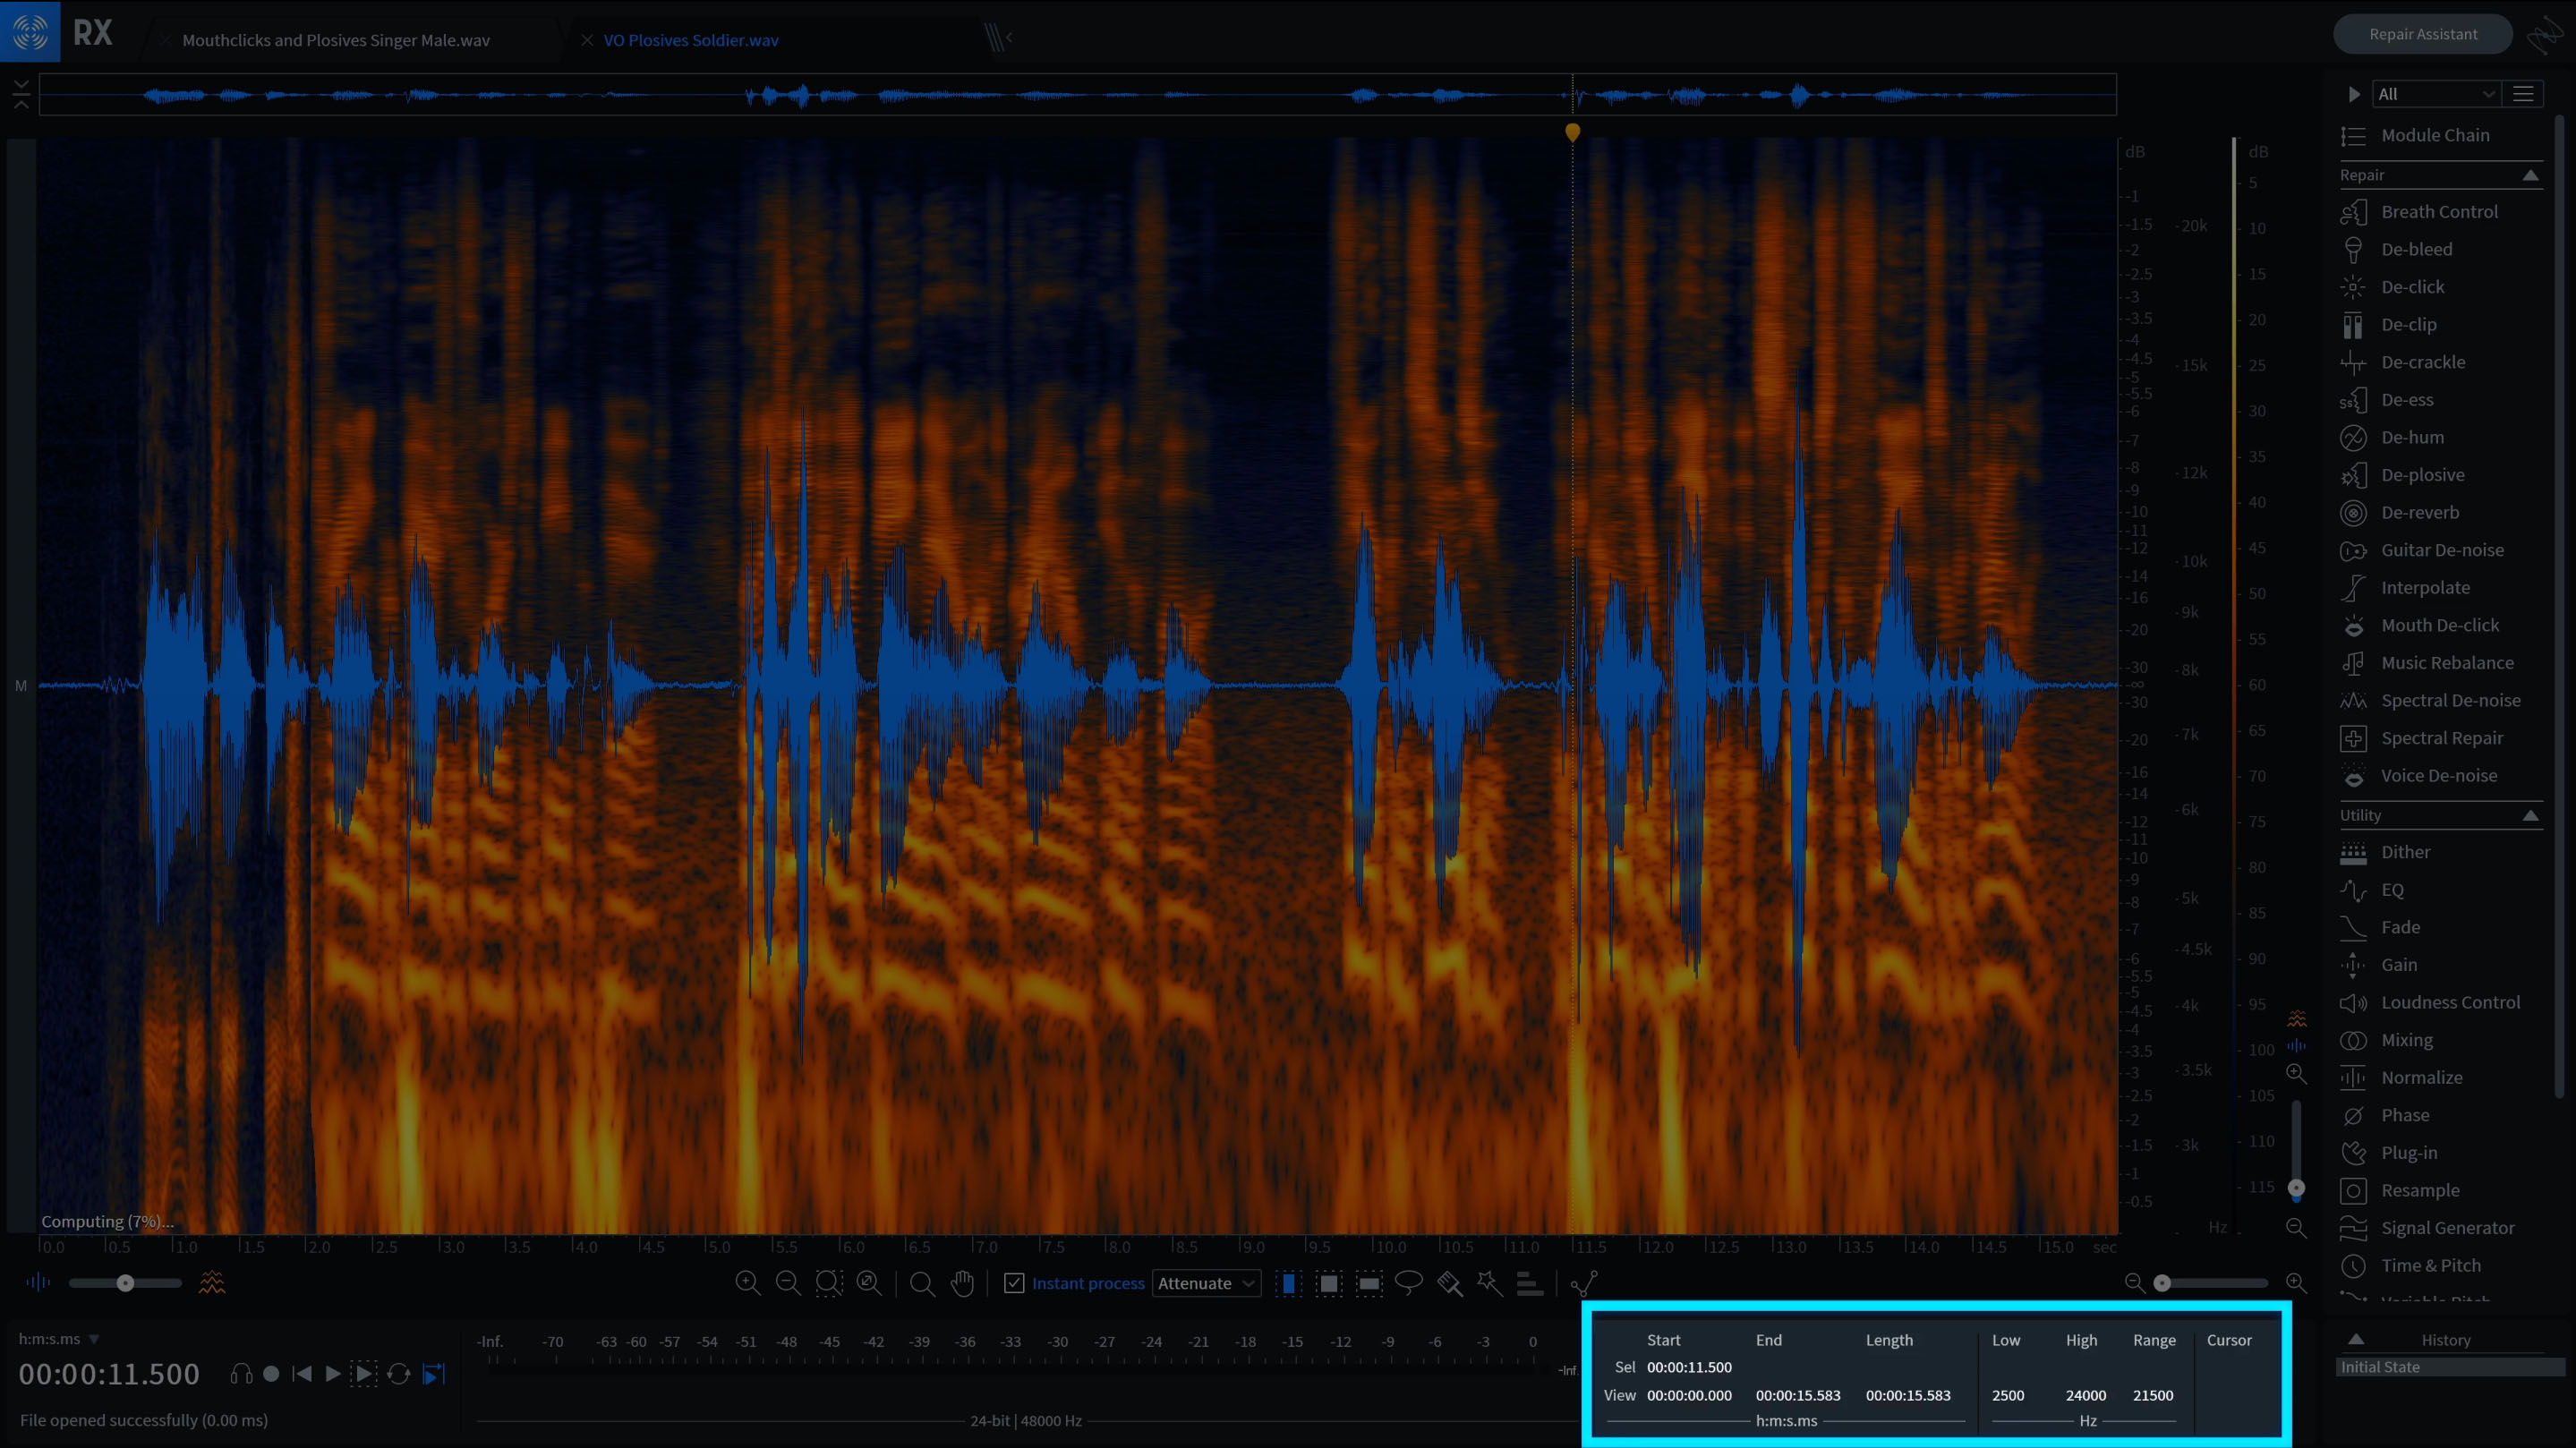
Achieve specific zoom levels or selection ranges with RX Pro for Music
2. Interharmonic editing
Sometimes problems that you're trying to get rid of seem just out of reach in the spectrogram. There’s a feature in RX Pro that allows you to go in between the molecules of sound, so to speak, to really get after things that you thought were impossible to fix.
In the spectrogram, you can press command or control, and then scroll up or down with your mouse or trackpad to zoom in across the time domain.
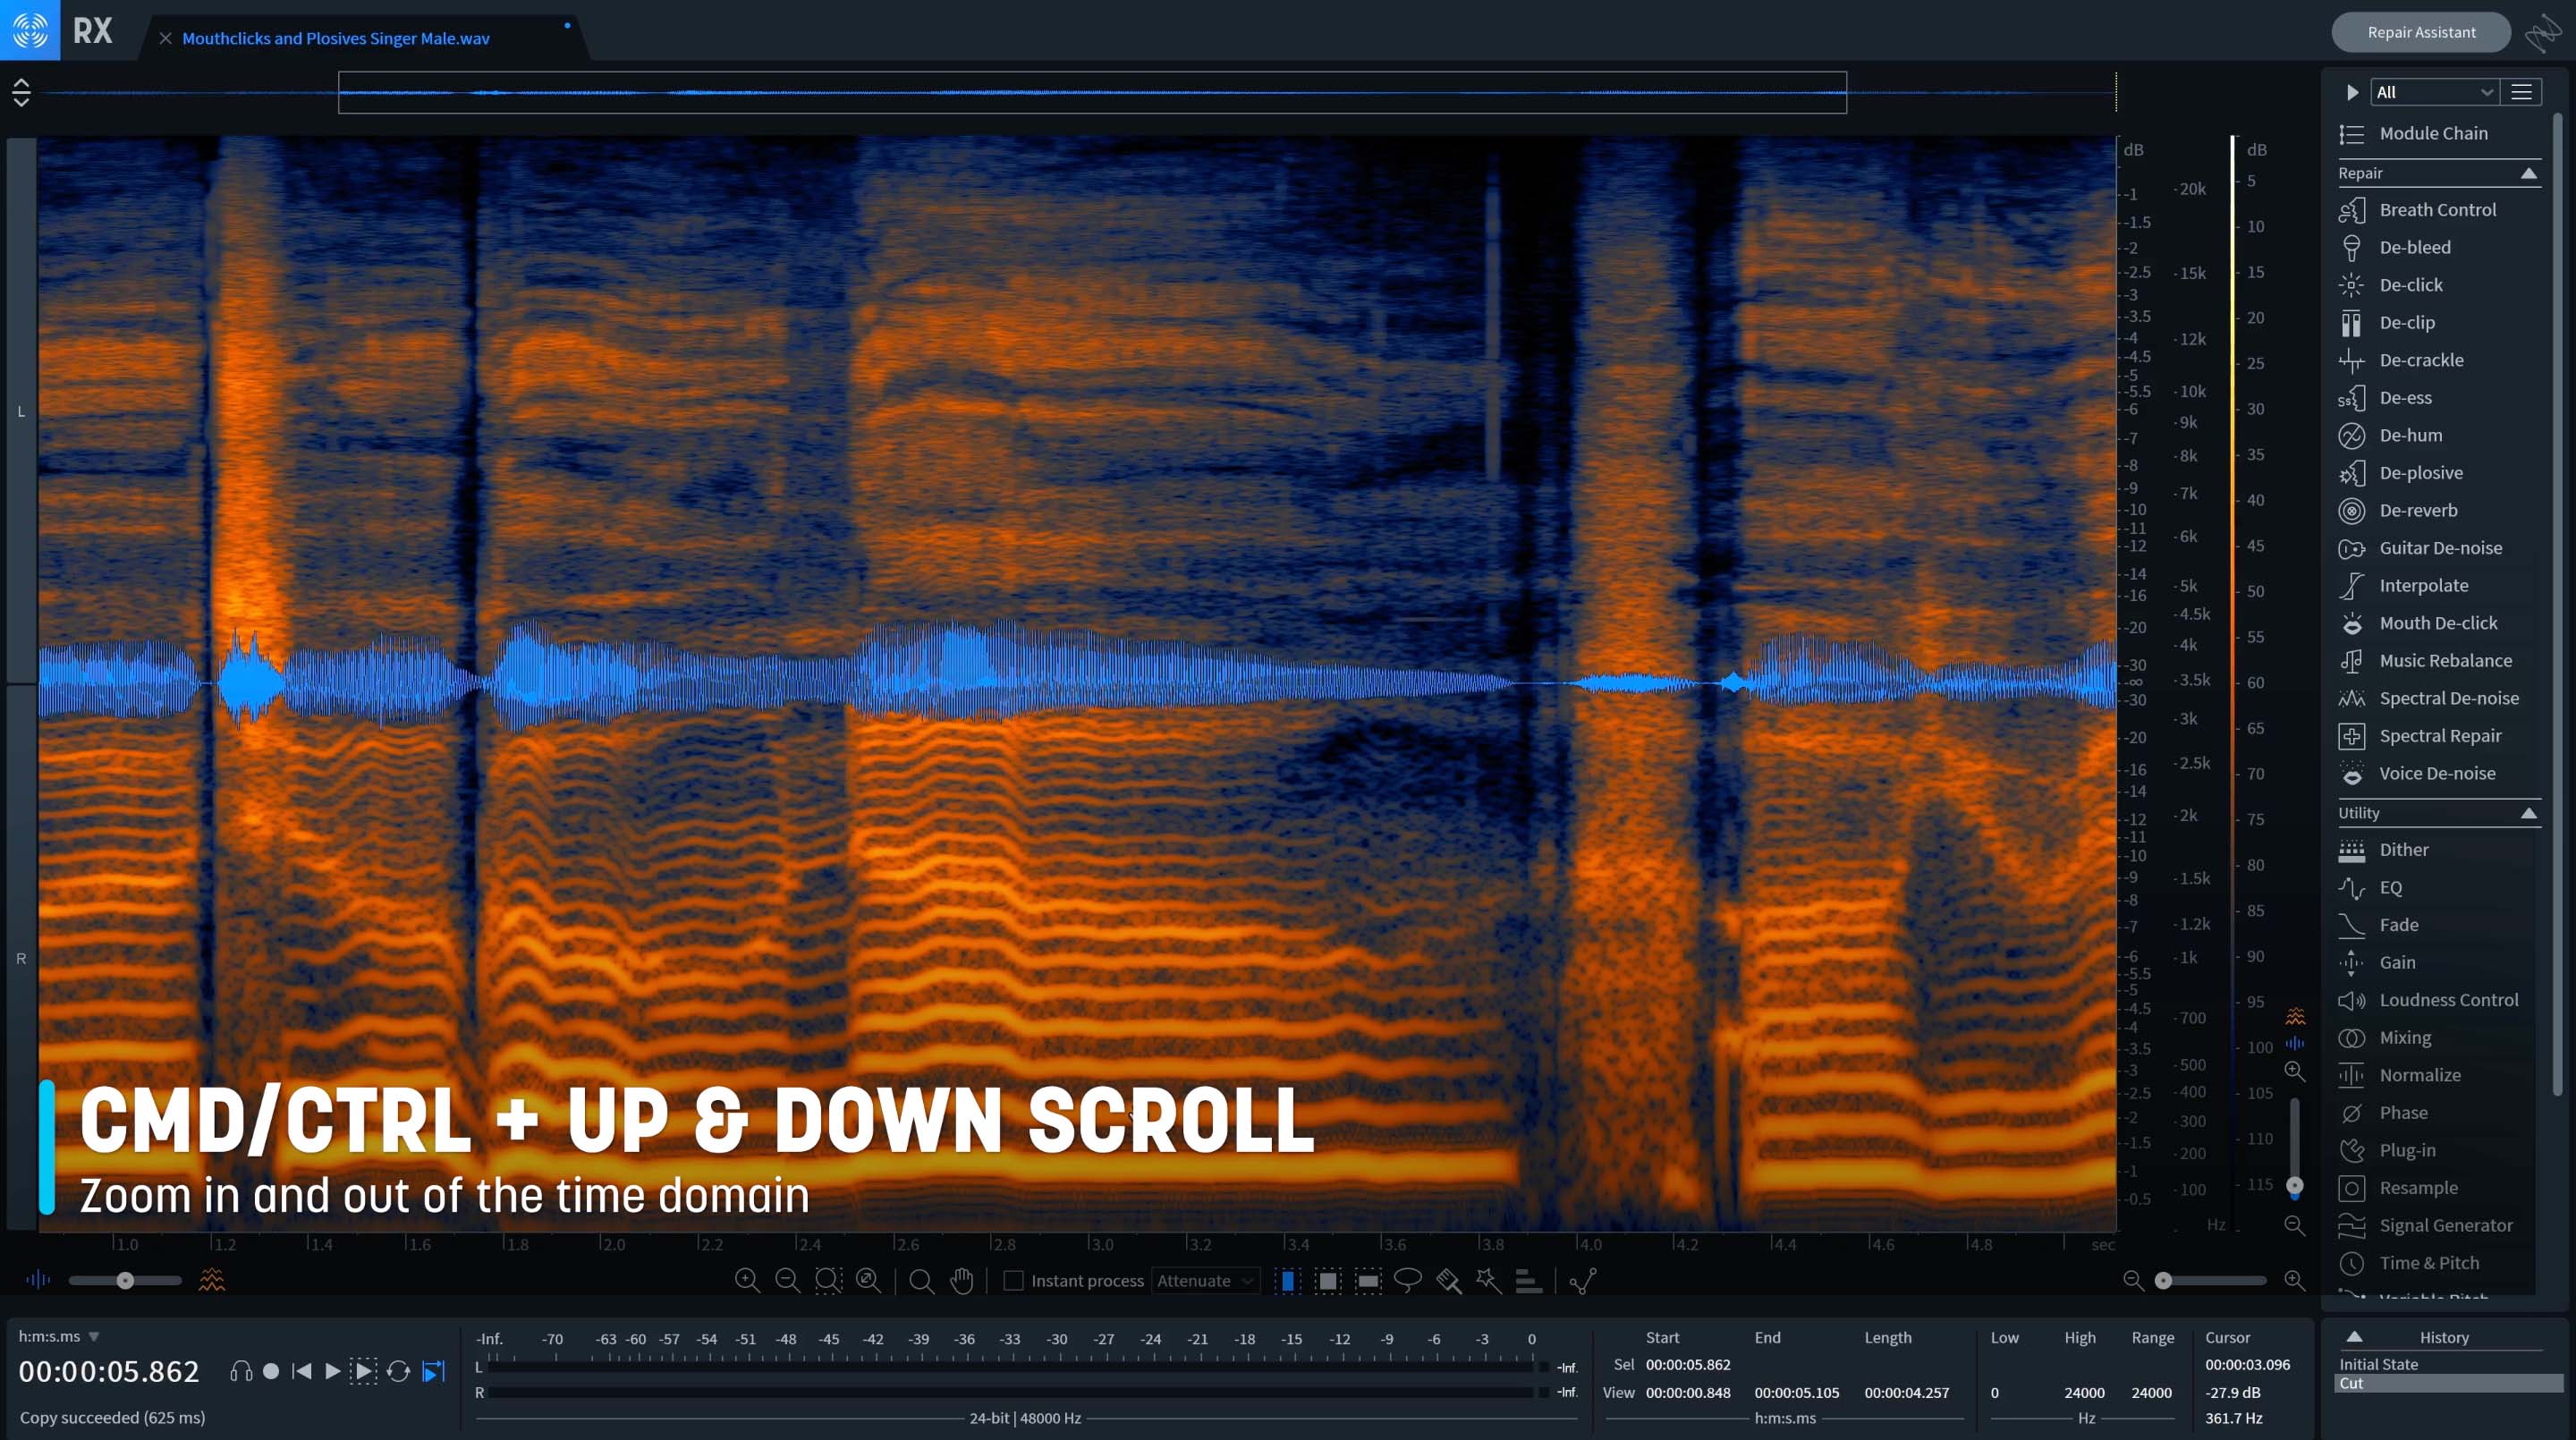
Press command or control, and then scroll up or down with your mouse or trackpad to zoom in
And you can also press option or alt and then up or down scroll to scroll in and around the frequency domain.
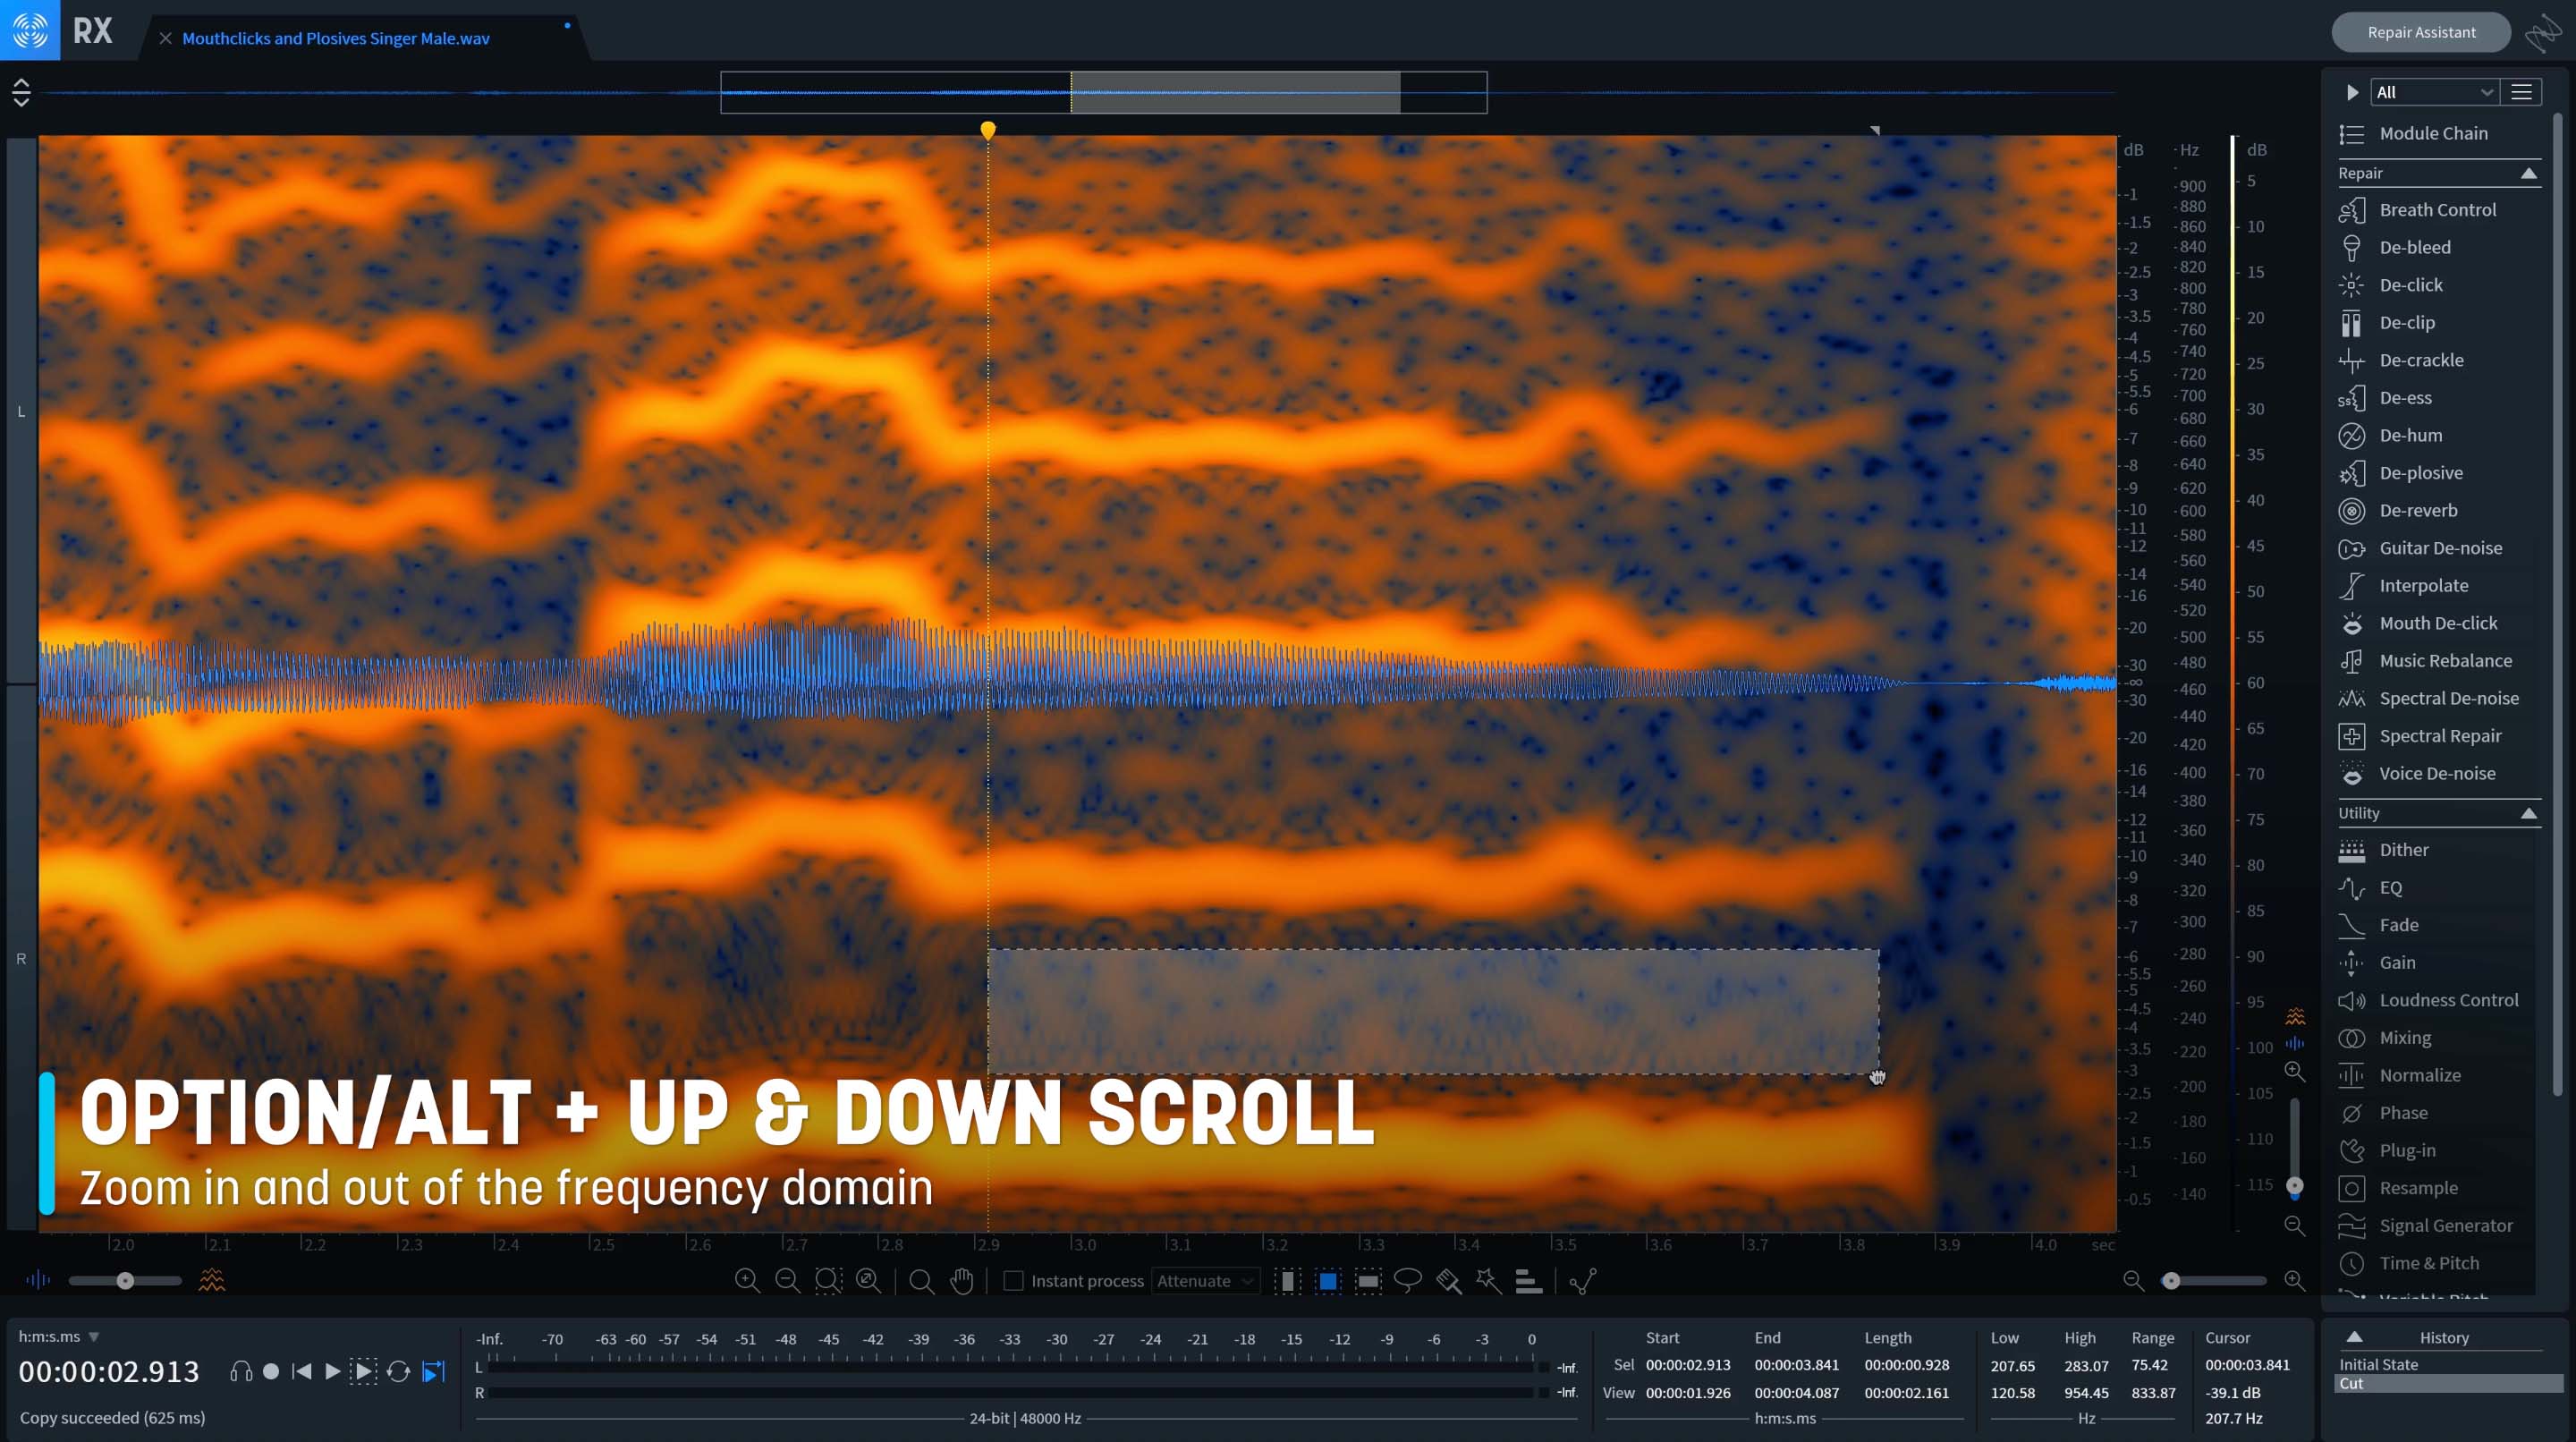
Press option or alt and then up or down scroll to scroll in and around the frequency domain in RX
Now you can get between the harmonics in the spectrogram for more detailed editing.
3. Zero-latency de-noising power
Many of the modules within the standalone editor of RX can actually be used outside of the application window in your favorite DAW as a plug-in, but there's a common misconception that the plug-ins will incur latency. Did you know you can run Voice De-noise in the digital audio workstation with zero latency?
In your DAW of choice, you can restore problematic vocal or production recordings in real time with RX Pro for Music's Voice De-noise audio plug-in. Improving on the earlier Dialogue De-noise the zero latency, Voice De-noise is the most powerful de-noiser focused on dialogue and song vocal treatment. Voice De-noise also has an adaptive mode that can adjust to changing noise floors in real-time, making it ideal for dialogue stem "set it and forget it" de-noising.
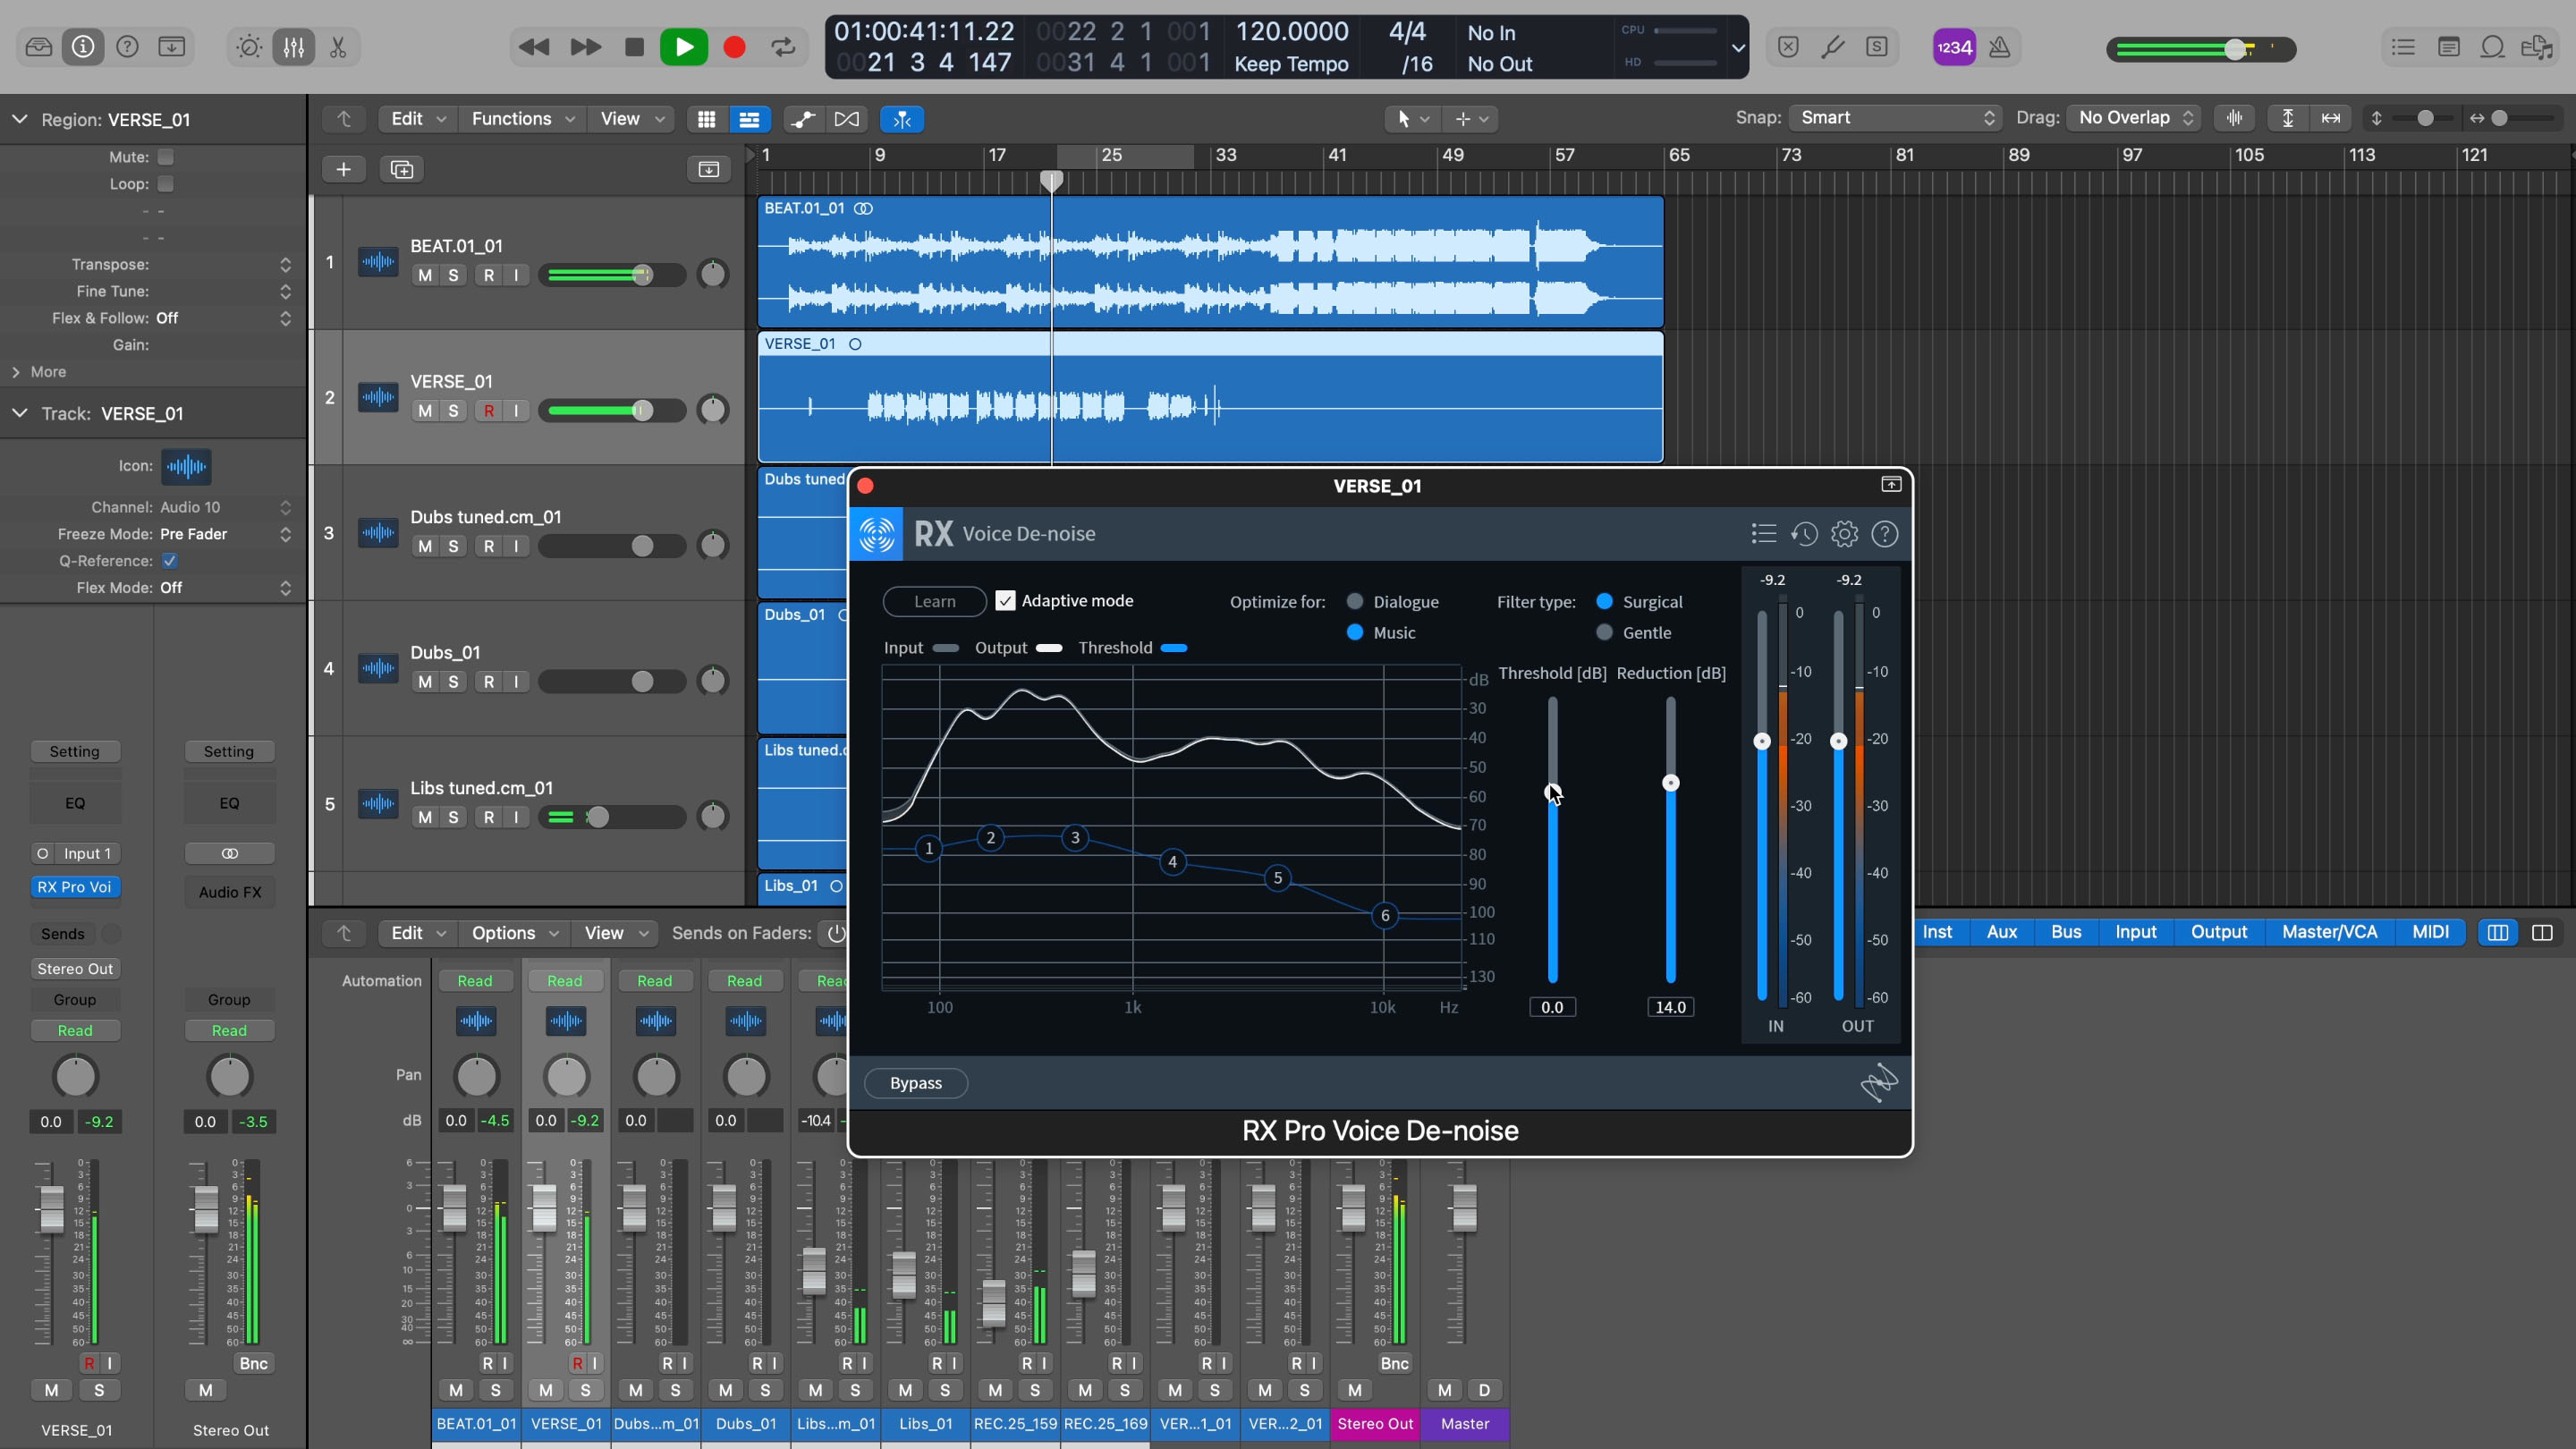
You can restore problematic vocal or production recordings in real time with RX Pro for Music's Voice De-noise
Just instantiate it at the insert level of the track with the breaths that you want to control. You can use the gain or target mode and then the sensitivity slider to tailor the control of the plug-in.
4. Spectrogram settings menu
You've seen just how much control you have navigating the spectrogram, but did you know there's a hidden menu that allows you to change the look, the color, and the way that audio information is represented in the spectrogram?
You can call up the main settings menu by pressing command or control and comma. But by pressing shift command comma, you can call up an entirely different menu that allows you to alter aspects of the spectrogram's colormap and type of spectrogram calculation algorithm.
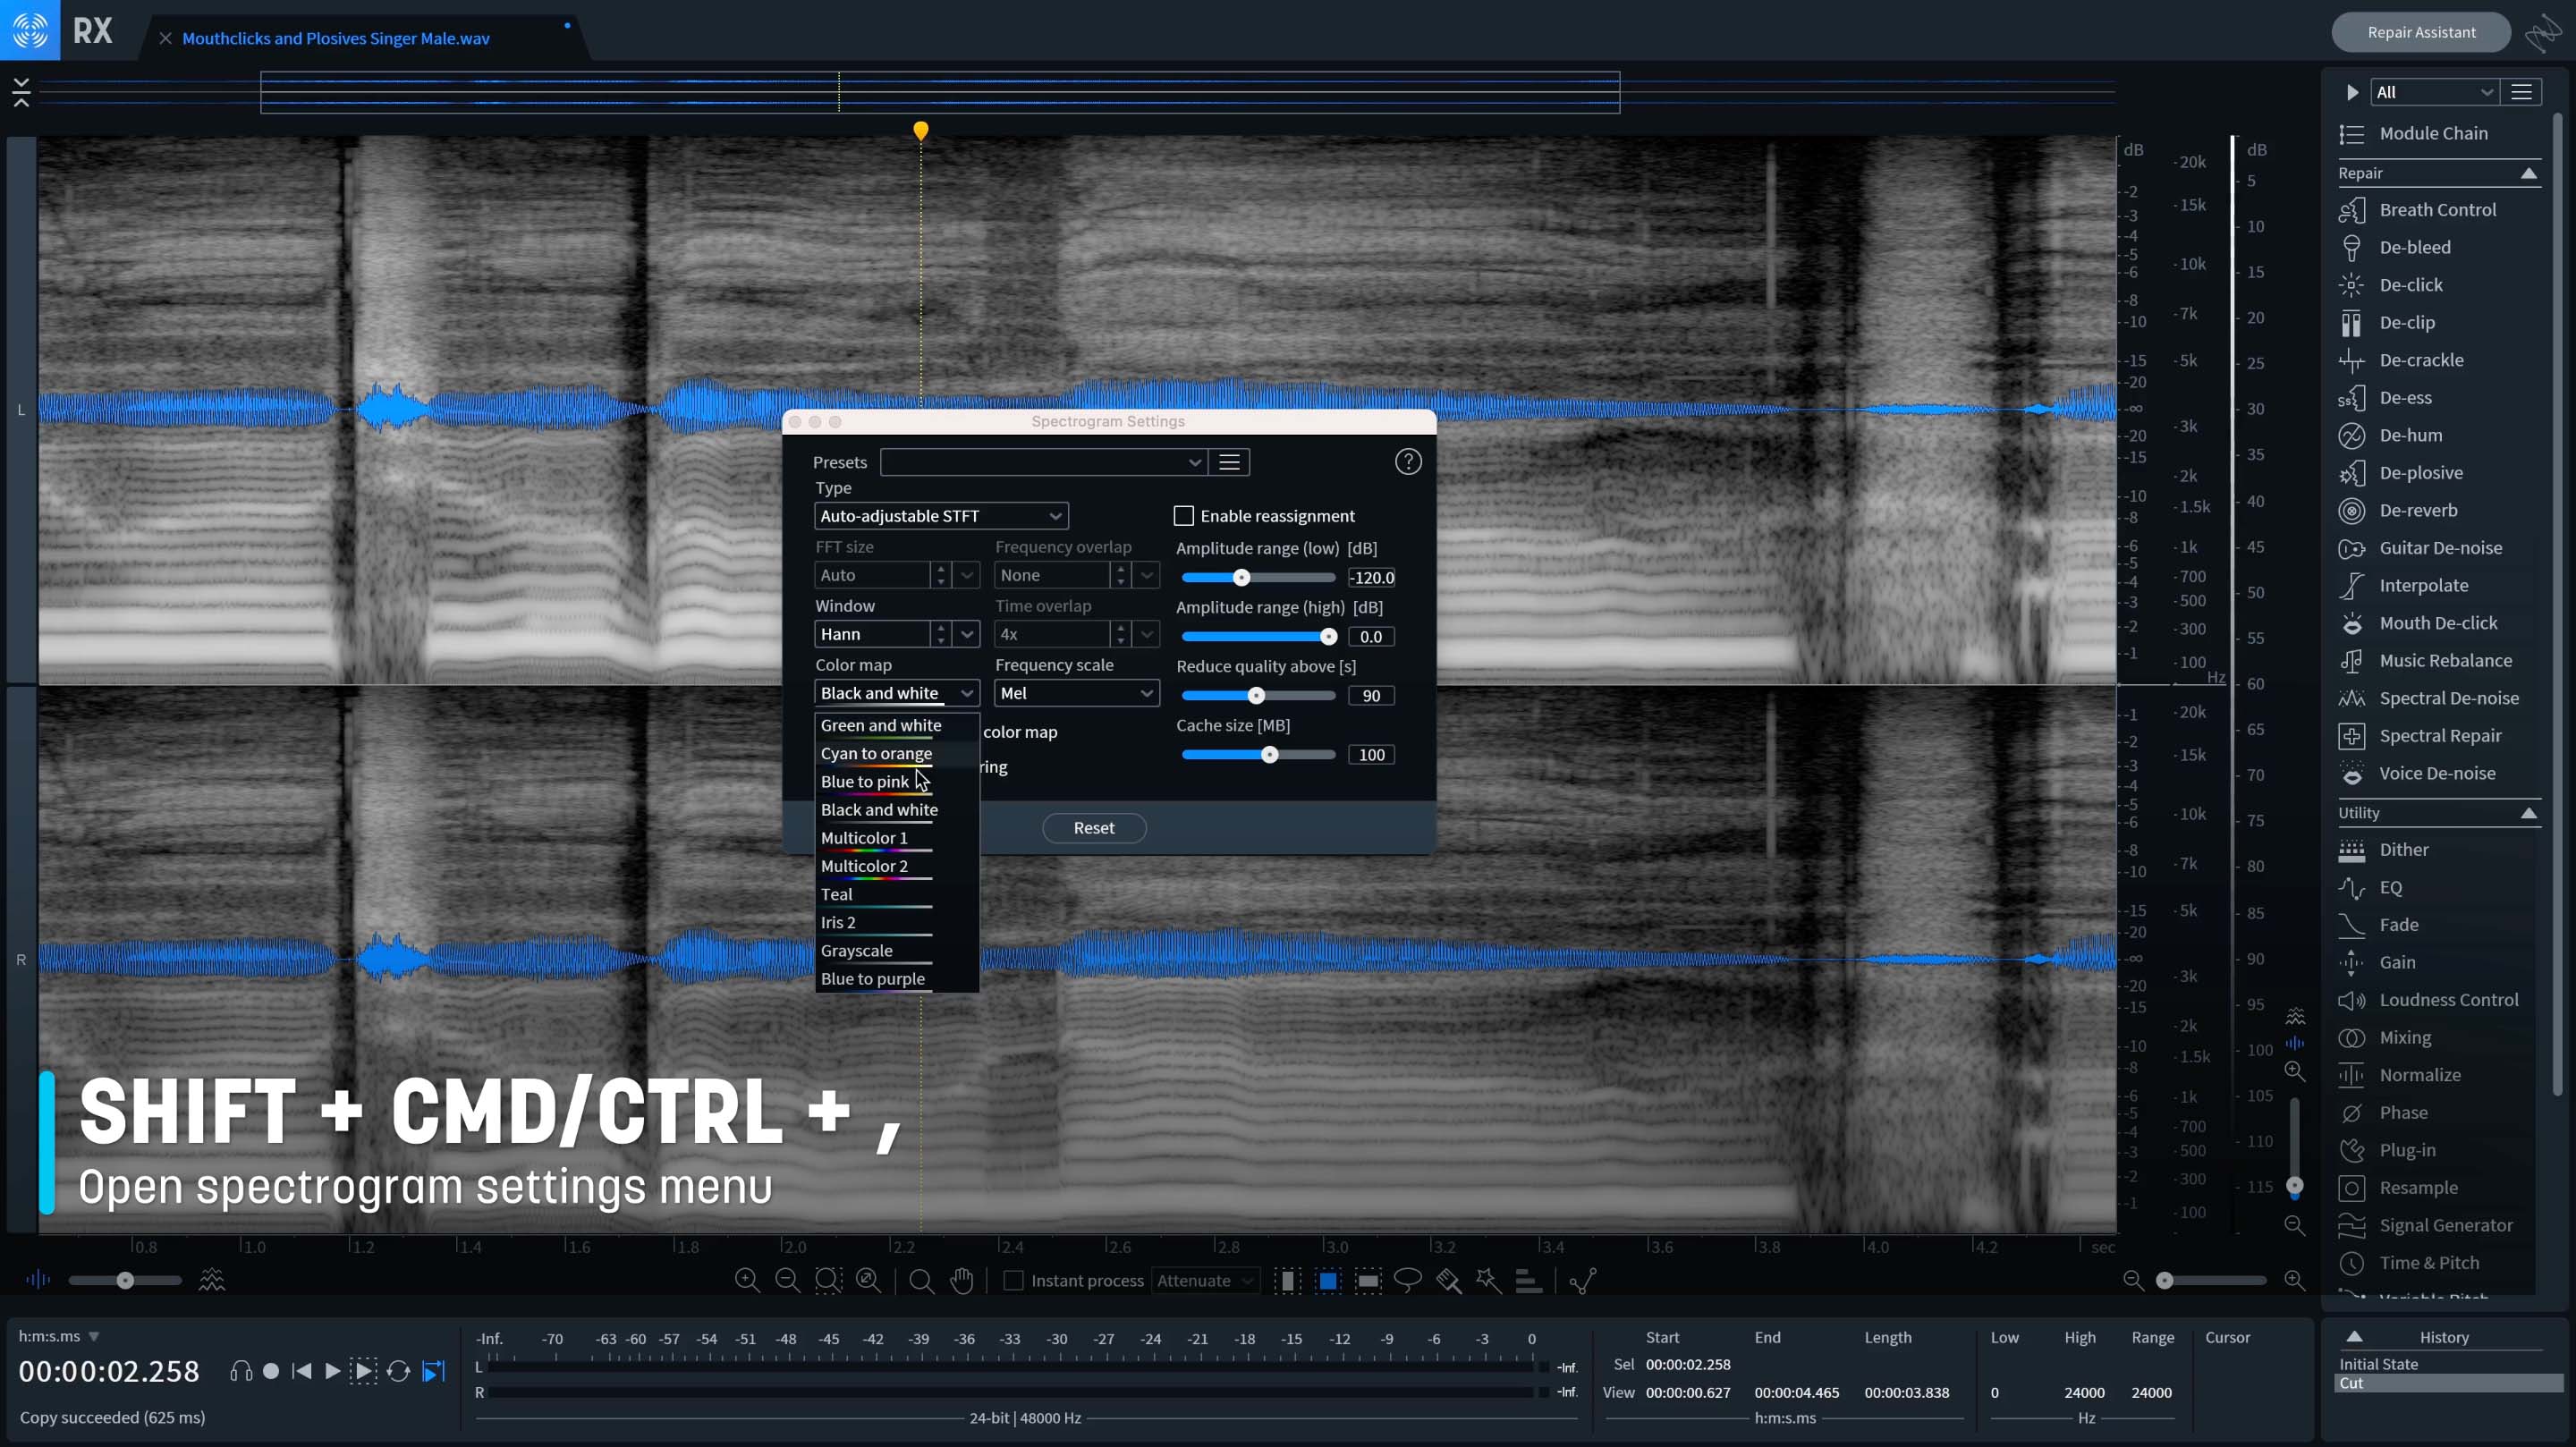
Alter aspects of the spectrogram’s colormap and type of calculation algorithm by pressing shift, command or control, and comma
Here you can change the color map, which might help you see problems a little better. You can also change the spectrogram calculation type which has implications for the visualization of audio. As you move between algorithms, you might find that one works better than another for the problems that you're working on. You can even sharpen the spectrogram with the reassignment box.
5. Invert selection
Sometimes you want to capture just the noise profile of something so that you could later subtract it from that sound source. Let's say you're trying to get rid of HVAC sound on a vocal or sound effect, but you might not have a clean one to two seconds of just noise that you need to pull from for a learning pass. If that ever happens, there’s a hidden feature called Invert Selection to make this task very easy.
Imagine you have a sample you'd like to extract a fingerprint of noise from, and you don't have prolonged noise for a learn pass with a module like Spectral Den-oise or Voice De-noise. Start by selecting the fundamental frequency with the magic wand tool. With the fundamental selected, press shift and click again to have RX mathematically estimate where the rest of the harmonics are and select them as well.
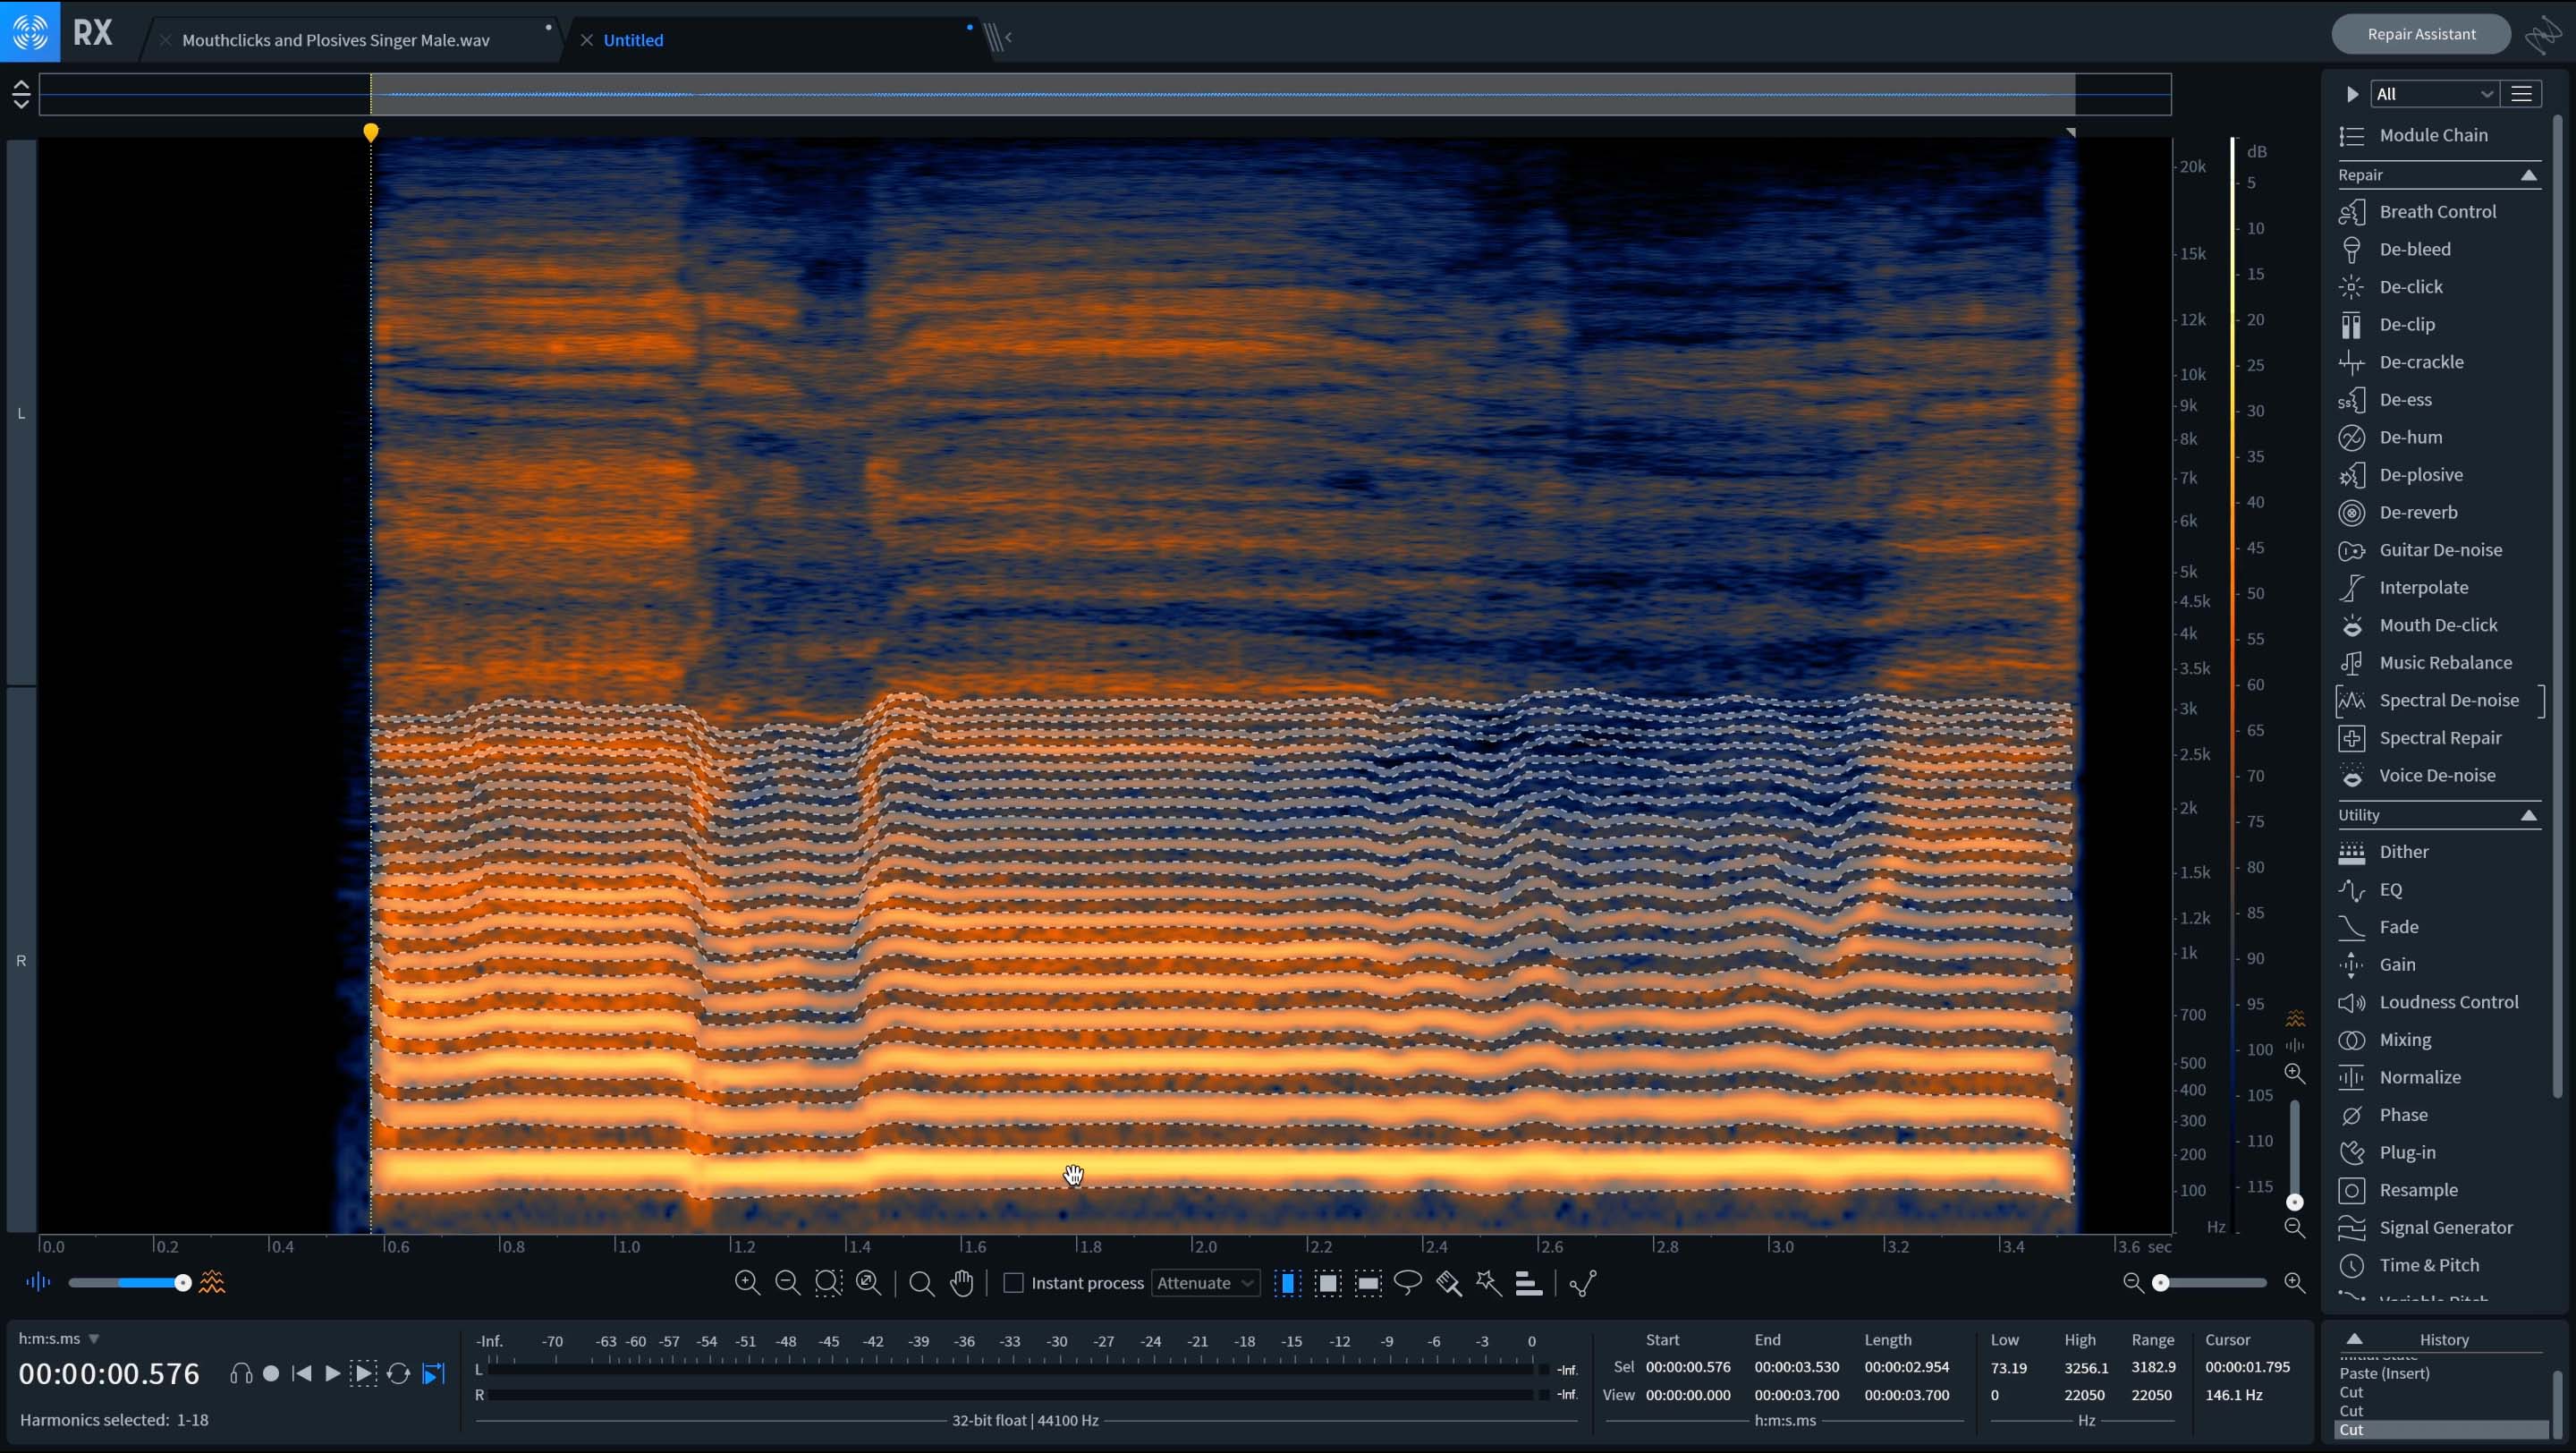
Select the fundamental frequency and then press shift and click again to have RX estimate where the rest of the harmonics are for selection
Now by pressing shift command (or control) and i, it will invert the selection completely. This means we flip the selection preferences, targeting everything that was unselected earlier.
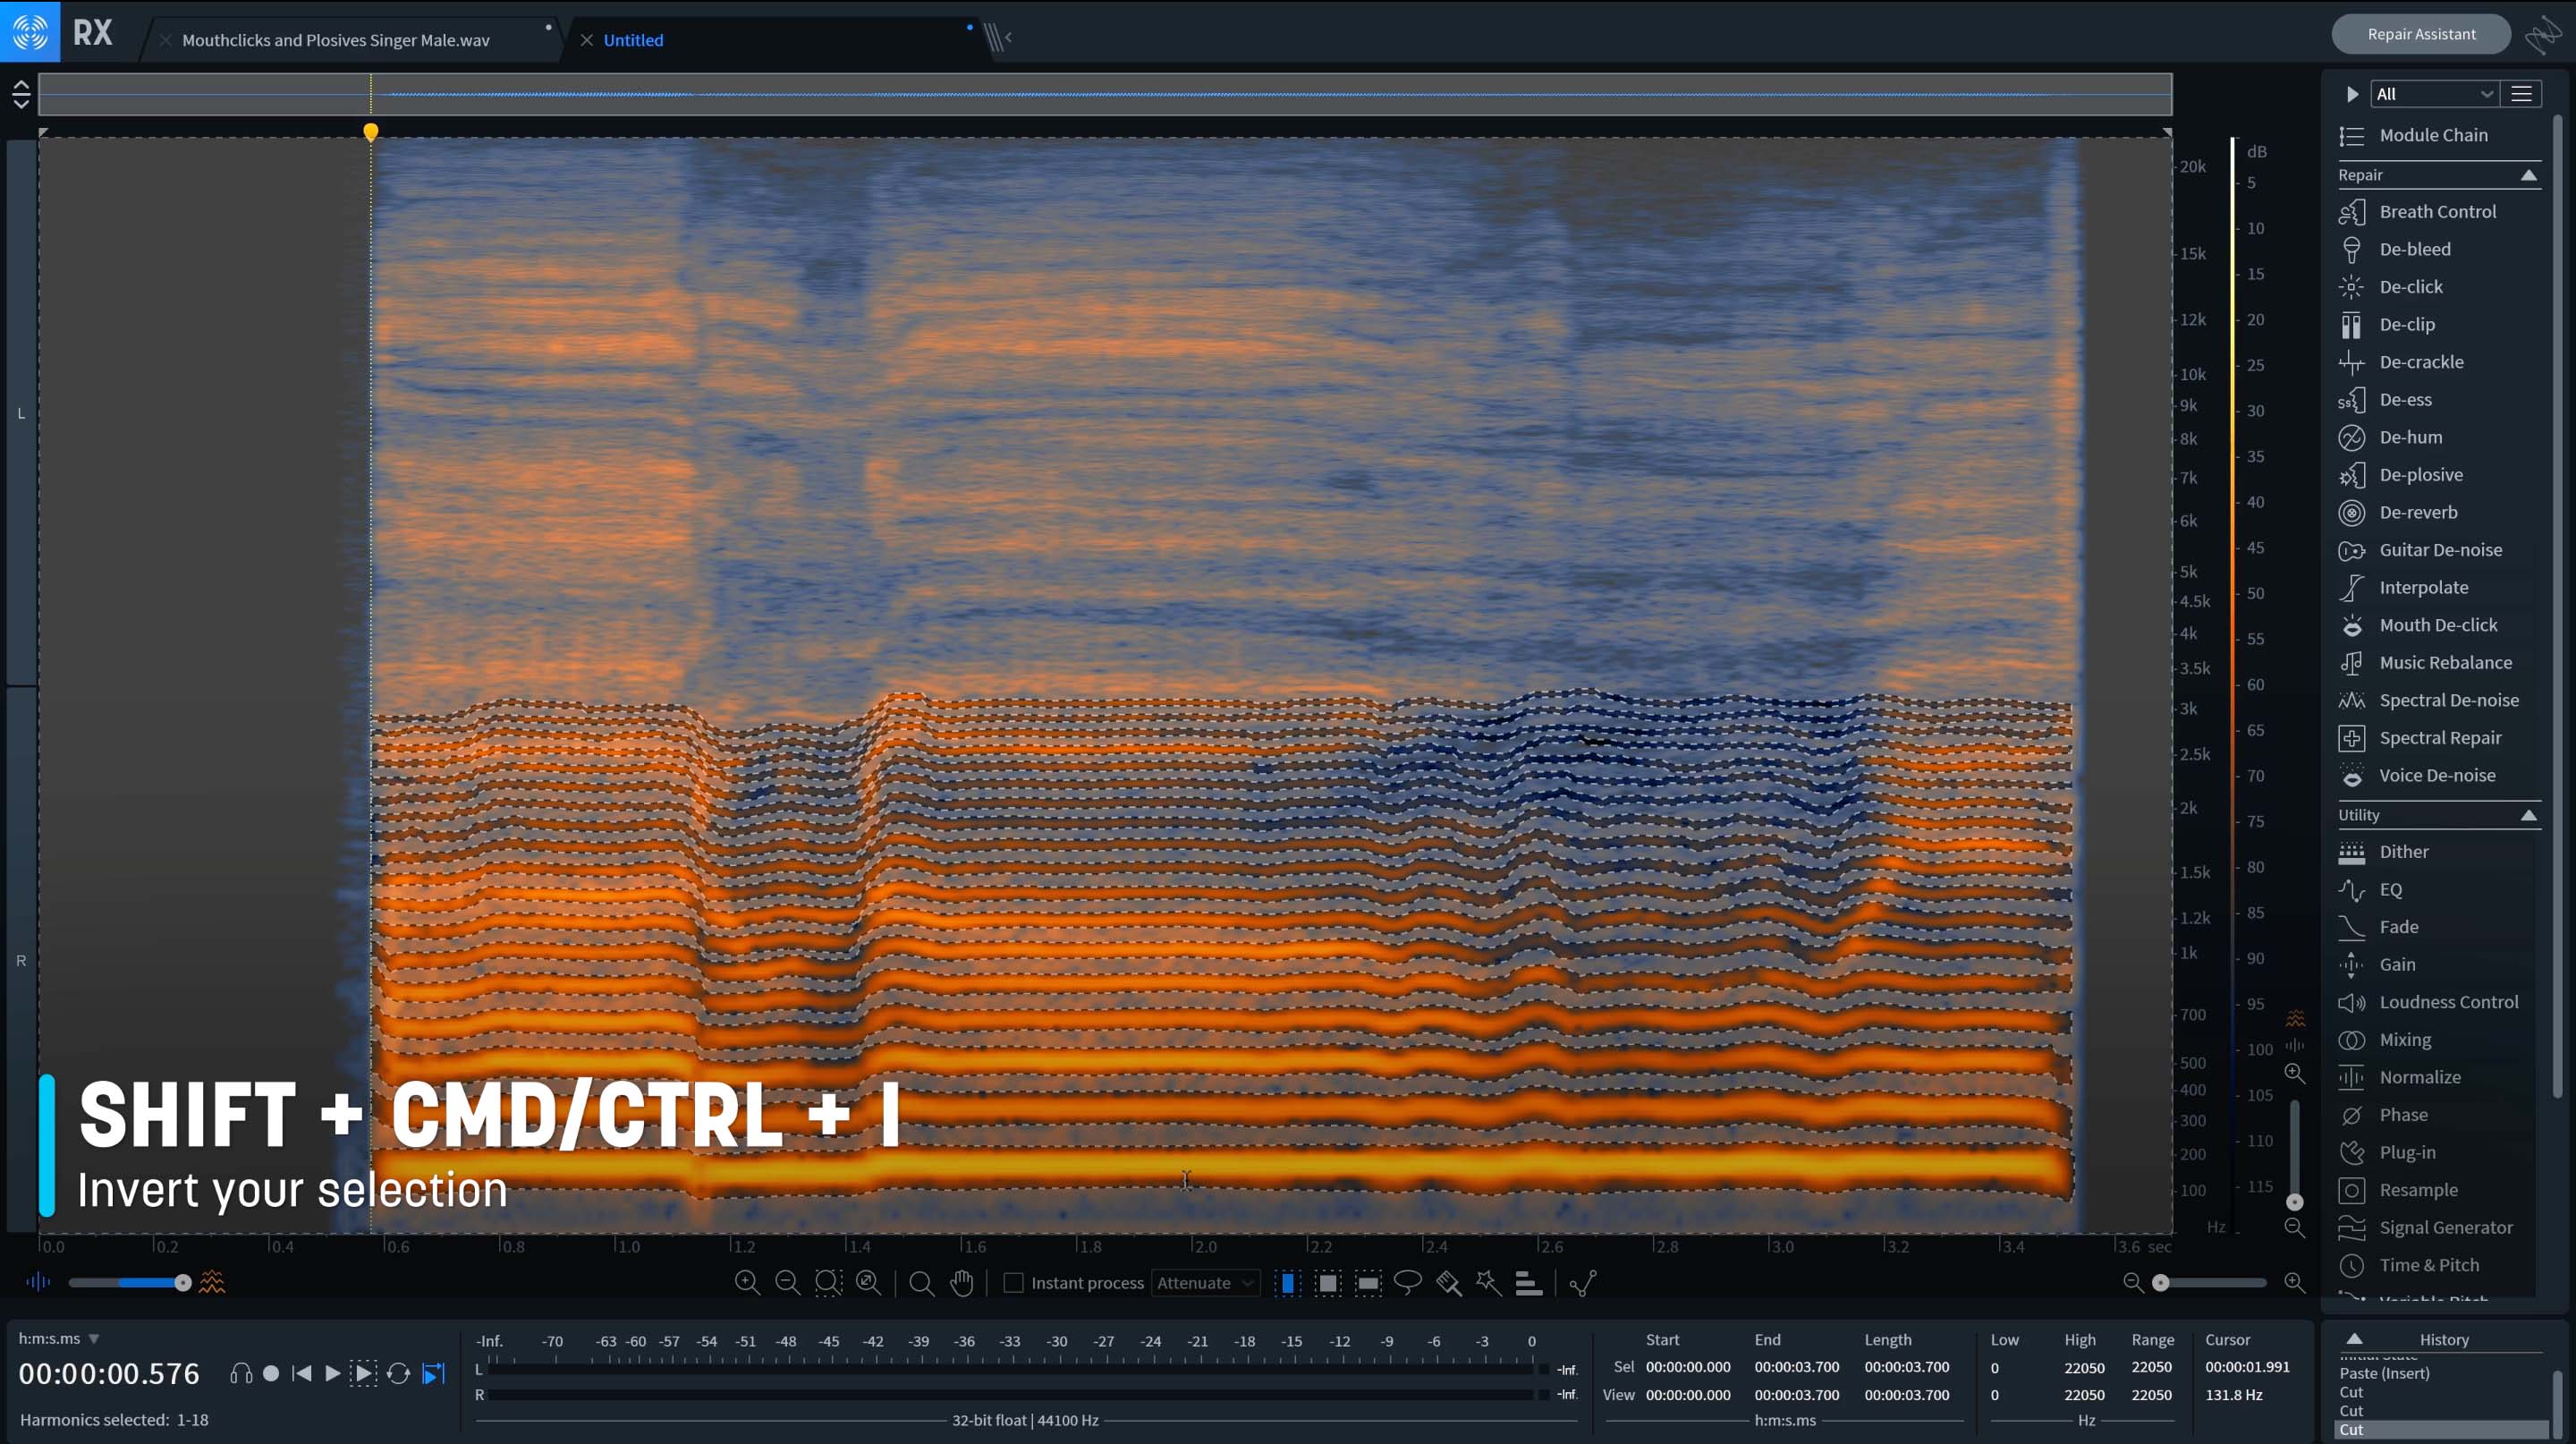
Pressing shift command (or control) and i will invert the selection completely, allowing you to focus on the noise profile in RX
Now you’re largely omitting the harmonics and focusing on just the noise profile. And from here, you can refine your selection with some manual moves, perhaps using some hidden feature controls that were shared earlier, like the option alt up and down scroll to select, and build out a more complete noise profile. When you’re ready, you can input this profile into a module like Spectral De-noise so it can learn and then subtract the noise from the tonal, useful sonic information.
6. Instant process
This next hidden feature is probably most useful for people doing repetitive tasks like removing kick drum squeak or environmental noise that's interfering in a repetitive way with your all-important audio.
Instant Process is designed for people who undertake repetitive tasks that happen over and over across the performance. Take this kick drum squeak. Now instead of opening up a tool like Spectral Repair's attenuate, using a brush tool, and then selecting, and then pressing render over and over, and over, why not turn on Instant Process, then find attenuate? Now you can make a selection, and when you let go of your mouse, your processing is rendered.
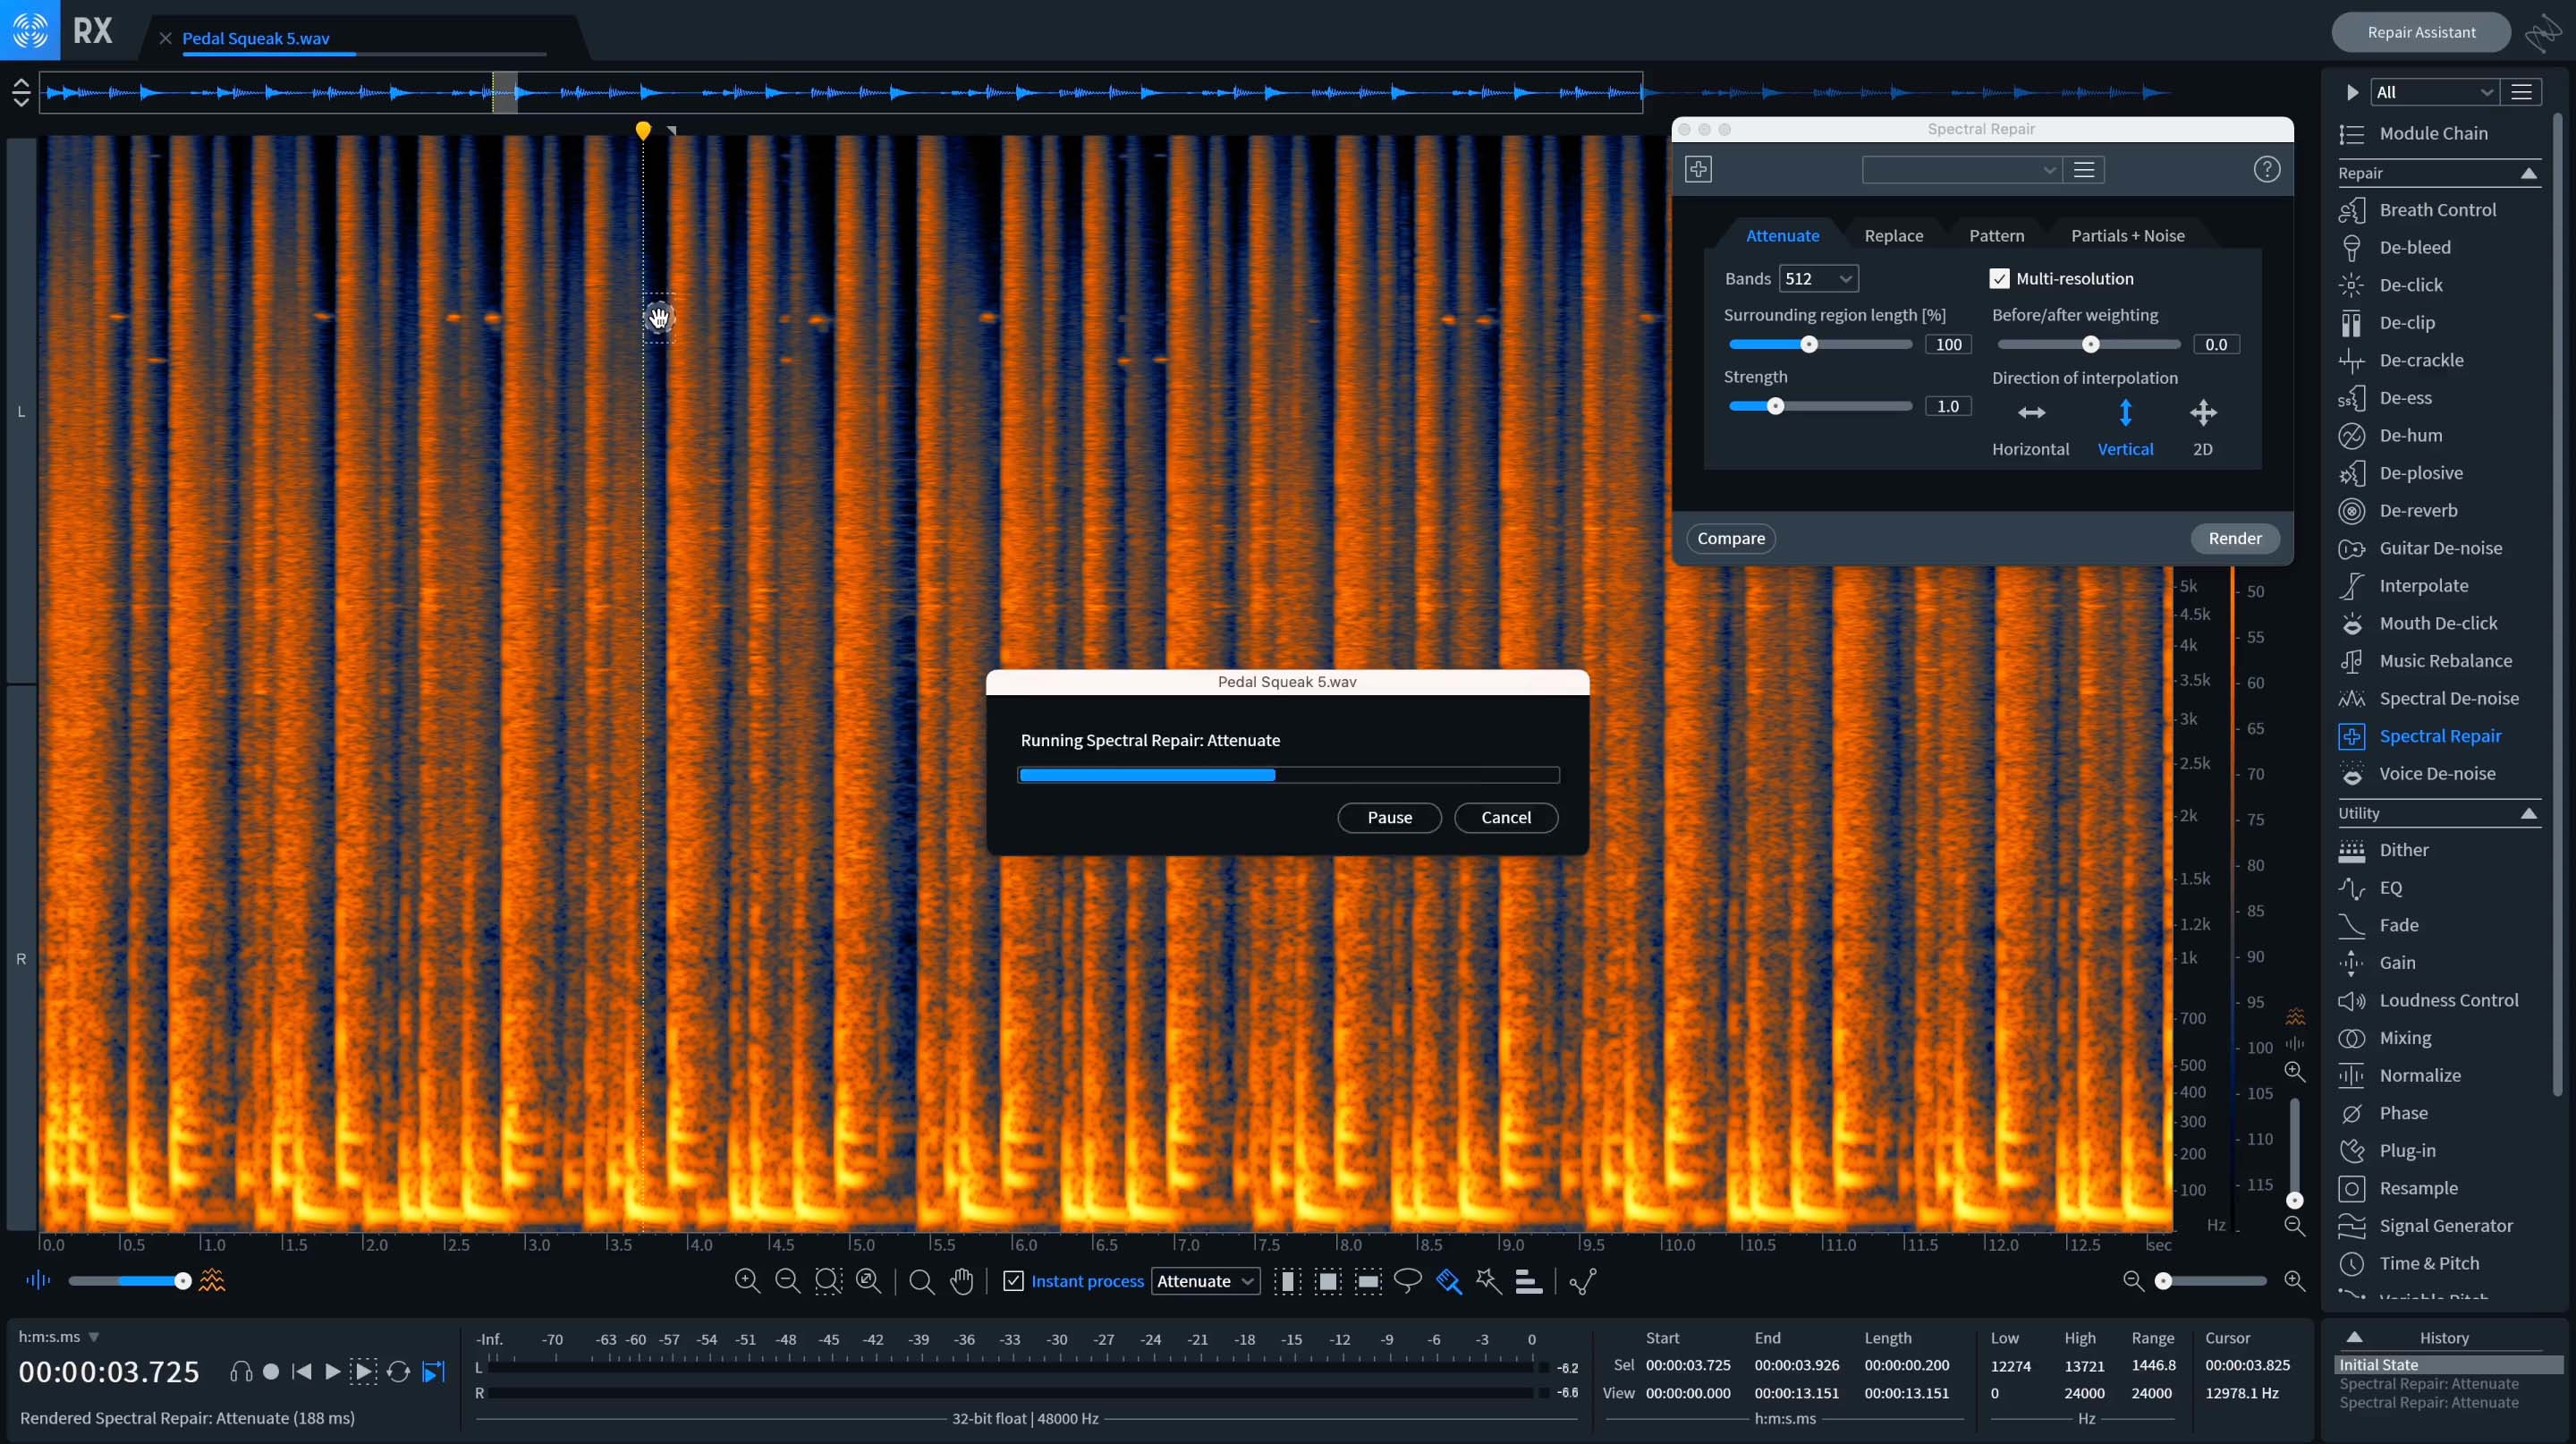
Instant processing allows you to make a selection, and when you let go of the mouse, the processing is rendered
You can control a number of other popular modules here too, like De-click, Fade, Gain, and Replace, which is another tab alongside the attenuate tab in the Spectral Repair module.
7. Targeting frequencies with the Module Chain
The Module Chain in RX Pro for Music is a massive time saver for people who work on repetitive audio problems that either come from the same singer or the same sound source. But what people don't realize is that you have control right down to the frequency range for how you want to process the audio in the Module Chain.
Once you've set up your module chain, you'll see an icon. This will allow you to target the processing of the module to only affect the frequency range of your choosing. This can help prevent over-processing your samples by focusing the processing only where it needs to be.
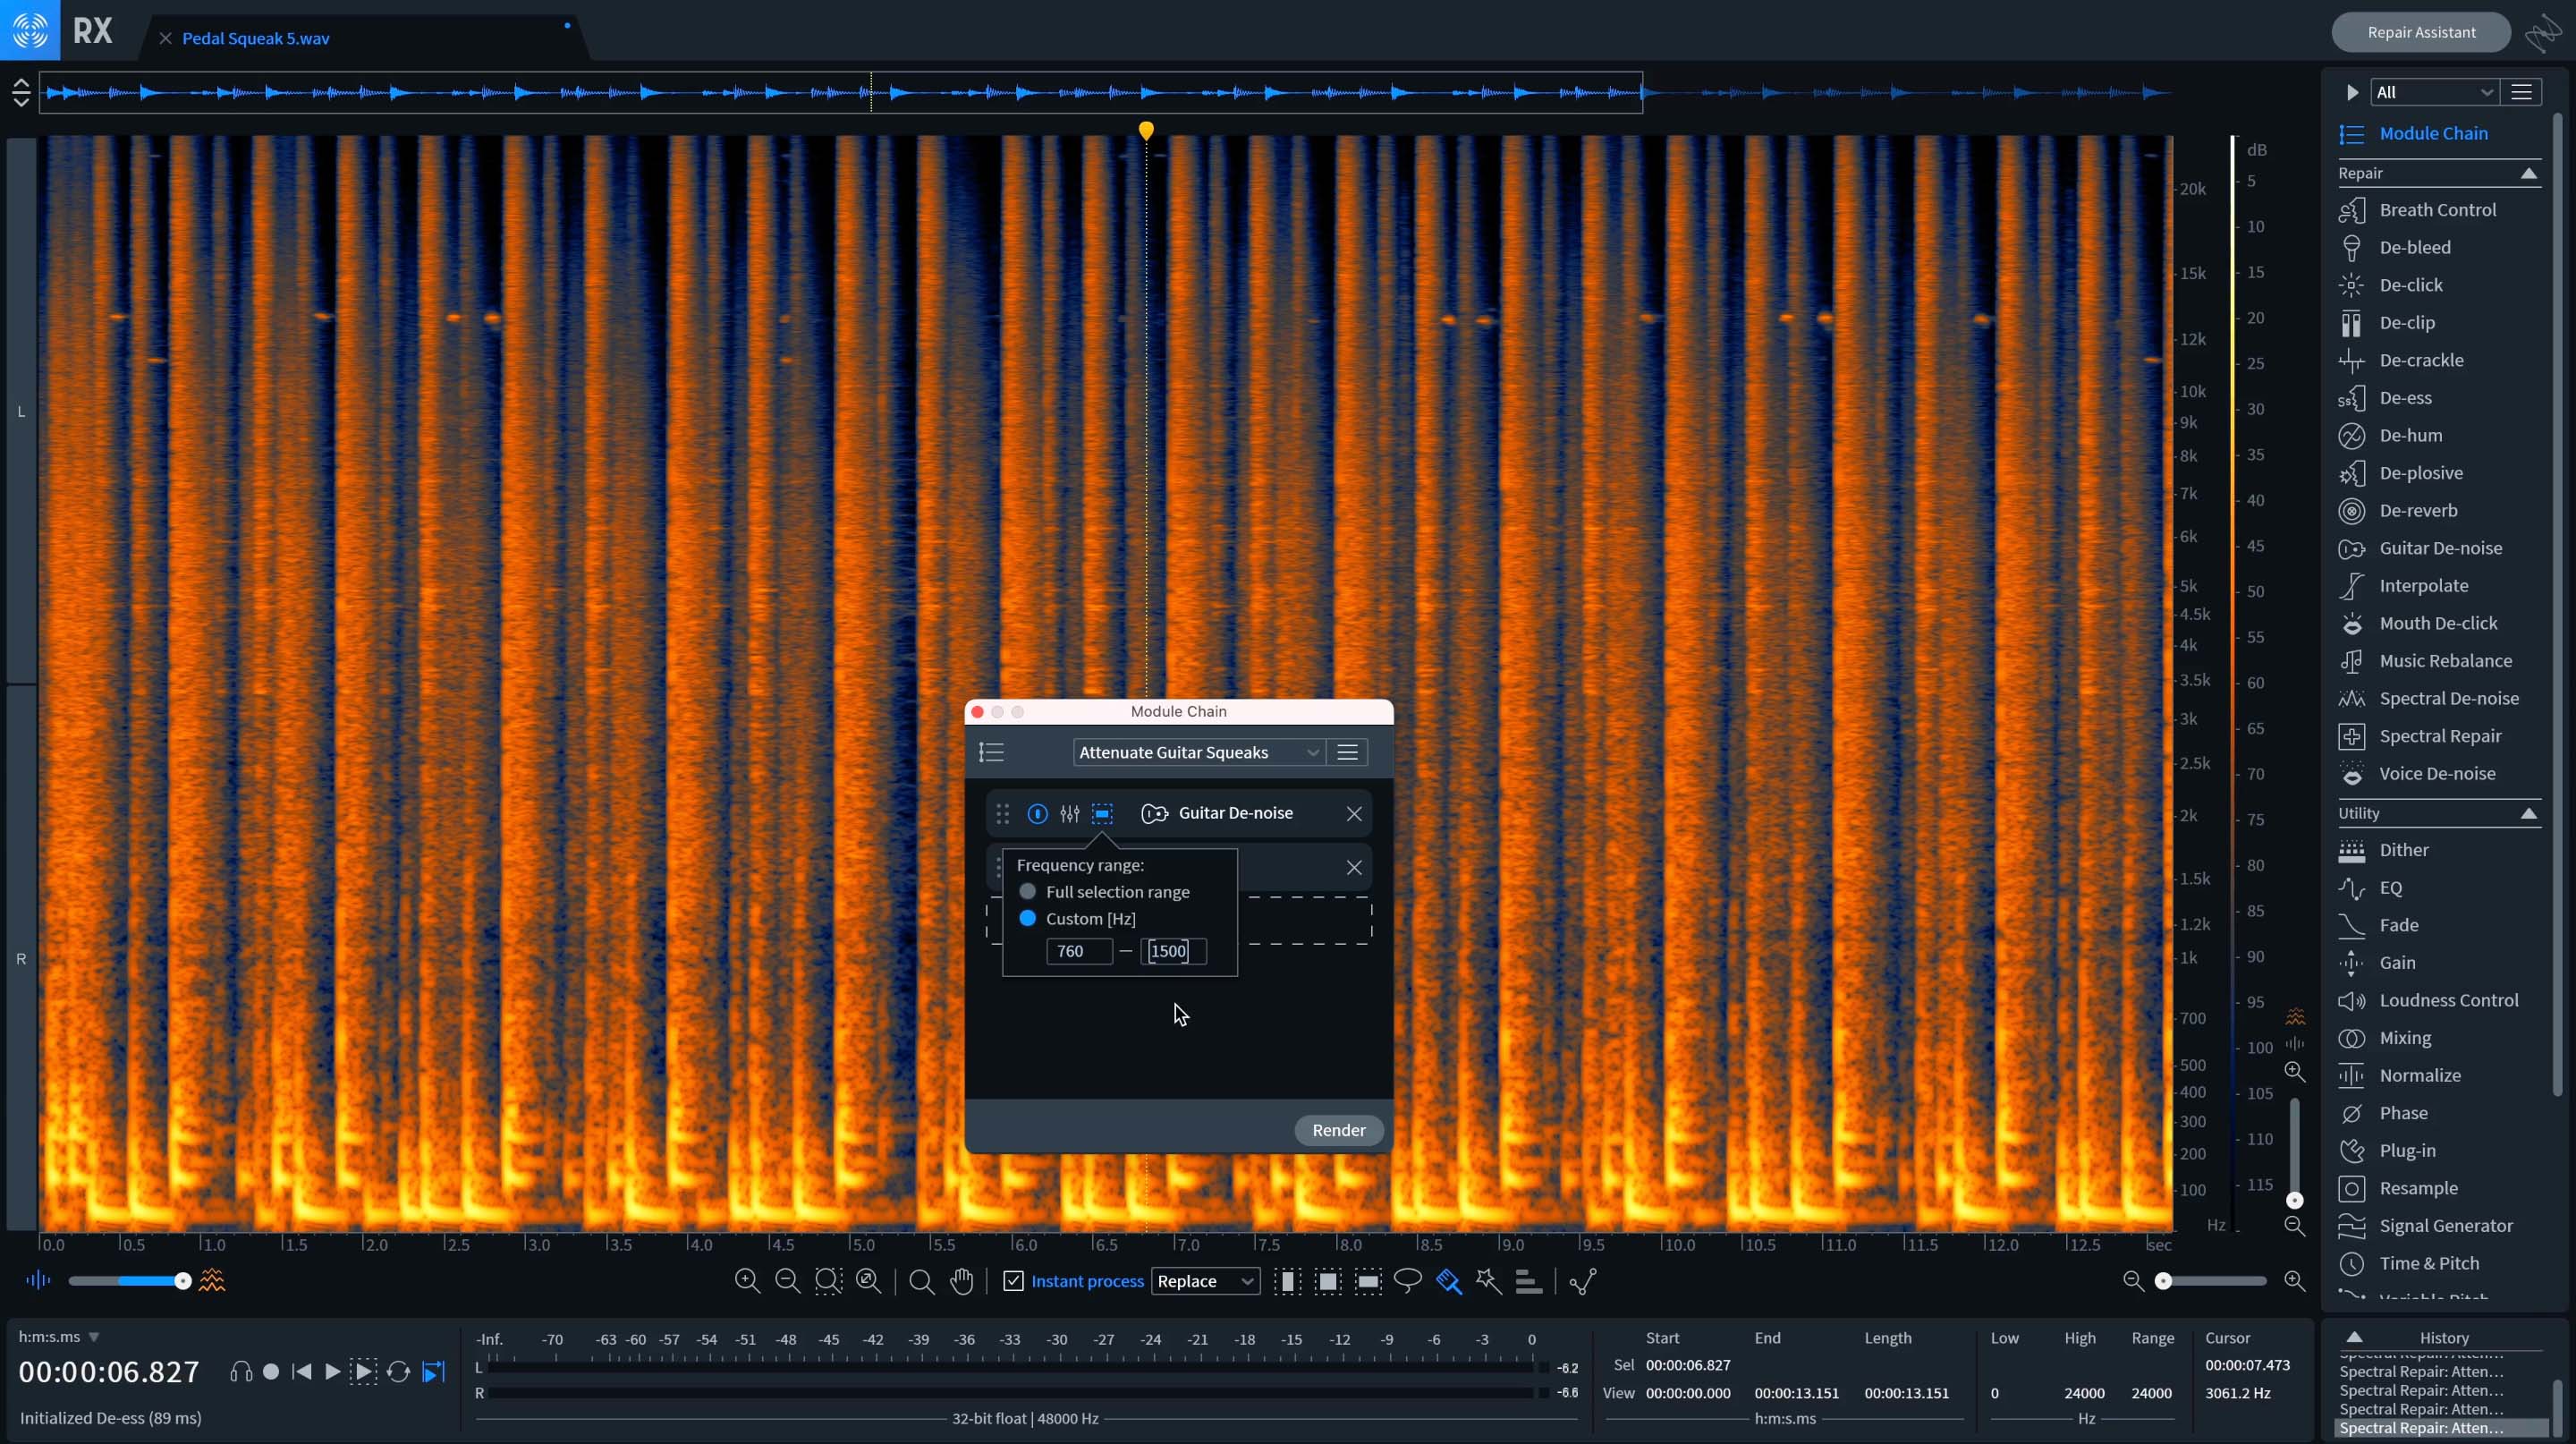
With Module Chain, prevent over-processing your samples by focusing the processing only where it needs to be
8. Prevent MP3 clipping
The export menu in RX offers a variety of options for people looking to export their audio into different formats. For those exporting MP3s, there's some helpful options to protect against codec clipping when encoding to lossy formats. Pressing command or control and e will call up the menu.
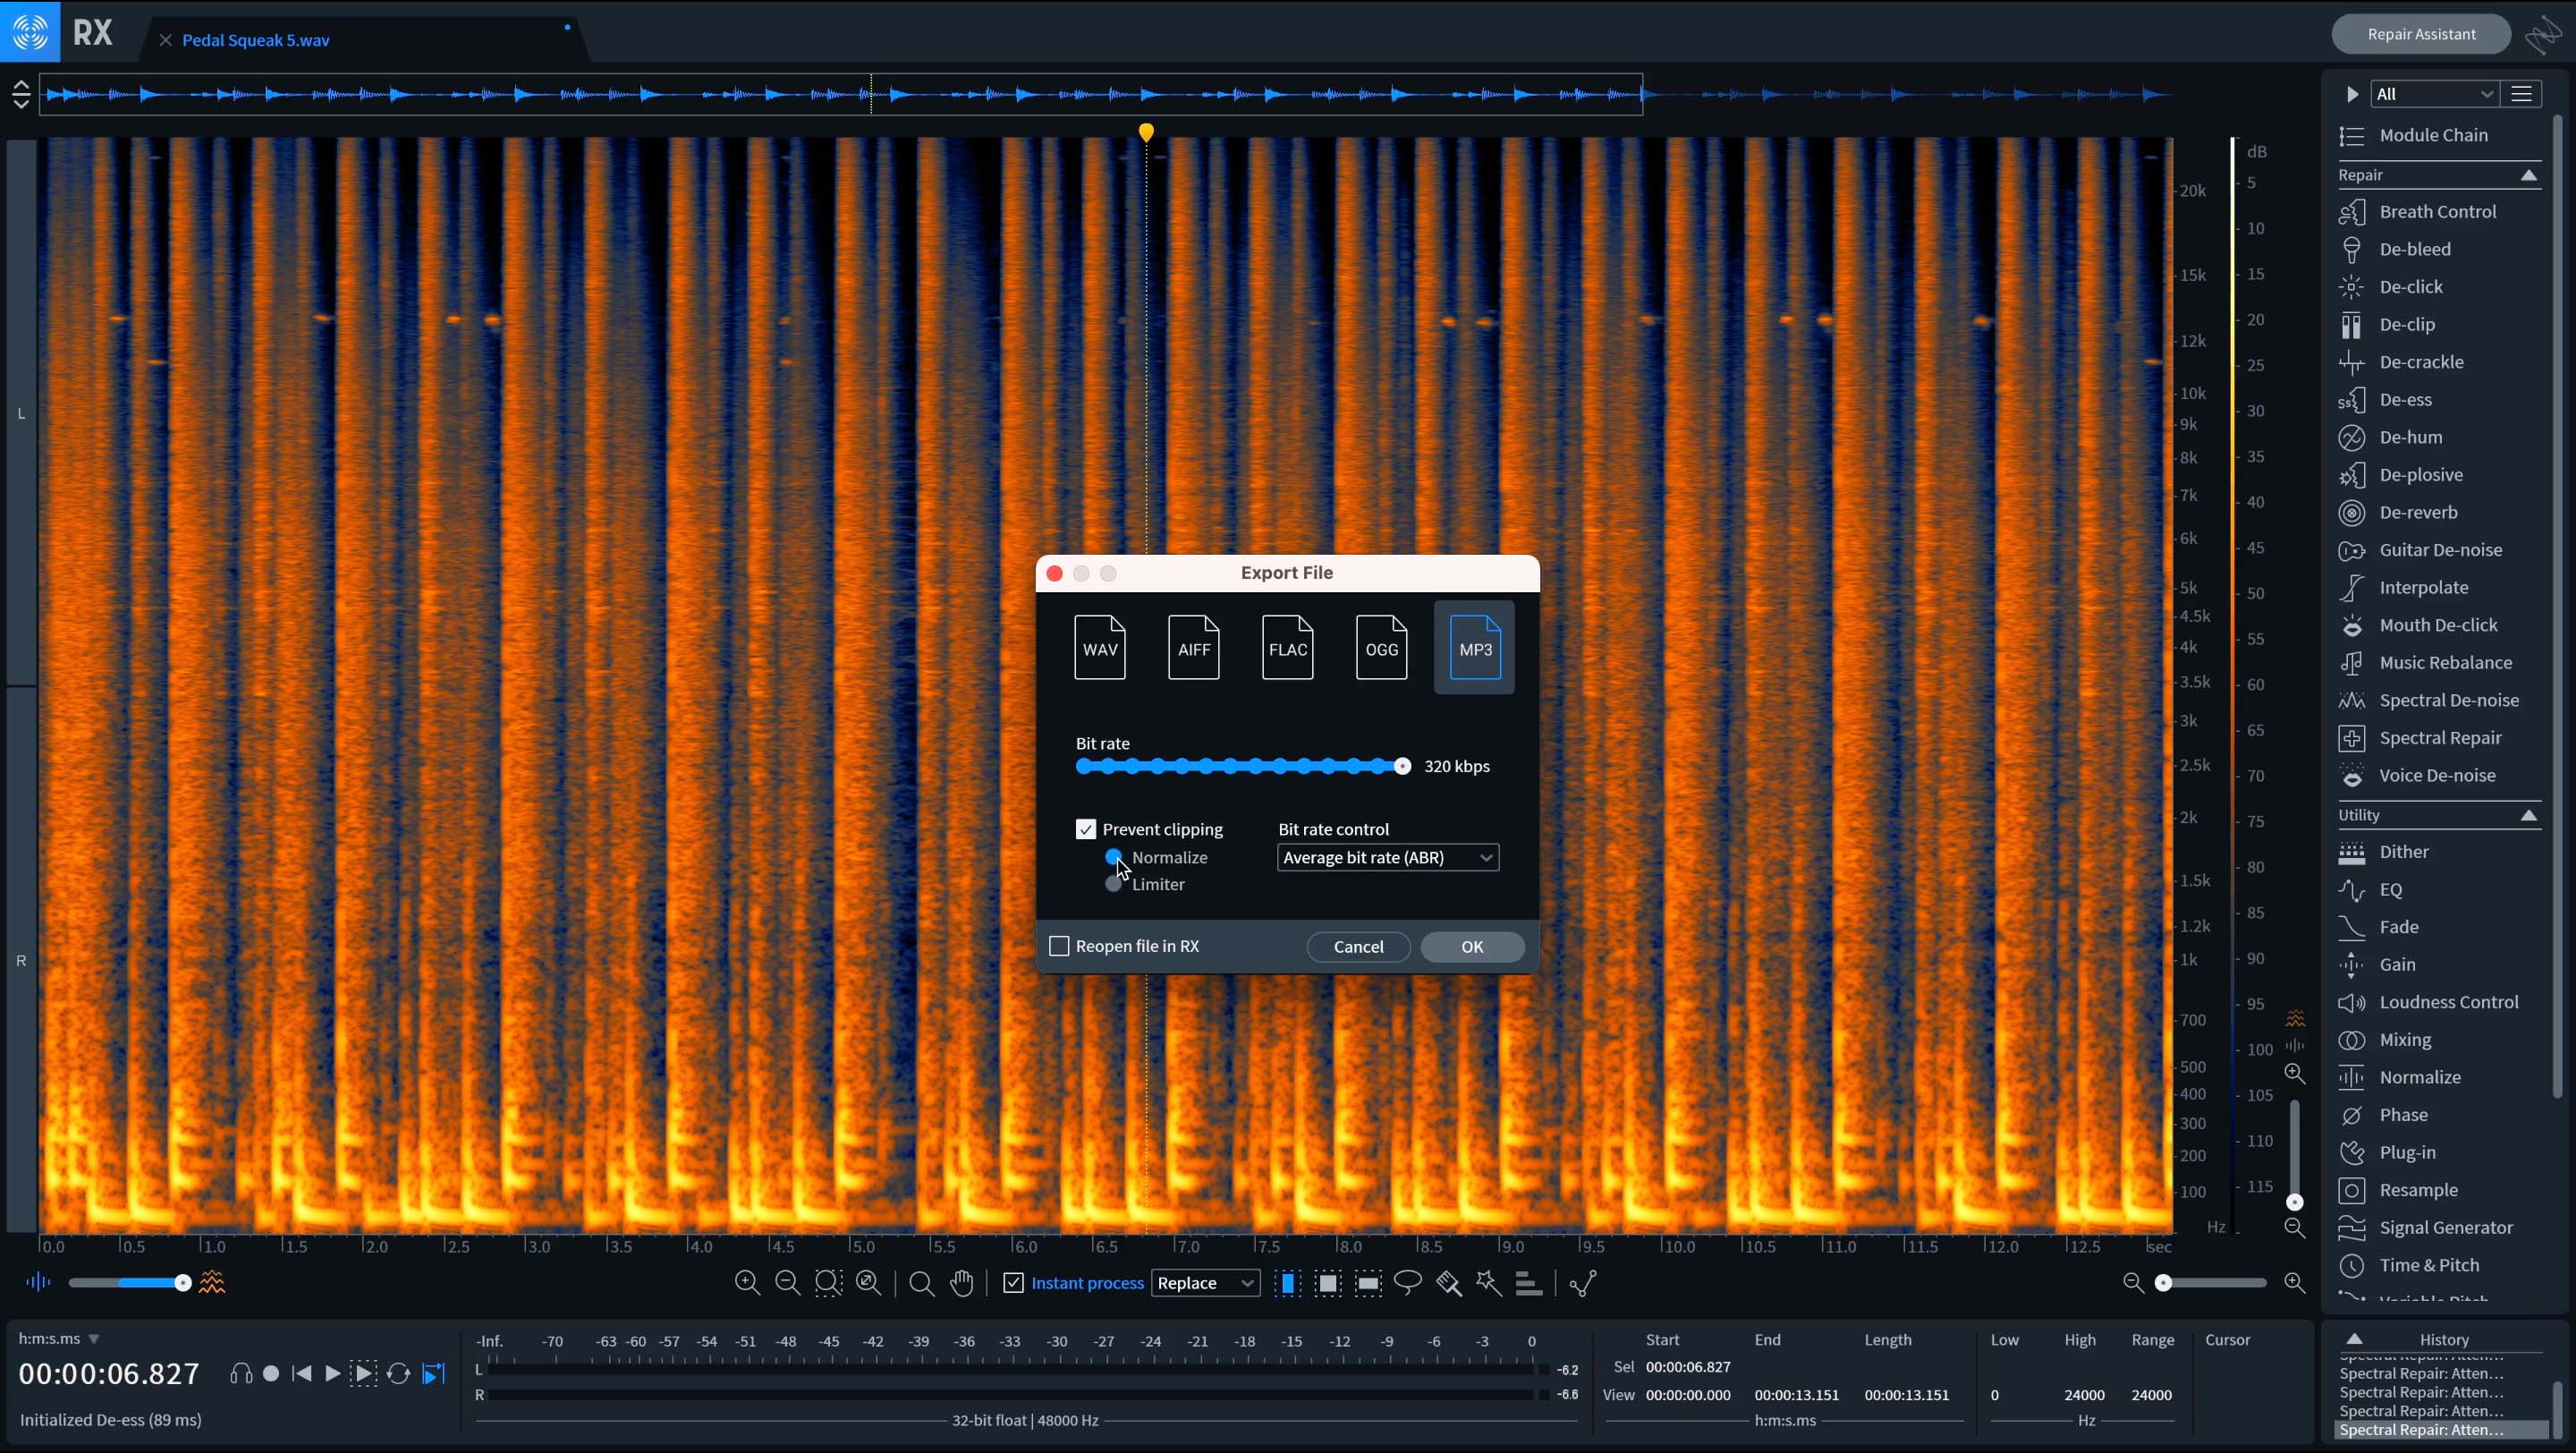
Prevent MP3 clipping with the export options in RX
From there, you'll see the MP3 option. In addition to the bit rate and bitrate control options, you can also prevent clipping. There are two options here. You can use normalize, which, if the signal surges above 1 dB true peak, it'll be attenuated to 0 dB to peak, or you can choose the limiter. This will limit encoding surges with a 0 dB peak ceiling.
9. Extra stereo screen space
Many people repair stereo tracks in RX, and when they do that, they will see the left and right channels sandwiched on top of each other. But some people want a bit more screen space to really see the full spectrum of information, while also editing things simultaneously across left and right channels.
Here’s how to get the best of both worlds. You can see below that there is a stereo track loaded into the application window. And as you can see, by processing one channel, your moves are carried over to the other channel. But there isn’t a lot of screen real estate to work with because they're scaled in such a way to see both channels at the same time.
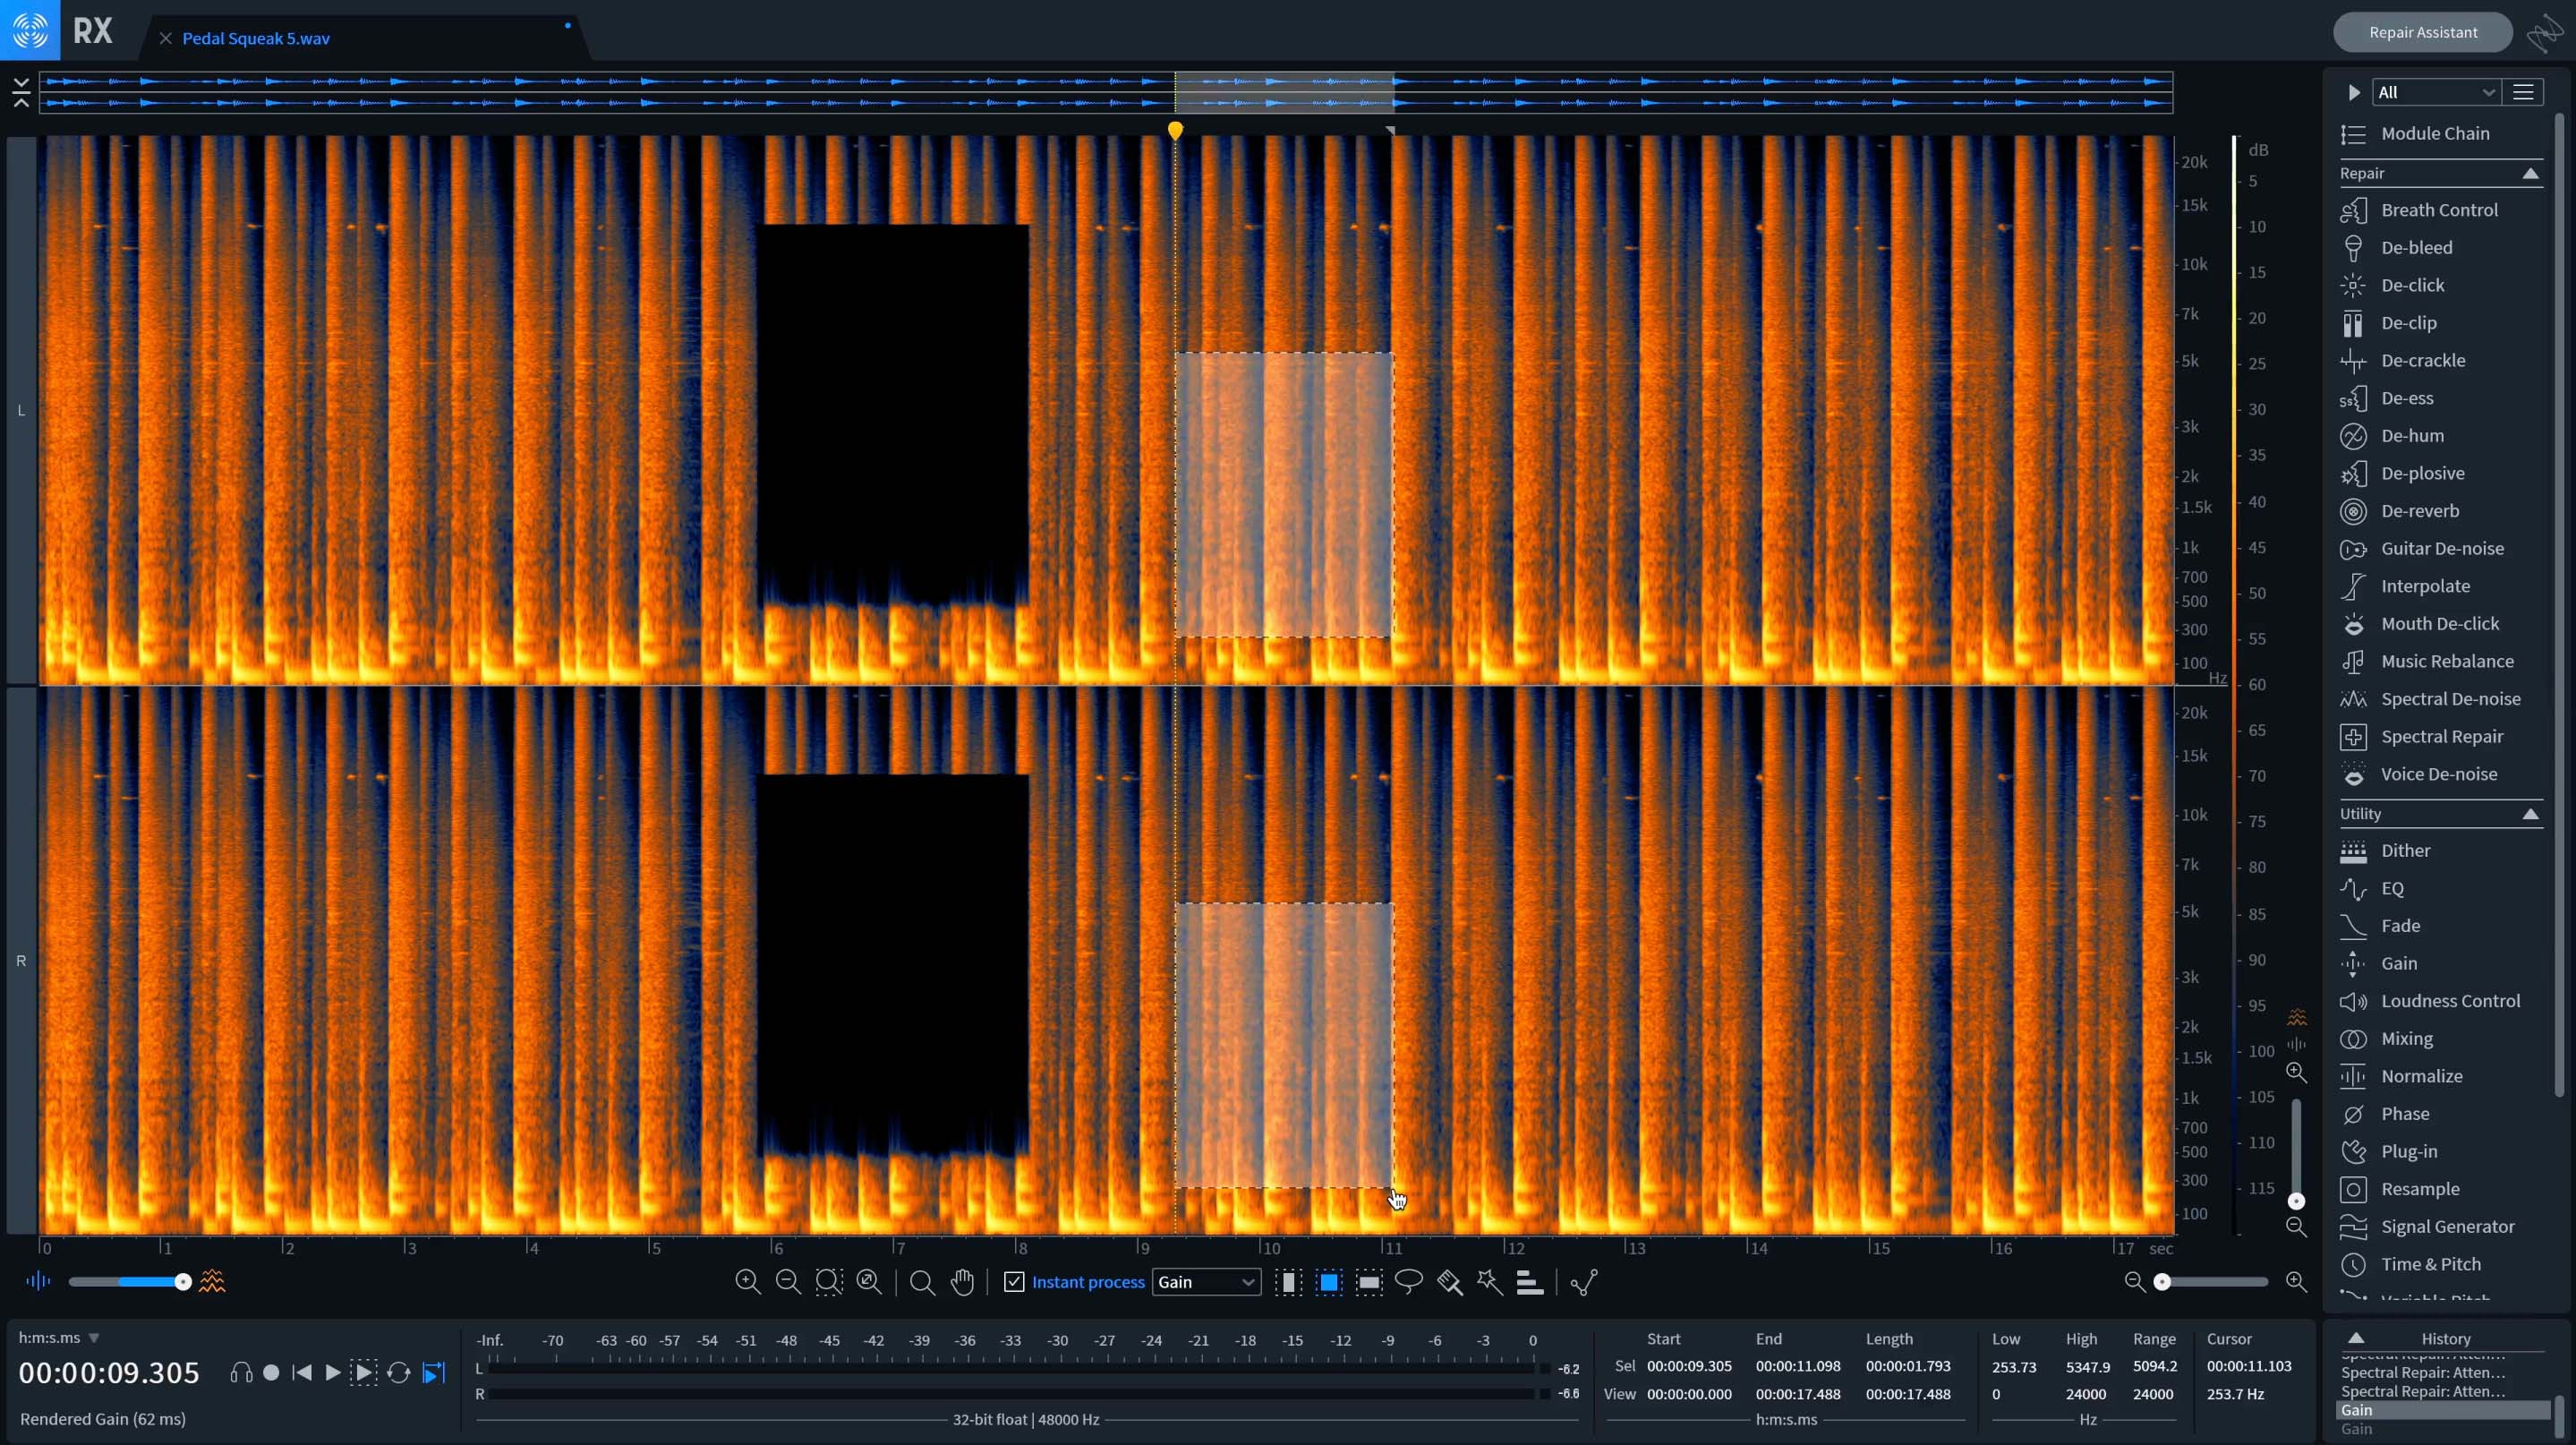
Repairing stereo tracks in RX Pro in its default view
You can fix that by pressing shift, command or control and c, and watch what happens. There is now a full view of stereo information.
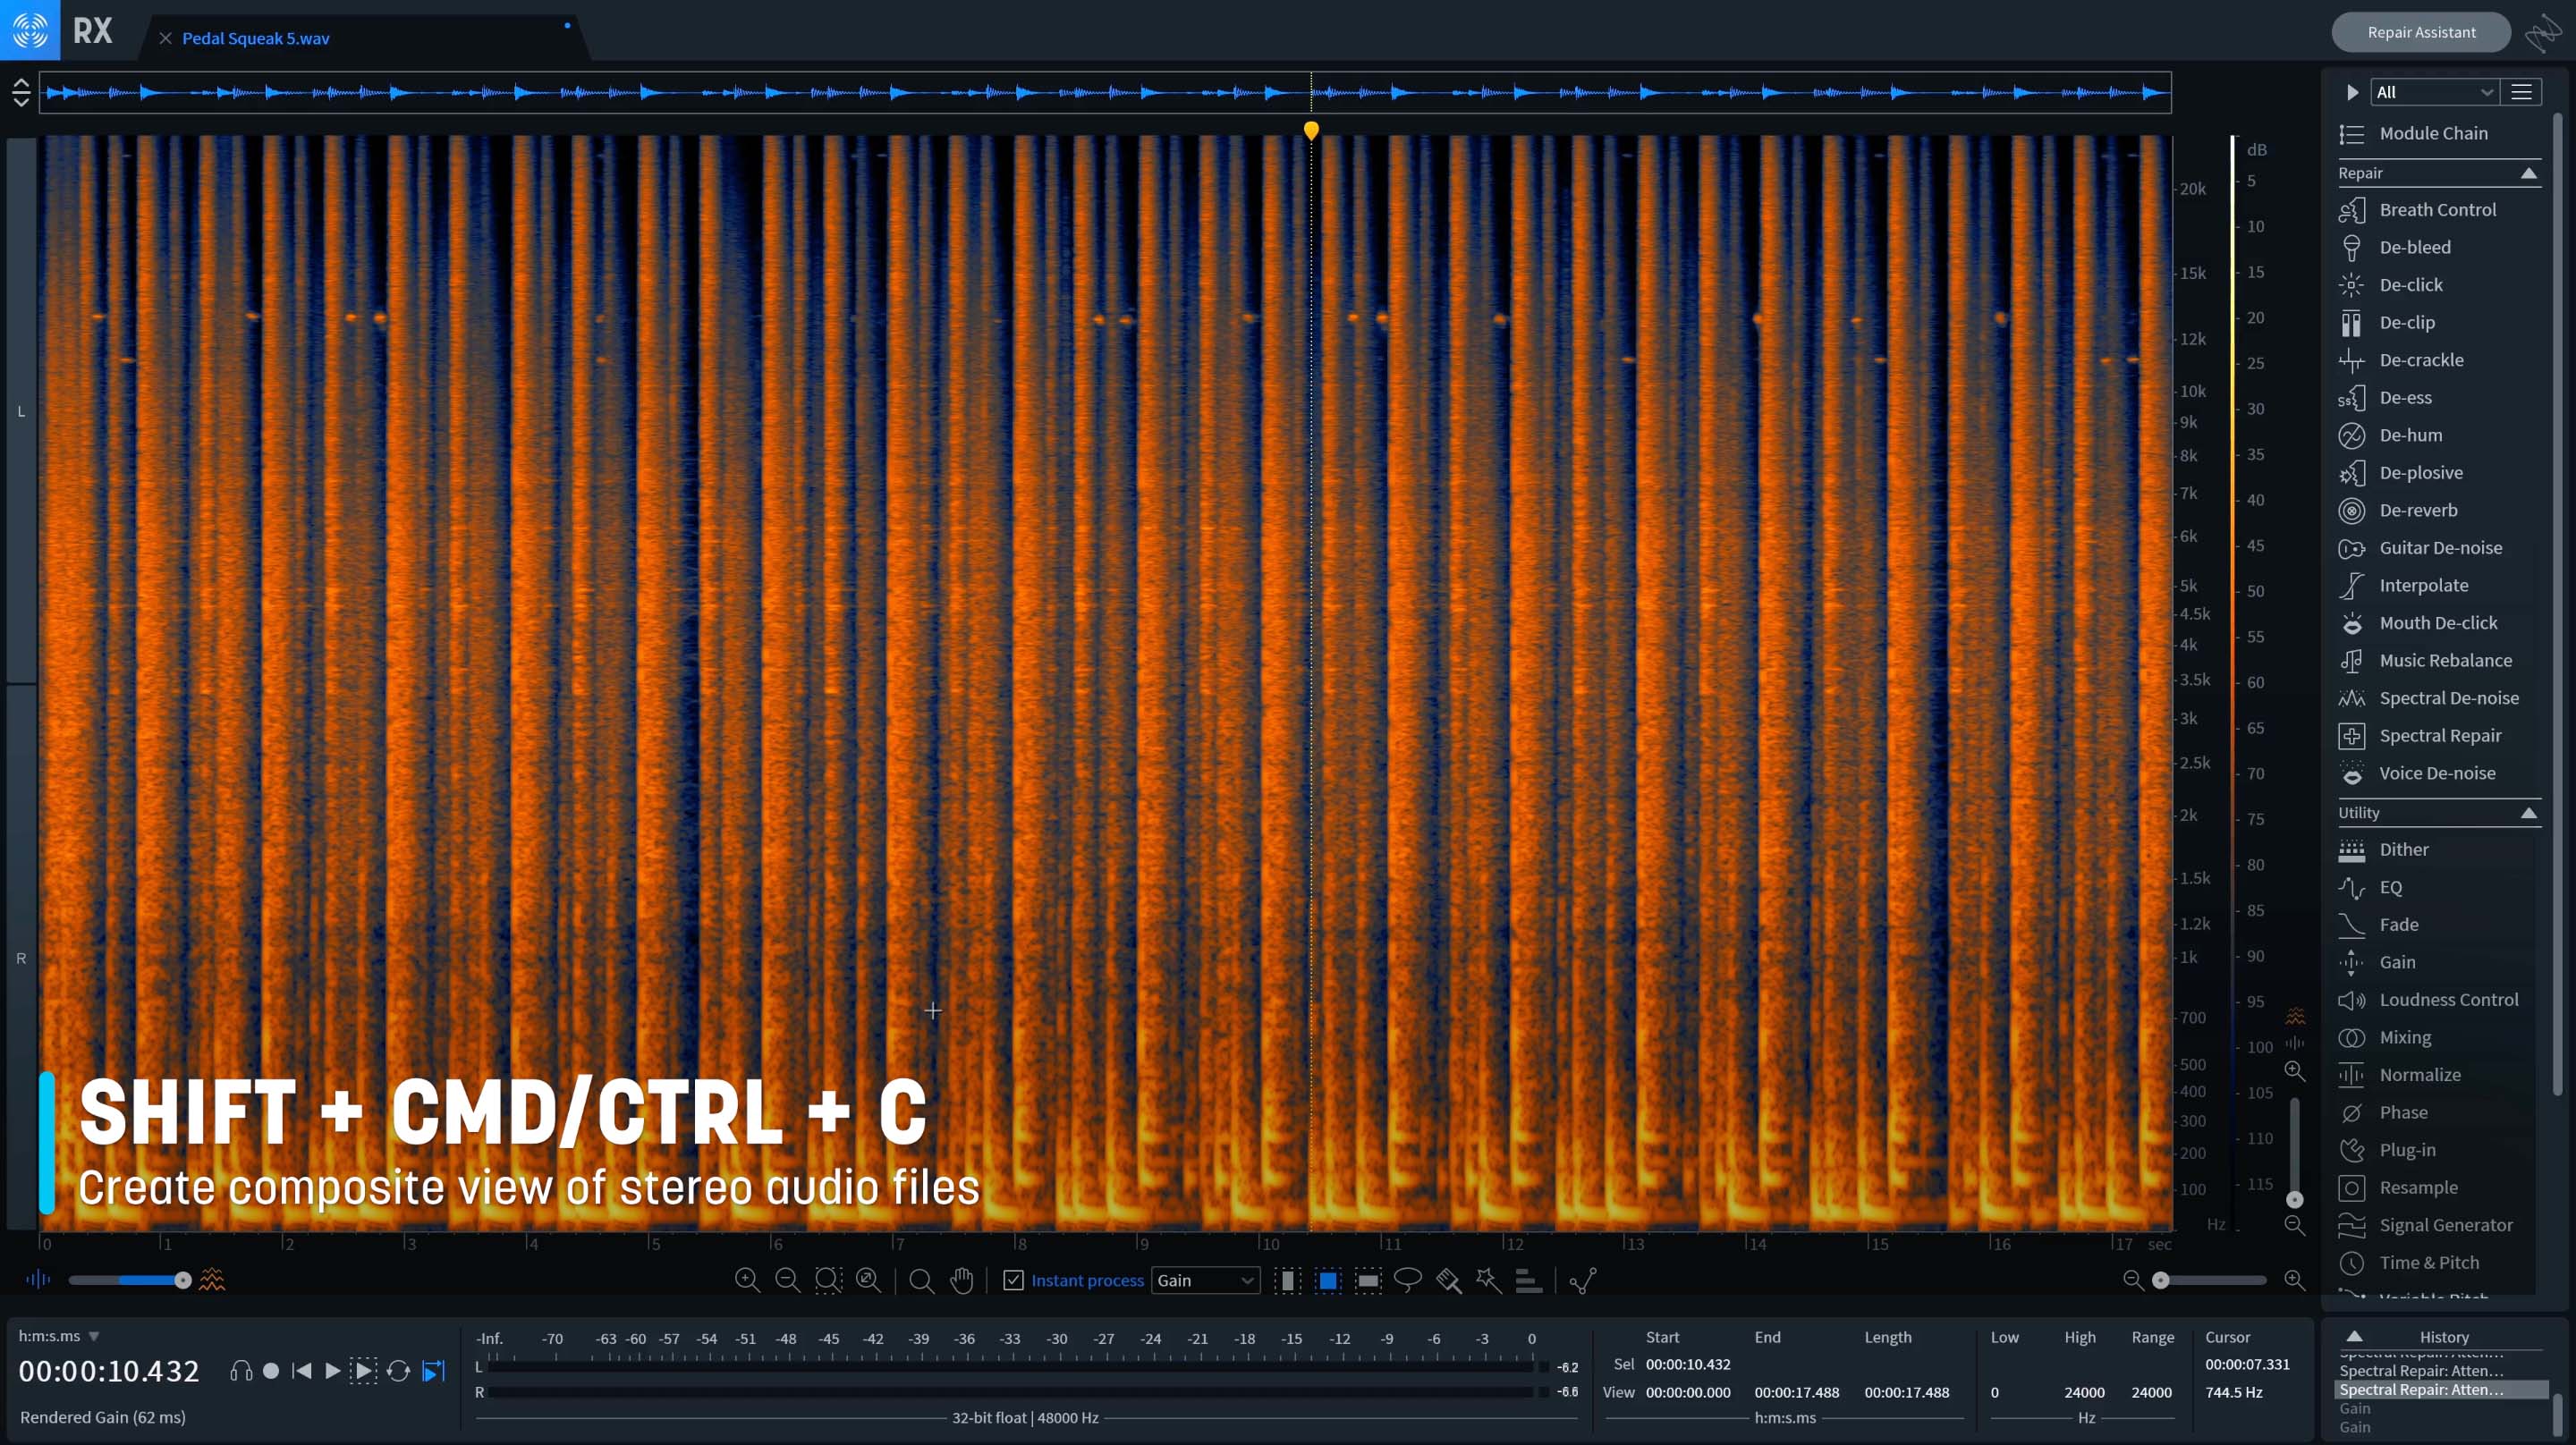
Create a composite view of stereo tracks in RX using keyboard shortcuts
Even though it looks like you’re only viewing one channel, it's actually both left and right channels in a composite view. And when you make processing decisions, they're reflected across the left and right channels.
10. Playhead controls
The final hidden feature concerns the playback head in the RX standalone editor. You can actually control its movement and behavior in helpful ways.
Let's say you're carefully reviewing an audio document and you don't want to miss a pop or click. Head to view, then switch on continuous mode. Now, when you play the audio back, you'll see the audio scroll past fluidly.
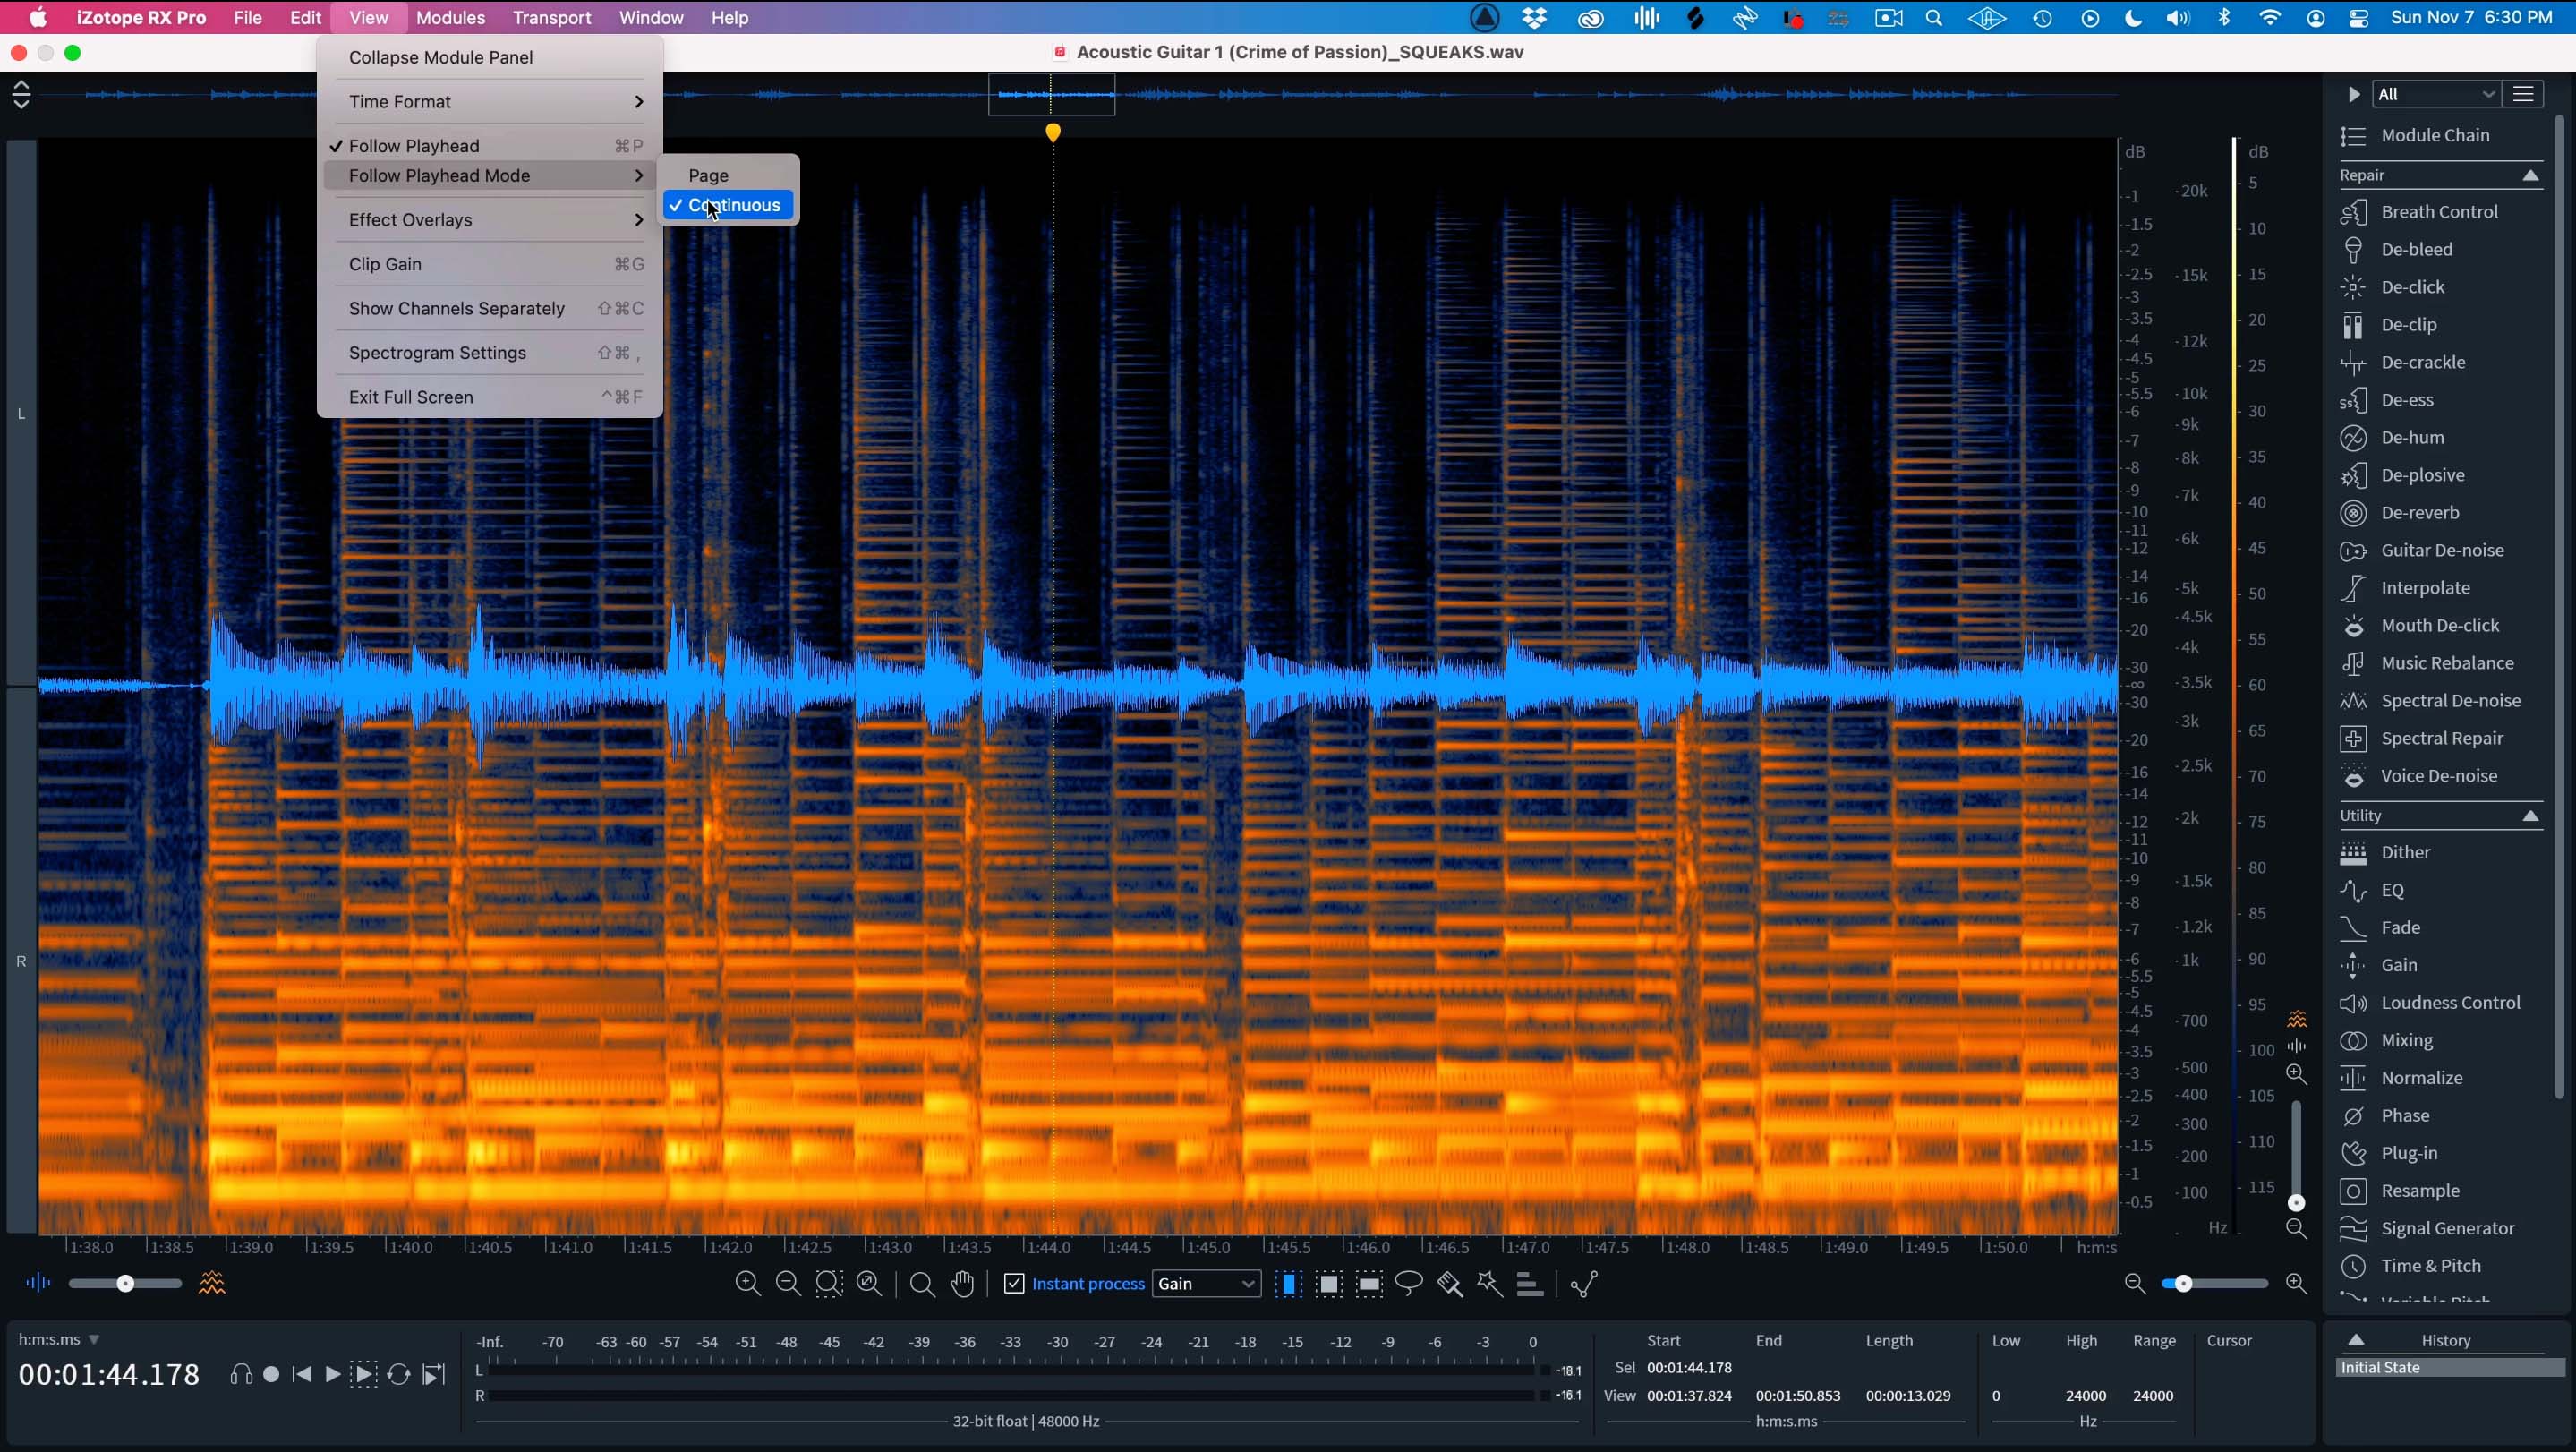
Selecting continuous mode in the view options will allow you to see the audio scroll past fluidly
There's another hidden feature regarding the playhead though. Let's say you're reviewing a particular sequence in the application window, and you need to listen back a few times to that moment in the audio but you don't want to keep returning the playhead with your mouse to a starting point. Instead, head to transport, then disable playhead follows playback. Now you can set your playhead, play some audio, and when you stop transport, the playhead will return to where you placed this yellow line.
Start repairing audio with these "hidden" features in RX
Now that you’ve discovered these hidden features in RX, it’s time to add them to your workflow. You can access RX Pro for Music by downloading a free trial of


iZotope Music Production Suite Pro: Monthly
Looking for even more “hidden” features tutorials? Take a look at Ozone and Nectar’s hidden or lesser known workflows.
