Understanding guitar compression: a beginner’s guide
Learn how to use compression on guitar to help level out dynamics, add punch, and more. Explore the best guitar compression settings in this tutorial.
When mixing music, audio compression is one of the most powerful tools we have at our disposal. When applied skillfully we are able to reshape an instrument’s dynamic envelope, limiting peaks, leveling dynamics, adding punch, or creating movement to emphasize groove.
In this article, we’ll learn about the use of compression and specifically how to apply it to guitars. We will look at a few common guitar mixing scenarios with demonstrations for each.
Follow along with


Music Production Suite 7


Neutron


Nectar 3 Plus
What is compression?
Compression allows us to control dynamic range – the difference between the loudest and the quietest moments of a signal – by reducing its level when it rises above a specified threshold.
What does each compression parameter do?
The Threshold setting tells the compressor at what amplitude the signal needs to reach before it reacts.
Attack time controls the speed at which a compressor begins to react once the amplitude of a signal has risen above the specified threshold.
Ratio controls how much of the signal above the specified threshold that you want to compress. The higher the ratio, the more compression.
Release time controls the speed at which a compressor stops reacting once the amplitude of the signal has fallen below the specified threshold.
We'll also be working with envelopes. The envelope of a sound refers to how it changes in amplitude over time. This process can be broken down into four stages referred to as ADSR (attack/decay/sustain/release).
How to think about guitar compression in a practical way
Threshold and ratio work together to determine the amount of gain reduction. You can think of threshold as the “what part of the signal” do I want to compress, just the peaks or more? You can think of ratio as the “by how much” do I want to compress.
Attack and release deal with time or speed. How fast or slow do you want the compressor to react once above the specified threshold? And how fast or slow do you want the compressor to stop reacting once the signal is below the specified threshold?
For more detailed information check out our audio compression guide.
How much should I compress guitar?
The amount of compression for a guitar can vary widely based on the style, the specific guitar part, and the desired effect within the mix. As a starting point, aim for gentle compression and adjust based on the guitar's dynamics and the overall mix context. Listen carefully to ensure the compression maintains the natural dynamics while evening out the performance.
Trust your ears and make adjustments accordingly until the guitar sits well in the mix. In these next few paragraphs, we'll cover some examples of how to do this effectively.
Compression on acoustic guitar
Compression can enhance the acoustic guitar in a mix by smoothing out its dynamics, ensuring that softer notes are audible without getting lost and controlling the peaks of louder strums or plucks. Let’s take a look at a few examples of acoustic guitar compression.
1. Tighten and balance a double-tracked performance
In pop music, a very common technique is to double-track a rhythm acoustic guitar part. When the first recorded performance is panned to the left, and the second recorded performance is panned to the right, it creates a very wide stereo image which can add a great deal of width as well as symmetry to a mix.
This wide stereo image is made possible due to slight variations in pitch and timing between the two separate performances, however, too much variation in level can be distracting and have the effect of pulling the listener's attention from one side of the mix to the other.
In the following steps, learn how to balance the level of a double-tracked acoustic guitar part.
A note on EQ and compression: When it comes to using EQ or compression first on guitar, I prefer to remove any unwanted frequencies or resonances from a recording before compression, then add compression, and lastly add any tone shaping or creative EQ. This is the processing order I use “most” of the time, however there are always exceptions. Whatever sounds the best is always the best.
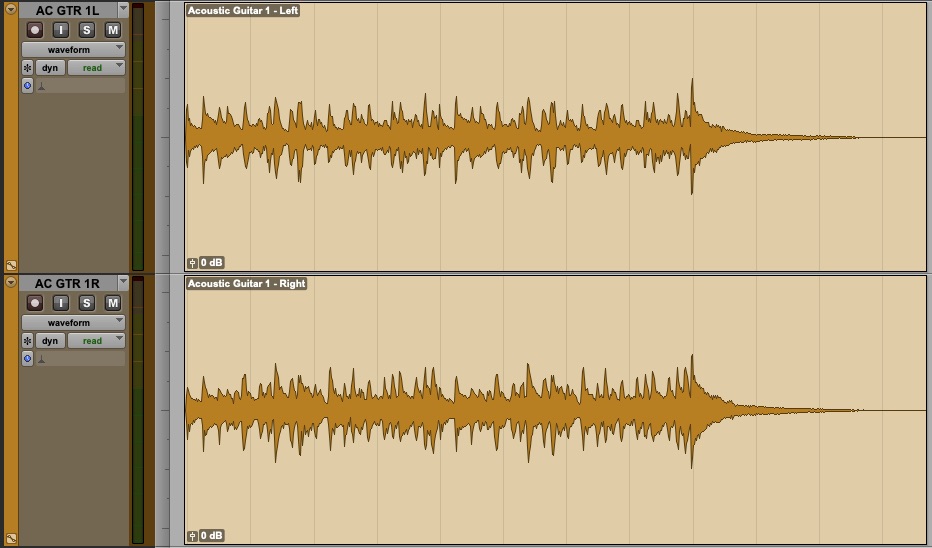
Doubled acoustic guitar, no processing
First let’s listen to the original doubled acoustic guitar.
It doesn’t sound too bad, however, it can be improved. Considering that this guitar part will likely be in a dense mix, it does not need a lot of low end. This will only muddy things up while fighting for space with other low frequency instruments, i.e. bass, low piano, keyboards, etc.
a. Use subtractive EQ
The first step is removing unnecessary frequencies and unwanted resonances with subtractive EQ. This avoids those frequencies from triggering the compressor and also from becoming more prominent in level once makeup-gain is applied.
I am using a mono version of iZotope Neutron 4 instantiated on each of the two acoustic guitar tracks.
After assessing the recording, the low-end has been removed up to 60 Hz. unwanted resonances have been cut at 110 Hz and 185 Hz. I have also taken out a bit of nasal tone just above 1 kHz and softened the presence around 3.5 kHz.
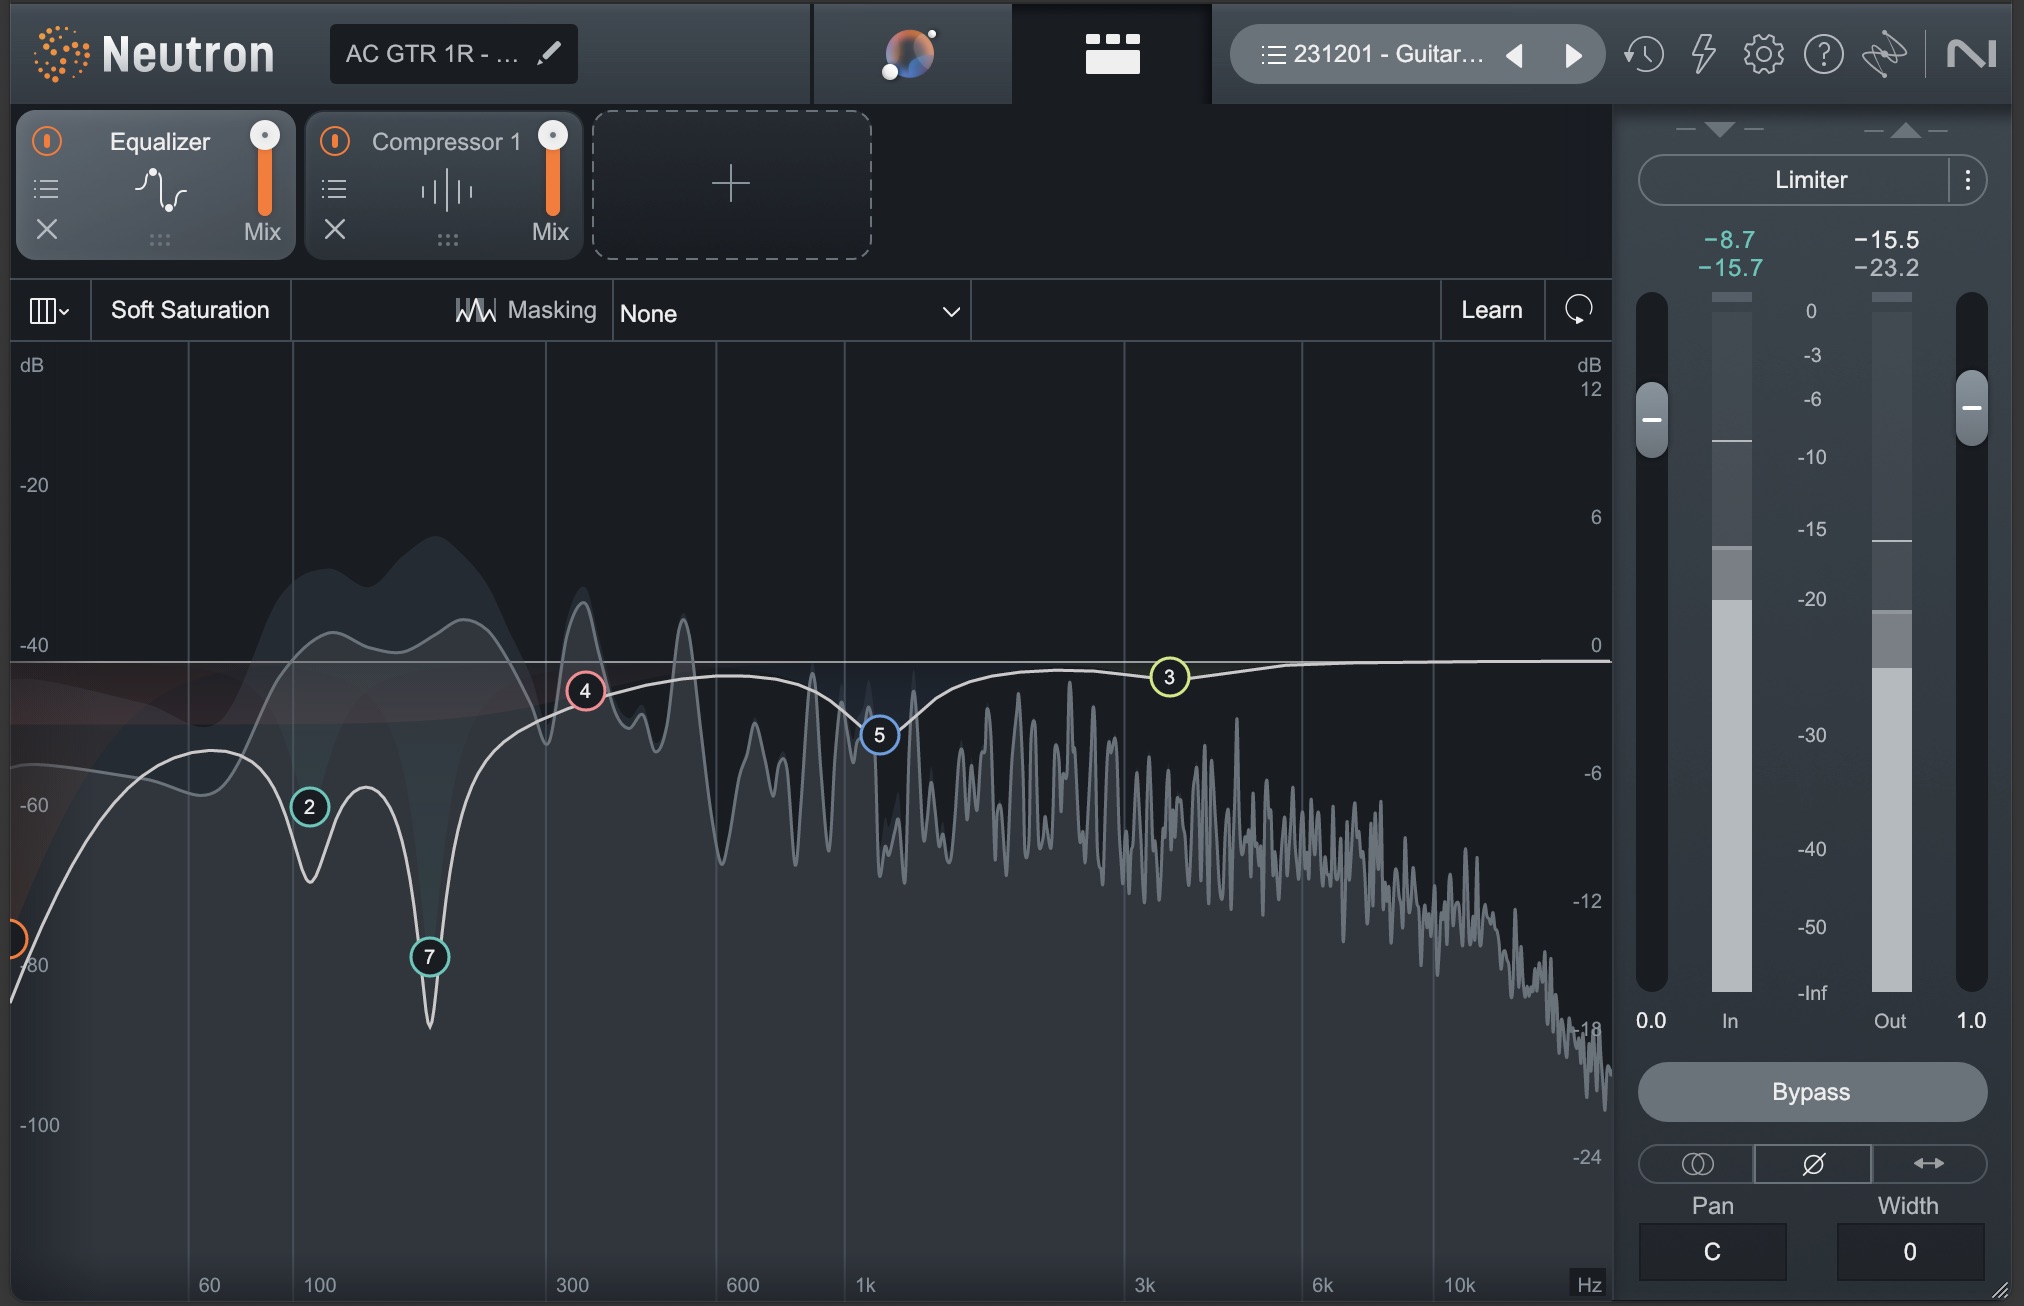
Doubled acoustic guitar with corrective EQ
Here is what the acoustic guitar sounds like before and after corrective EQ.
Acoustic guitar, subtractive EQ
You will notice that the guitar not only sounds less muddy, but the mix also feels wider. Due to the fact that low frequencies have such long wavelengths, they are by nature less directional. They can easily smear the stereo image by filling up the entire mix from left to right.
By removing some of the low-end information the left and right signals become more clearly defined and the stereo image feels wider.
b. Soften and balance peaks
Using the same instances of Neutron 4 as in the first step, I have added the compressor module after the EQ module. I have set a very fast attack, a very fast release, a high threshold, and a high ratio. The compressor style is set to “Modern” for a cleaner, more transparent tone, and the detector circuit is set to, “Peak,” for a sharper attack.
The idea here is to catch just the very peaks of the attack of the acoustic guitar in order to even them out a bit. Although I have a high ratio, I am only looking for a gain reduction of about 2 dB.

Softening and balancing the peaks of the acoustic guitar
Here's how the guitar sounds before and after compression is applied to soften and balance the peaks.
Acoustic guitar, peak softening
Although subtle, you will notice that the attack of the pick on the strings is a touch softer and the balance between the left and right guitars is just a bit tighter.
c. Leveling
For these next steps, I've bussed both the left and right acoustic guitars to a stereo auxiliary track in order to process them together with a single stereo version of Neutron.

Bus routing for the acoustic guitar
Here I have used a much slower attack, a slower release, and a ratio of 3:1. I am usually looking for gain reduction of about 1 or 2 dB. The compressor style is set to “Vintage” for a bit more color and warmth, and the detector circuit is set to RMS for a softer attack.
The idea here is to balance the level between the left and right guitars even more while also adding a bit more density, or “glue.”

Leveling acoustic guitar
Here's what the guitar sounds like before and after leveling.
Acoustic guitar, leveling
d. Additive tone shaping/EQ
Using the same stereo instance of Neutron as with leveling, I have added the equalizer module after the compressor module.
At this point we can now add a final bit of EQ to shape the sound of our guitars in a way that we like, or that best fits into our overall mix.
It is not uncommon for a compressor to add some unexpected harmonics or subtle artifacts, so this is also our opportunity to address those if necessary.
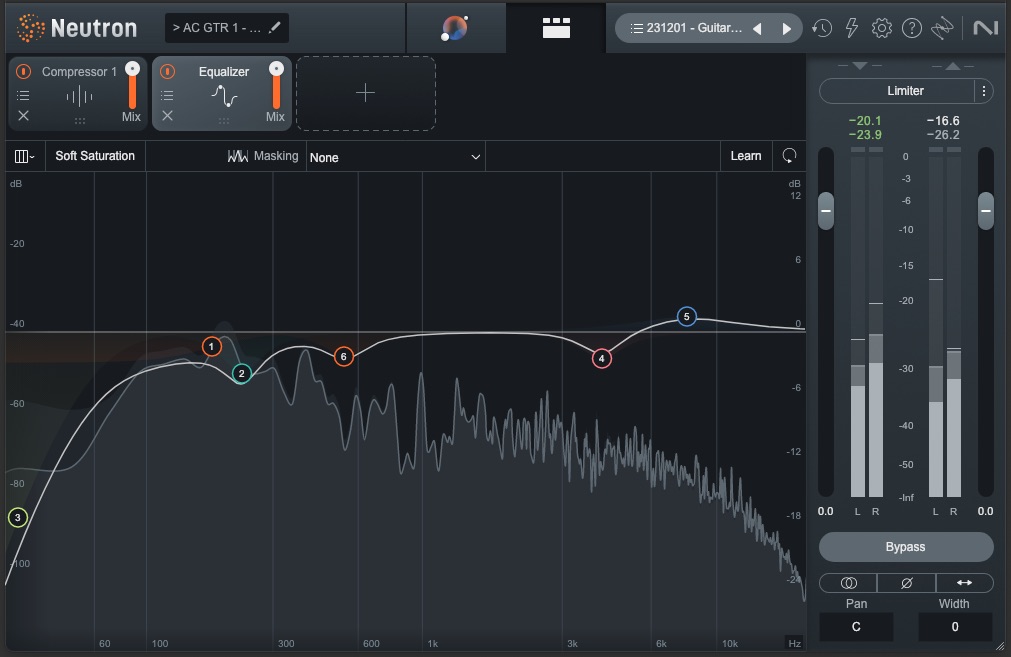
Tone shaping EQ
And here's how the final compression and EQ adjustments sound on the double tracked acoustic guitar.
Acoustic guitar, tone shaping
2. Removing finger squeaks from an acoustic guitar
A common occurrence in an acoustic guitar recording is the introduction of very audible squeaks due to the fingers of the player sliding along the steel strings of the instrument. As this can be considered part of the instrument (nature of the beast so to speak), in certain contexts it may not be an issue, however, there may be times when it is too much.
There are multiple ways to address this. One approach is to simply lower the squeaks in level on the clip directly using “clip gain” or some equivalent.
Another option is to use audio restoration software like


RX 11 Advanced
For this example I have chosen to use the de-esser within Nectar. Just like Neutron, it allows me to build a processing chain of my choice within a single plugin. I have already added a touch of EQ and reverb, so we will only focus on the De-esser.
The trick here is to set the threshold of the de-esser so it only compresses when the string squeaks happen and not at any other time that the guitar is playing. I have set the crossover frequency to 4.5 kHz. This may vary depending on the frequency content of the signal you are trying to de-ess.
Nectar’s “Listen” function can be helpful here as it allows you to solo only the part of the signal that you are isolating for potential compression. As always, we need to use our ears here.
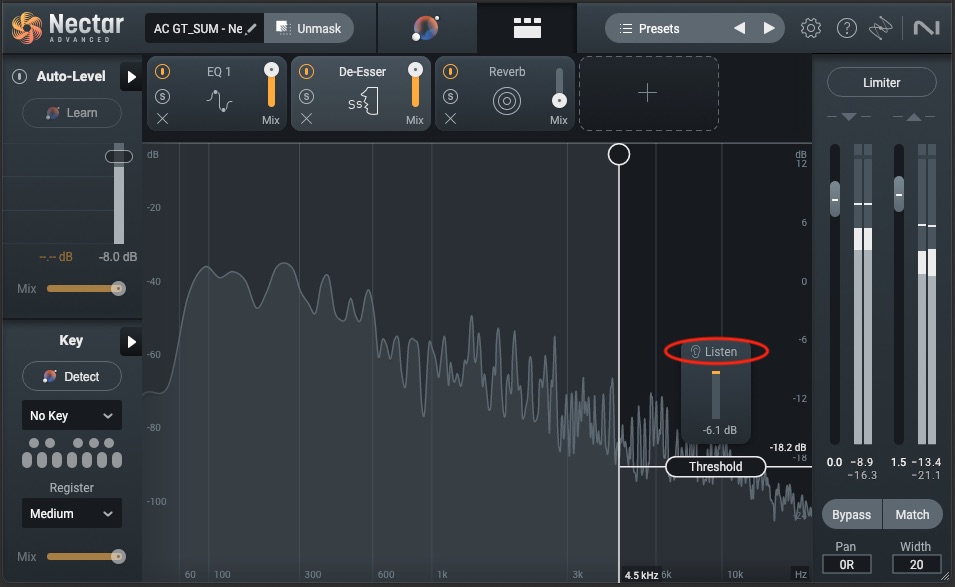
Acoustic finger squeaks de-essed in Nectar with "Listen" feature enabled
Here's what the squeaks sound like before and after de-essing.
Finger squeaks, de-essing
As you can hear, the squeaks are very audible in the "before" example, if not louder than the actual played notes. The use of reverb only exaggerates this even more.
In the "after" example, you should notice right away that the guitar string squeaks are now much softer in relation to the rest of the guitar.
Compression on electric guitar
Compression can enhance the electric guitar in a mix by adding sustain and consistency to its sound, allowing sustained notes to ring out while controlling peaks. It helps maintain a stable and present guitar tone, ensuring it cuts through the mix without overpowering other instruments.
Let's take a look at a few examples of electric guitar compression.
1. Adding attack to distorted electric guitar
Typically, the distorted sound of an electric guitar that we are familiar with is created by “overdriving” the level of a guitar at the “input” of an analog amplifier circuit. This is what adds the saturation and harmonics which give us that distorted sound. This type of overdrive has the effect of naturally compressing the signal by rounding off the transients of the guitar, essentially “flattening” its overall dynamics.
By using compression we can bring back some of the attack by reshaping its envelope (ADSR).
To demonstrate this I have double tracked an electric guitar using the Guitar Rig 7 Pro Super Fast 100 amplifier and cabinet emulations as well as the Solid Bus Compressor.
In this scenario I will use a slow attack, around 30 ms in order to allow the initial attack of the guitar to pass. The release is set to a speed which allows for the compressor to stop compressing before the next transient occurs. I have set the threshold, combined with a ratio of 5:1, in order to achieve a gain reduction of around 4 dB.

Adding attack to distorted electric guitar with Solid Bus Comp
Let's listen to the uncompressed version followed by the compression version.
Adding attack to electric guitar
Although subtle, you should notice a bit more transient attack, or “bite,” as well as an overall more balanced and dense sound.
2. Creating movement with clean electric guitar
There are times when we may want to add a bit of excitement to a recording. Certainly the technique of the player brings a lot to the dynamics and groove of any guitar part, but with a bit of compression, we can enhance this by manipulating the envelope (ADSR) to both even out the performance and giving it a bit more movement or “bounce.”
To demonstrate this I have doubled tracked a clean electric guitar using the Jazz Amp in Guitar Rig and matched Cabinet emulation. I have also inserted the parametric EQ in Guitar Rig just before the Solid Bus Compressor and Fast Compressor.
I have used a slow attack, around 30 ms, to allow the transient to pass, with a fast release in order to avoid squashing the sustain. I have set a modest ratio of 2:1, combined with a threshold setting to achieve a gain reduction of around 3 dB.
The Fast Compressor at the end of the processing chain is simply meant to soften any peaks that may stick out. The attack is set to FAST, and the input into the threshold has been set to achieve a gain reduction of no more than 1 dB.
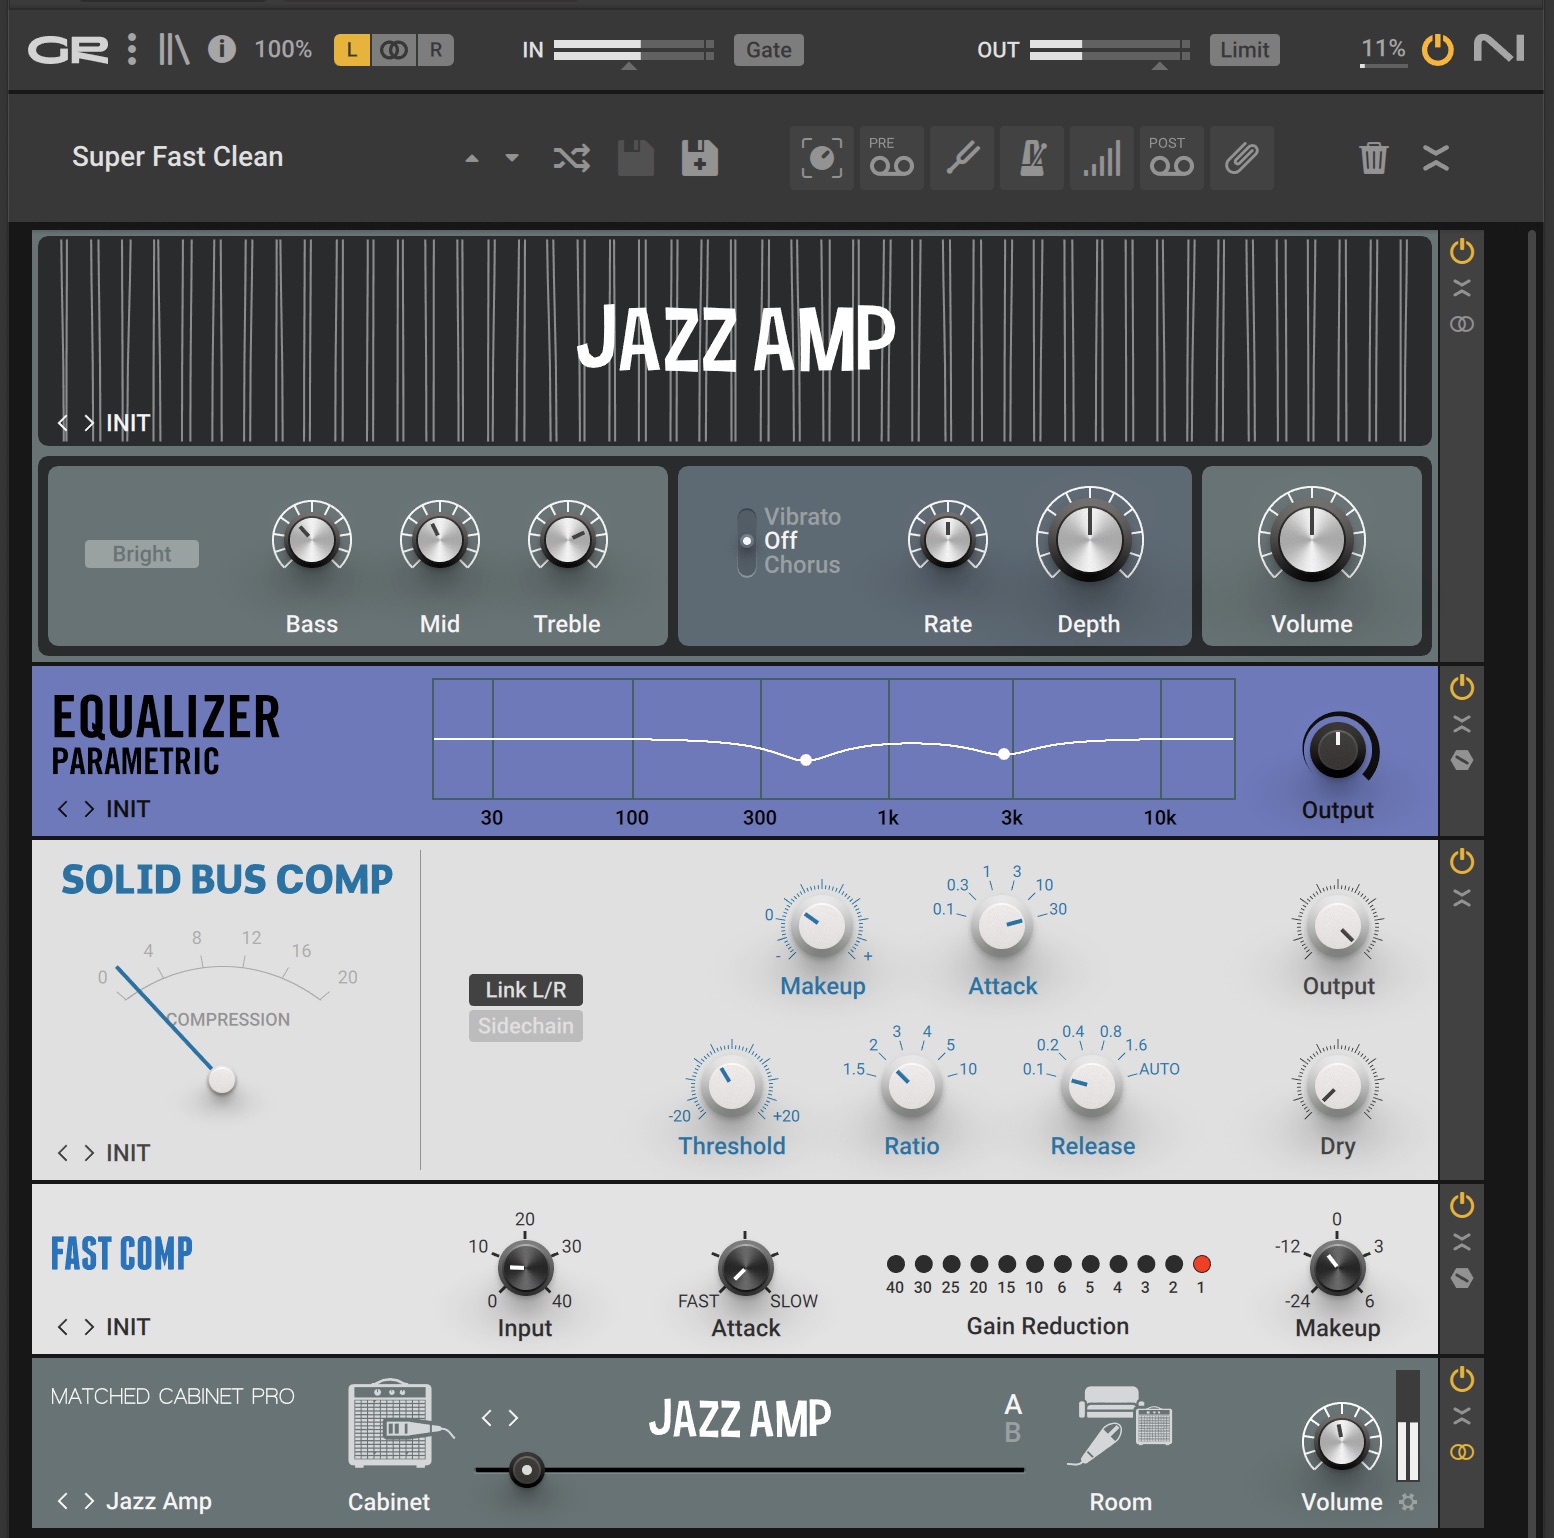
Creating movement and enhancing groove with compression on a clean guitar
Here's what the guitar sounds like before and after compression.
Creating movement with compression
Again it is a very subtle change, however you should notice that the palm muted rhythm of the pick has been accentuated and the performance has a bit more movement, helping to emphasize the overall groove.
3. Create a pumping effect with clean electric guitar
In this scenario I have used the same guitar recording as the previous example, however, for fun I have engaged the chorusing effect and manipulated the compression parameters to squash the transient and allow the sustain to swell.
I have set a fast attack of 0.1 ms, to clamp down on the transient. The release time has been set to allow the sustain to come back up to full level before the next transient. I have set a healthy ratio of 5:1, combined with a threshold setting to achieve a gain reduction of around 4 or 5 dB.
The Fast Compressor at the end of the processing chain is simply meant to soften any peaks that may stick out. The attack is set to FAST, and the input into the threshold has been set to achieve a gain reduction of no more than 1 dB.

Creating a pumping effect with compression on electric guitar
Let's listen to what these compression moves did to the guitar.
Pumping effect with compression
The effect is subtle, but you should notice that the attack of the guitar is less and the sustain of the guitar has a bit more, “swell” to it. This can be helpful to add even more movement to a guitar recording or make more room for other transient heavy instruments in a mix.
What are some things to watch out for when using compression with guitars?
- Over-compression: Too much compression can squash the natural dynamics of the guitar, making it sound lifeless and unnatural. Watch for excessive gain reduction that might remove the instrument's dynamic range entirely.
- Attack and release settings: Adjusting attack and release times incorrectly can alter the guitar's transient characteristics. If the attack is too fast, it might distort the initial pick attack, and if the release is too slow, it could affect the guitar's sustain or cause pumping artifacts.
- Context within the mix: Pay attention to how the compressed guitar fits within the overall mix. If it stands out too much or doesn't blend well with other instruments, it might be due to improper compression settings. Aim for a balance where the guitar maintains its natural character while contributing effectively to the entire musical arrangement.
Start using guitar compression
When first learning to work with compression on instruments like guitar, it can be challenging to hear, however, with a bit of practice and active listening it will become easier, and in turn can open up a whole new world of creative and purposeful audio manipulation.
If we understand the basics of ADSR (attack, decay, sustain, and release) of an audio signal, and we also understand the parameters of a compressor and how they affect a signal’s dynamic envelope, then we can shape our audio anyway we choose to achieve any desired result.
As every type of instrument has a different and distinct envelope (ADSR), I highly recommend practicing on multiple types of sources and pushing the parameters to the extremes in order to really hear the effect that each one is having on your audio.
And remember, Music Production Suite includes a host of compressors that you can use to practice mixing with compression.
