
Automation isn't just for mixing engineers. Neither is automation strictly limited to volume rides. Whether you're working in the analog or digital world—or relying on a hybrid audio mastering setup—there are a handful of circumstances where time-based adjustments on your mastering chain can help you achieve your desired results. Let's look into a few practical examples of automation being used in mastering sessions.
Note: For the best learning experience, listen to the examples below with headphones to catch the nuanced qualities of the master.
In this piece you’ll learn:
Want to try these techniques for yourself as you learn about mastering automation? Try an iZotope subscription for free, to access the tools used in this guide, including Ozone and RX.
What is automation in mastering?
Automation refers to automating, meaning having a robot or a computer do some task(s) for you. In the case of music production and audio mastering, automation means having a DAW (Logic Pro X, Pro Tools, Ableton, etc.) automatically perform tasks over time, particularly moving knobs, faders, and switches for you.
Before digging into our examples, how does one exactly define what mastering automation is in the first place? And how does it compare to automating in the mix stage?
Automation in mastering versus mixing is not that much different. You’re still setting a predetermined time-based adjustment on your parameter of choice using a DAW—whether it’s volume rides, EQ, compression threshold adjustments, etc. The actual method for setting your automations might vary depending on your DAW, but the principle remains the same.
However, one detail that sets mastering automation apart is scale. In contrast to mixers, mastering engineers have to work within a significantly limited amount of headroom. Therefore, adjustments are done in much smaller increments. Mix sessions could have automation rides spanning 5–10 dB or more. In mastering, 1 dB of change could already yield drastic effects. Therefore, a critical, thoughtful ear is key when utilizing automation in mastering.
Why automate in mastering?
With the limited range of a mastering engineer’s work environment, subtle static adjustments could be all it takes to achieve that final mastered sound. However, there are a few occasions where a fixed mastering setting might not be enough to account for all the nuances in a musical performance.
Mastering in some genres might require more attention than others. An EDM track might have drops that sound distinctly different from its verses or your desired settings for a dynamic power ballad might begin to distort by the time the climactic section comes in. Those are a few situations where automations might come into play.

An EDM track might have drops that sound distinctly different from its verses. Mastering automations could help address challenges such as this.
Apply different mastering settings in various points of the music
Song: "I Need U"
Artist: Arthur Tan and Lesha
Produced & engineered by: Arthur Tan (New York, NY)
As mastering engineers, we have more freedom to use automation to change treatments between sections of a song in some genres more than others. A good example of this is electronic music where various sections within a song (e.g. verse & drops/choruses) may sound drastically different from each other, from the mix treatment all the way down to production choices. Here is where automation can level up your mastering workflow.
In Arthur Tan & Lesha’s electronic house track “I Need U,” the verses prominently feature Lesha’s vocals with Arthur Tan’s production taking on a minimalist sound. But by the time the chorus hits, the electronic house vibe takes center stage, with the kick and synth effects driving the pulsating tempo of the music.
You’ve heard the final version above that incorporates automation. When mastering this song, it was apparent that when the chorus dropped in at the 17-second mark and the kick came in that it had a slightly overwhelming quality that enveloped the rest of the production. The music started to feel a bit constricted during the choruses.
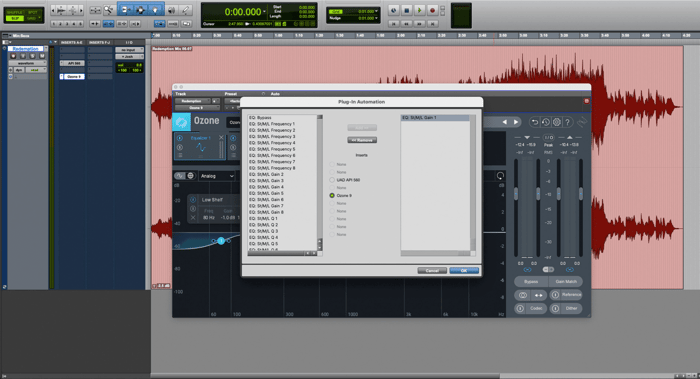
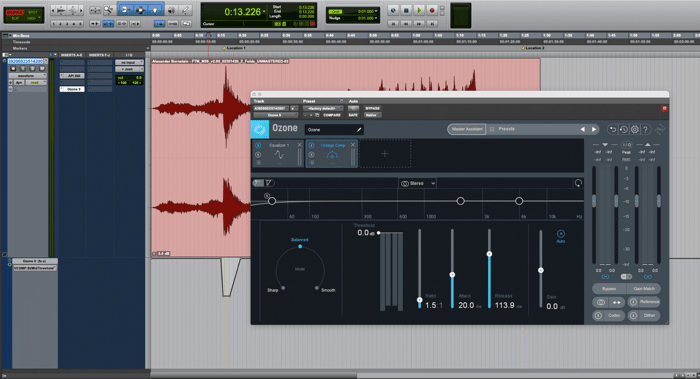
One way to address this without compromising the sound you’ve achieved for the verses is by enabling automation, then using that to adjust your mastering settings according to the needs of the chorus section. To enable automation in Ozone and Ozone Advanced using Pro Tools, click the Auto button (see screenshot below). This will launch Ozone’s Plug-in Automation window.
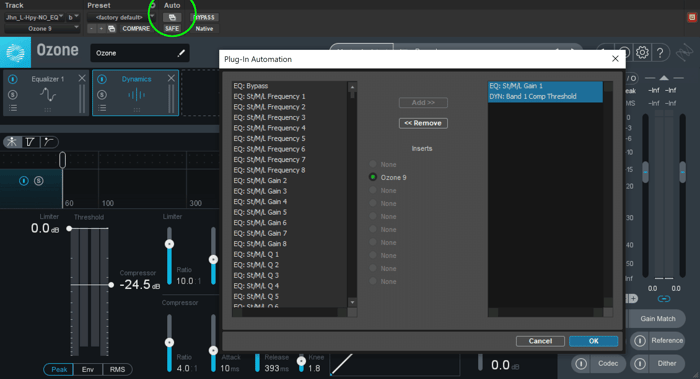
Select the Plug-in Automation Enable button to activate automation inside Ozone
For this song, a strategic combination of subtractive EQ and multiband compression helped tighten the chorus without losing the punch and drive in the kick and bass frequencies. Once I’ve nailed my mastering adjustment using Ozone’s Equalizer & Dynamics module, I enable those specific parameters on the Plug-in Automation window so I can automate when those settings start to kick in on my mastering chain.
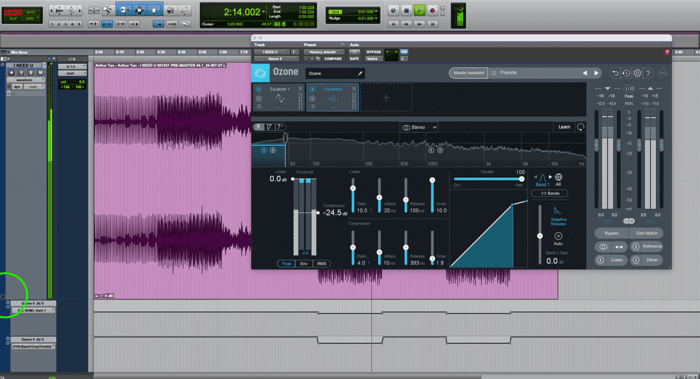
Apply different mastering settings in various sections of the song by enabling automation in your DAW
Through automation, I was able to isolate that specific mastering treatment in the chorus, without compromising the warmth & clarity I’ve achieved in the verses.
Finely adjust levels of specific mix elements (vocal, bass, drums)
Song: "Person to Person"
Artist: Juicy
Produced & engineered by: Jerry Barnes & Katreese Barnes
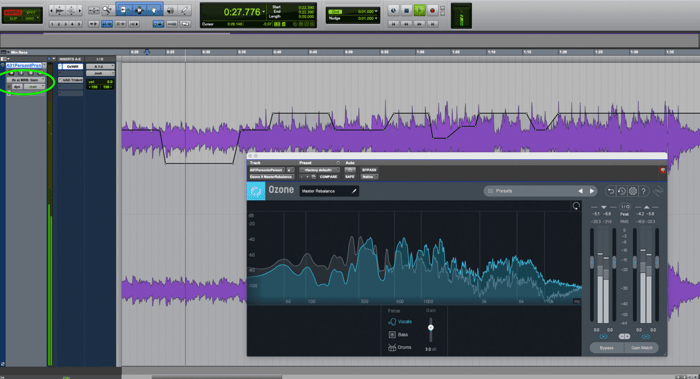
One of the exciting new features that come with Ozone 9 Advanced and Ozone is the Master Rebalance module. Master Rebalance allows you to control levels of specific elements within a stereo mix in ways that used to be possible only in the mix stage. This is incredibly powerful especially for mastering sessions where you don’t have the ability to go back to the mix session with all the individual tracks. Take for example this archival cassette recording of “Person to Person” by 80’s duo Juicy. Listen to the audio clip of the song below for reference:
Artist Jerry Barnes specifically mentioned how he needed help bringing out Katreese’ vocals more in the audio recording. As you can hear in the audio clip, the lead vocals are buried in the mix in varying amounts. Usually, a simple EQ adjustment can help bring the vocals out in the mastering stage, but in severe cases like this, Master Rebalance becomes an essential tool.
Before I went ahead with using Master Rebalance, I focused first on restoring the cassette recording and lessening the loud tape noise. You can read up on the many ways you can restore old/noisy recordings with RX here.
After the audio restoration step, I loaded Master Rebalance, making sure it’s the first plug-in on my mastering chain, and then setting its focus on the “Voice.” With this parameter set, you instantly gain control over the levels of your lead vocals with the Gain fader. Now, you can make magic happen by automating this Gain fader by enabling “MRB: Gain” on the Plug-in Automation window (see screenshot below).
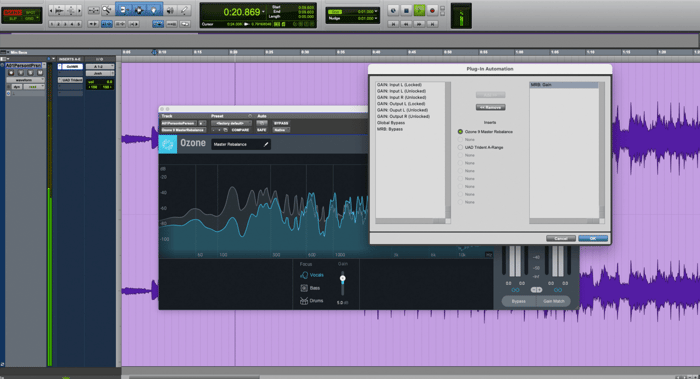
Enable MRB: Gain on the Master Rebalance automation window to start automating the level of your selected instrument focus
Once MRB: Gain automation is enabled, you can use the Track View Selector dropdown menu in Pro Tools (see screenshot below) to start finetuning your automation. For this song, I increased the gain on the lead vocal as soon as the full band came in to ensure that the vocals stay upfront and balanced with the rest of the mix.
You can also use the Track View Selector (see screenshot) to switch to the parameter you want to automate
Listen to a clip of the final mastered audio for comparison below. Keep in mind that A/B comparisons in mastering require some critical listening so a few repeated rounds of listening will help:
Control low-frequency build-up
Song: "Redemption"
Artist: Ashla Jaye
Produced & engineered by: Josh Alba
This song, in particular, has a very dynamic quality to it. The goal as the mastering engineer is to make sure not to lose this dynamic feel and that the progression of the music is present throughout until the grand ending. You also have to take into account certain elements in the production that might interfere with the build-up as you dial in your mastering settings.
In Ashla Jaye’s "Redemption," a low-end synth comes in by the second chorus. Though it has a distinct boomy character from 80 Hz and below, it only ever-so-slightly overwhelms and distorts at certain points of the musical performance. To address these points without compromising my overall settings, I decided to automate my Ozone EQ.
Below is a clip of the audio and a screenshot of my mastering settings enabled but without my automation on the low frequency. At around 10 seconds in the clip, you’ll notice how the low-end build-up from the synth overwhelmed the rest of the mix and caused some slight distortion.
Control low-frequency build-up by enabling automation on your EQ
Once enabled, I used the Pro Tools pencil tool to indicate the times where I wanted the low shelf EQ automation to take place. I found that sculpting out 1.5 dB more of low shelf EQ around the 80 Hz range helped control the synth build-up without taking away its warmth and body. Having gradual automation beginning at the second chorus, which then slowly tapers off during the bridge helped maintain a natural sound throughout.
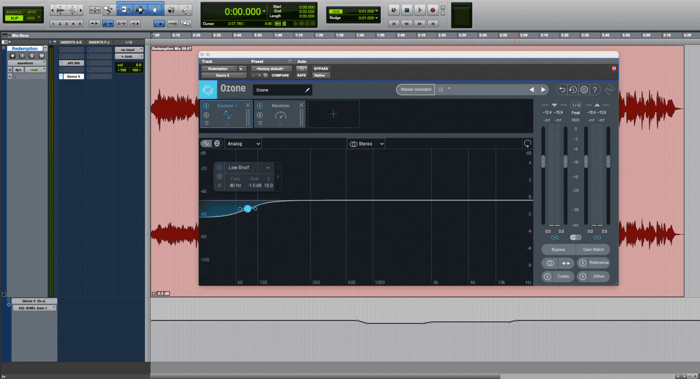
Automating gain on the EQ to control the momentary low-end build-up
Here’s the same audio clip of the "Redemption" master with automation enabled.
Control distortion in a dynamic album
Album: First to the Moon: The Journey of Apollo 8 (OST)
Composer: Alexander Bornstein
Engineered by: Shinnosuke Miyazawa
Film scores are known for their sweeping orchestral cues and wide dynamic range. Alexander Borsntein’s soundtrack to the documentary First to the Moon: The Journey of Apollo 8 not only possesses these qualities but it also features electronic elements that serve the documentary’s space exploration theme.
As the mastering engineer, my goal was to ensure that none of these qualities ever get lost during the mastering stage—that despite consumer playback’s limited headroom, we still get to hear the delicate nuances and depth that define this soundtrack.
To achieve that requires a thoughtful configuration of our analog console’s signal chain and the occasional level rides only when necessary. Rarely do we include a compression in the chain as it’s important to keep the natural dynamics of the score intact. Retaining these dynamics, however, opens the door to more potential distortions in the master.
Listen to a clip of one of the soundtrack cues below and you’ll notice the distortion in :07.
This type of distortion occurred quite often throughout the soundtrack, though not on all loud, dynamic sections. To address this without affecting the entire mastering chain and the overall dynamics, I added Ozone’s Vintage Compressor in the chain. However, the threshold is set to “0” by default and automated to only latch on when a dynamic section begins to distort.
With the vintage compressor selected and set to taste using Ozone, I loaded the Plug-in Automation window to enable automation on the compressor’s threshold.
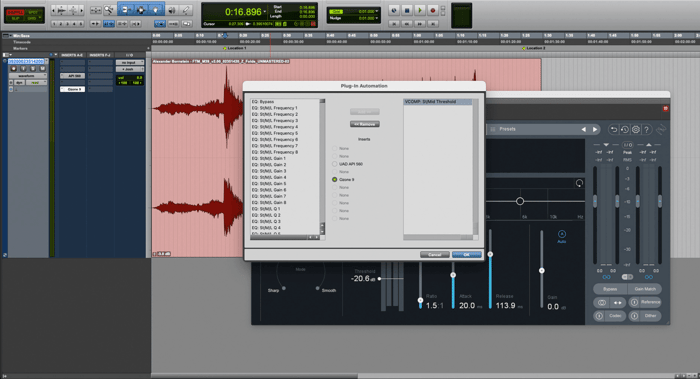
Ozone Vintage Compressor’s threshold automation enabled
Once enabled, I used Pro Tools’ pencil tool to automate the threshold so that the compressor is only activated during the point of distortion. Once the distortion is controlled, the threshold is brought back to “0,” avoiding compression and letting natural dynamics breathe as intended.
Ozone Vintage Compressor with automation
Listen to the same audio clip with the compression automation enabled at the distorting section.
Fine-tune your sibilance control
Song: "Copy and Paste"
Artist: Neska
Produced & engineered by: Ainjel Emme & Anthony Paul Lopez
Though not as common at the mastering stage, controlling sibilance is sometimes necessary. And it’s good to have transparent de-essing tools like RX Pro and RX 8’s De-ess module that allow you to de-ess without compromising the sound you’ve crafted with your mastering signal chain. Combine that with automation and you’re in a much better position of taming that sibilance with less compromises on your master.
Neska’s “Copy and Paste” is a good example of de-essing in action at the mastering stage. After nailing the final mastered sound on the first pass, producer Ainjel Emme noticed how the sibilance became a bit too enhanced as a result. Let’s listen to the audio clip of the mastered audio without the tamed sibilance below:
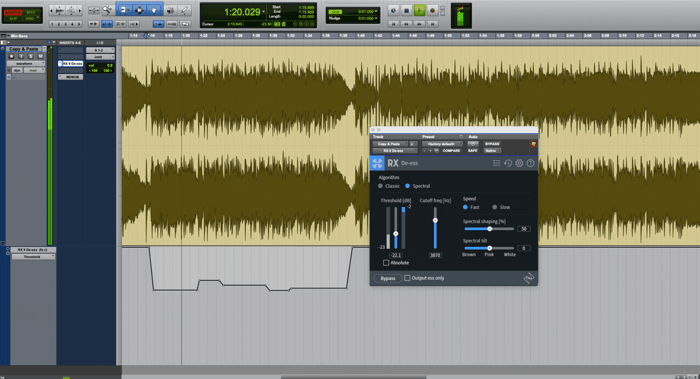
As you hear from the clip, there are varying levels of loud sibilance throughout the chorus. There are many approaches to taming sibilance at the mastering stage, one of which is using RX’s Spectral Repair for spot treatment. Another option is to insert the RX De-ess plug-in at the beginning of your mastering chain, then using automation for finer sibilance control.

You can also enable automation in RX De-ess to fine-tune your control of the varying levels of sibilance in a track
With automation enabled, you can then adjust your sibilance so that it only engages in the mastering chain whenever necessary. For this song, I set the sibilance so that it only engages in varying amounts during the chorus. This accurately tames the varying amounts of sibilance without affecting the overall energy of the master.
Use automation to de-ess with varying amounts in targeted areas of the music. This lessens the sonic footprint of your de-esser on the overall sound of your master
Let’s listen once again to the resulting mastered audio with the controlled sibilance below:
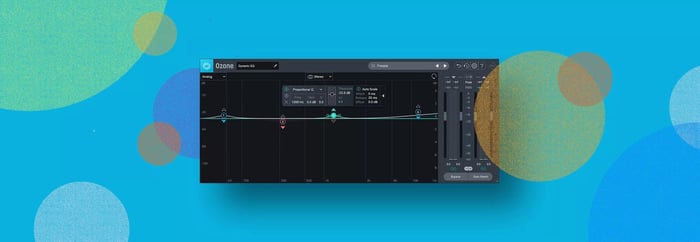
Here is another example of applying subtle automation on the low shelf EQ but in an opposite scenario. Poetic Thrust's "PSA" is a hip-hop track which features an array of organic ambient and percussive elements, coupled with a persistent low-frequency drone that drives the song’s vibe.
One of my objectives while mastering this track was to make sure that the frequency spectrum of the music is balanced from the drone all the way to the crispy percussive instruments. I found that a -1dB low shelf EQ down at 25 Hz helped achieve a strong punchy low end while allowing the rest of the mix elements to breathe in the master.
One byproduct of this setting, however, is that by the time the climactic section comes in, the frequency balance begins to change—the vocals become denser and all the instruments come together into one energetic finish. By this point, my initial EQ settings aren’t ideal for showcasing the size and depth of this climactic ending.
Here is the audio clip and EQ screenshot prior to automation. Beginning at the 11-second mark, you’ll hear the mid-range and top end of the track become fuller with the bottom end not sounding as balanced in relation.
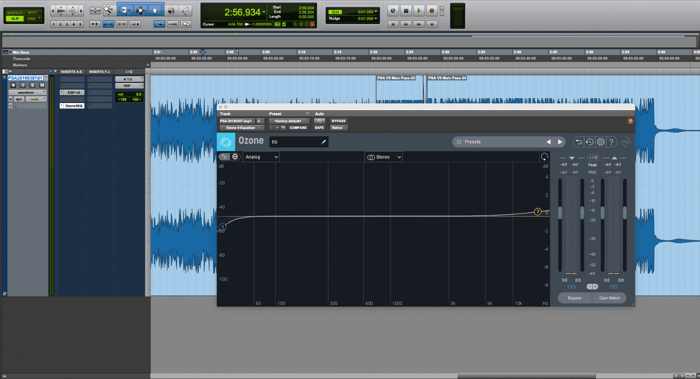
PSA Ozone EQ settings without automation
To adapt and make sure that the climactic section gets the full energetic sound it deserves, I enabled the gain automation on my Band 1 low shelf EQ once again to gradually remove itself from the chain by the time the climax begins. Below is a screenshot of the subtle EQ gain ride from -1.2 dB to 0. By taking out the low shelf EQ, the overall frequency spectrum of the ending section sounds more balanced and we hear the articulation from the low-end drone once again.
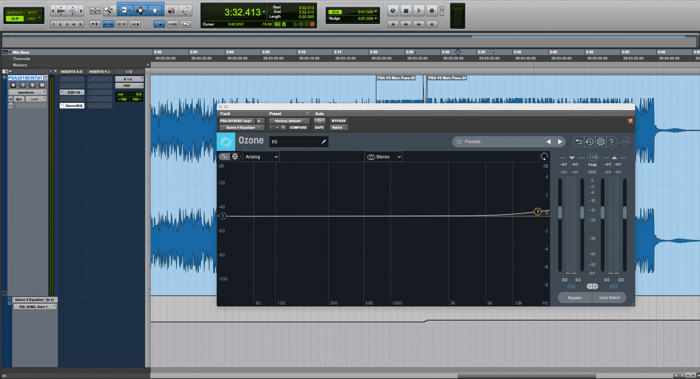
PSA Ozone EQ settings with automation enabled
Listen to the clip with this low end EQ automation enabled.
Limitations of automation & alternatives in mastering
Despite the many possibilities you have with automation, it does have its limitations. For one, when a track requires a drastically different treatment in certain sections, automations alone simply won’t cut it. Certain automations may cause audible drop-outs when switching between different plug-in states—the “plug-in bypass” function is notorious for this. Furthermore, depending on the session, the process itself of setting up automations can be a tiresome, trivial procedure that could distract from a mastering engineer’s natural workflow.
One alternative to automations is creating multiple mastering passes instead, each with its own set of mastering parameters. After printing, you then splice together these audio clips using your mastering DAW in order to come up with the final mastered sound. This allows for more creative freedom when mastering each section of a musical performance.
Another solution is object-based processing. For example, when controlling distortion in a highly dynamic album, you can instead reach for the RX’s De-clip module to treat these distortion spots without tampering with the overall sonics of your master.
Parting thoughts: critical listening and intent are key
While automation is a powerful and musical tool to add to your mastering arsenal, now is also a good time to remind yourself that critical listening and intent are key. It’s easy to fall into the trap of relying on certain techniques as a crutch, much to the expense of your masters’ fidelity. Many times just from listening, you’ll quickly discover that a nuanced setting across the board is all you’ll really need to achieve your desired sound. However, you’re at least aware that there are available tools at your disposal that allow you to address specific audio mastering challenges when absolutely necessary.