16 common EQ mistakes mixing engineers make
Discover sixteen common EQ mistakes audio engineers make, along with strategies for avoiding making them yourself.
Apart from faders, equalization is arguably the most powerful tool we have for mixing music, and in my opinion, even more important than compression, than reverb, or arguably even panning. This is again of course only my opinion, but I stand by it!
With EQ we have the ability to carve out troublesome frequencies, shape tone, meld instruments together, or separate them apart. However, if applied ineffectively or in excess, EQ can just as easily hurt a mix, as it can help it.
In this article I have compiled a list, in no particular order, of some common EQ mistakes that many beginner, and even professional mix engineers, sometimes make. And, if you find that you’ve made any of these mistakes yourself, don’t be too hard on yourself—I’ve made them all!
Follow along with this article using iZotope's Neutron.
Apart from faders, equalization is arguably the most powerful tool we have for mixing music, and in my opinion, even more important than compression, than reverb, or arguably even panning. This is again of course only my opinion, but I stand by it!
With EQ we have the ability to carve out troublesome frequencies, shape tone, meld instruments together, or separate them apart. However, if applied ineffectively or in excess, EQ can just as easily hurt a mix, as it can help it.
In this article I have compiled a list, in no particular order, of some common EQ mistakes that many beginner, and even professional mix engineers, sometimes make. And, if you find that you’ve made any of these mistakes yourself, don’t be too hard on yourself—I’ve made them all!
1. Not using reference mixes
Have you ever spent hours working on a mix, maybe even 2 or 3 days? You get to the end and you could not be happier. It is, without a doubt, the best mix of your life! You print it, take it with you in the car, and crank it up! Maybe you even put it on loop and listen to it two or three times in a row. Life is good. Eventually you decide to flip to something else, some new release by your favorite artist maybe, and suddenly, reality comes crashing down all around you. You realize in that moment that your mix is not nearly as good as you thought it was only 10 seconds earlier. If this sounds familiar, welcome to the club!
Reality check
In order to create a mix that sounds good, we must first know what good sounds like. It should be obvious, right? However, if we find ourselves mixing in a vacuum, with no point of reference, we can easily lose perspective of what it is that we are actually hearing. So, how do we know if what we are listening to sounds good? The answer, references mixes!
I’m sure that most of us have heard of reference mixes before. Most often we think of these as mixes that are chosen by us, the producer, or the artist, in order to reference a specific genre or possibly a particular aesthetic that we might want to emulate. This is all valid and good, however in this case, I am instead referring to reference mixes that are chosen for their overall frequency balance, and their high-end and low-end frequency extension. They should be professionally mixed, mastered, and commercially released songs that you know very well, and represent the entire audible frequency range of 20Hz to 20,000Hz.
Having a reference mix for this purpose can not only help you to evaluate your listening environment, but also, and for the focus of this article, serve as a “true-north,” by which to accurately judge your mix. The purpose here is not to match the reference exactly, unless that is indeed your intended goal, but instead, to use it as a reality check for our ears.
In practice
When I am preparing a session to mix, I import my reference track(s) directly into my DAW. Commercially released songs typically peak at 0 dBFS, if not higher in some cases, so the first thing I do is turn them down so that they instead peak somewhere around -8 dBFS.
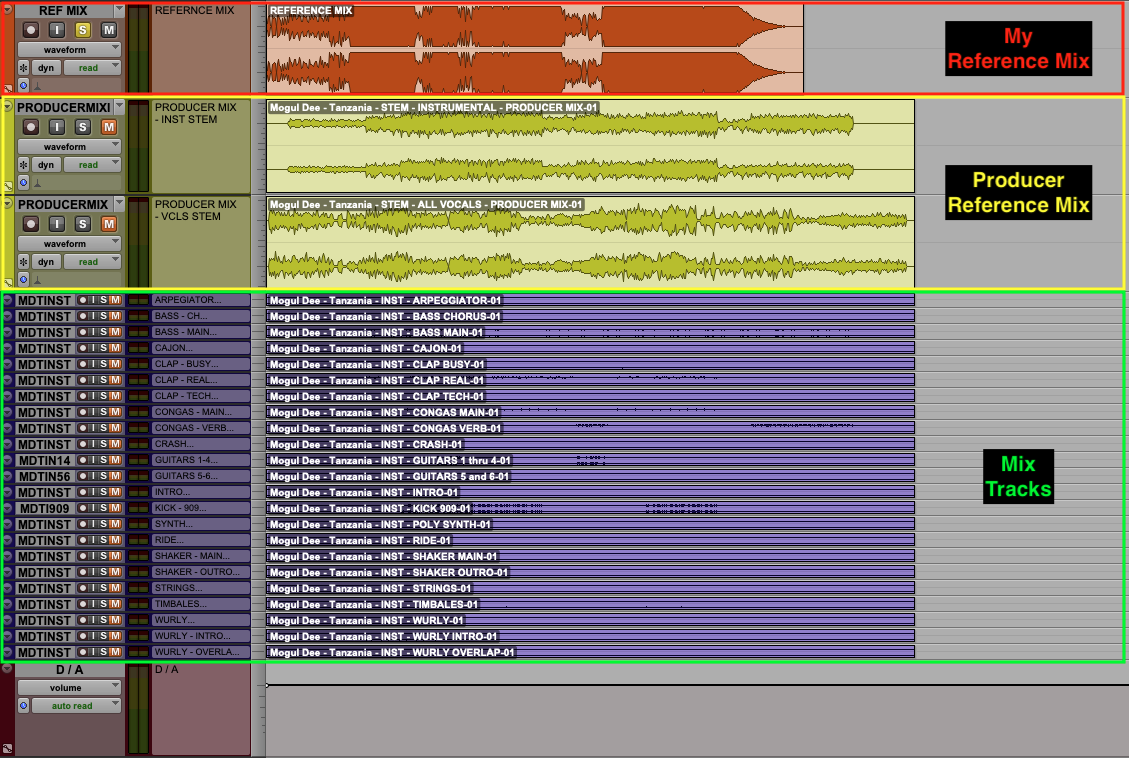
DAW edit window showing imported reference tracks and imported mix tracks.
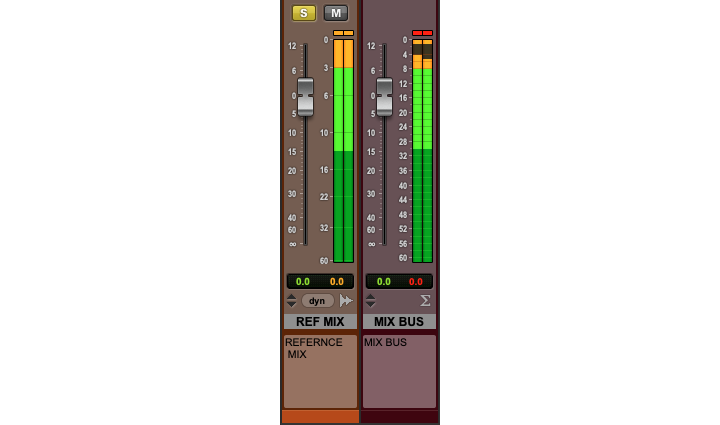
Reference mix at unity gain.

Reference mix at -8 dB.
-8 dB is just a starting point. As you are mixing, you may find that you need to adjust the level of your reference track a bit so that it matches the level of your working mix. This is completely normal. The important thing is that you keep them at the same perceived level for an accurate comparison, and also that you leave a comfortable amount of headroom on your master bus to avoid clipping, and keep your mastering engineer happy!
From this point on, I will check my reference any time I return from a break, and occasionally while I am mixing. This keeps me in tune with the “objective reality” of what I am actually hearing, and on track (pun intended) to achieving my intended sonic goal.
For more detailed information about references tracks, check out these articles:
What is a reference track and how to use it
4 Popular mixing reference tracks: why they work
2. Constantly adjusting the level of your speakers
There are multiple variables that affect our perception of sound. One of these, and an important one at that, is sound pressure level. Humans do not perceive all frequencies equally at all volumes. In fact, we are most sensitive to frequencies in the range of 2 kHz to 5 kHz, a.k.a., the presence range, and least sensitive to frequencies below 500 Hz. and above 8 kHz. The lower the volume that we listen at, the more this discrepancy is exaggerated, hence, the science behind the reason that “louder sounds better!”
Let’s experiment
Using your studio monitors, on good headphones, or with any playback system that can reproduce low-end, play your favorite commercially released song. Next, turn the volume down as low as you possibly can, while still being able to hear the vocals. What else do you hear? Likely the snap of the snare, the beater of the kick, maybe a bit of guitar; basically anything that lives in the frequency range of 2kHz to 5kHz. What don’t you hear? The hi-hat and cymbals are almost, if not completely gone, and there is absolutely no low-end. Now very slowly increase the volume. Little by little the low-end and high-frequency content will start to return.
Interesting fact: Have you ever seen a button on a car or a home stereo that says, “bass boost?” This was originally intended to be engaged specifically for listening to music at low levels. The idea being to compensate for the nonlinear way that we perceive frequencies as I stated previously. Of course most of us, myself included, engage it all the time just to crank that bass!
So how do we compensate for this? Short answer, we can’t. However, being aware of this allows us to better understand, and therefore properly evaluate what it is that we are actually experiencing when we listen at different levels.
In practice
For many years it has been widely accepted that when listening at a level of 85dB SPL we perceive all frequencies at some “approximation” of flat, or at least as flat as possible.
Therefore, one approach is to keep an SPL meter, or phone app equivalent, with you when you mix. Adjust your monitor level so that your meter reads around 85dB SPL. If this feels too loud, which it often does in small rooms, feel free to bring it down to 80 dB SPL, or even 75 dB SPL, until it is comfortable.
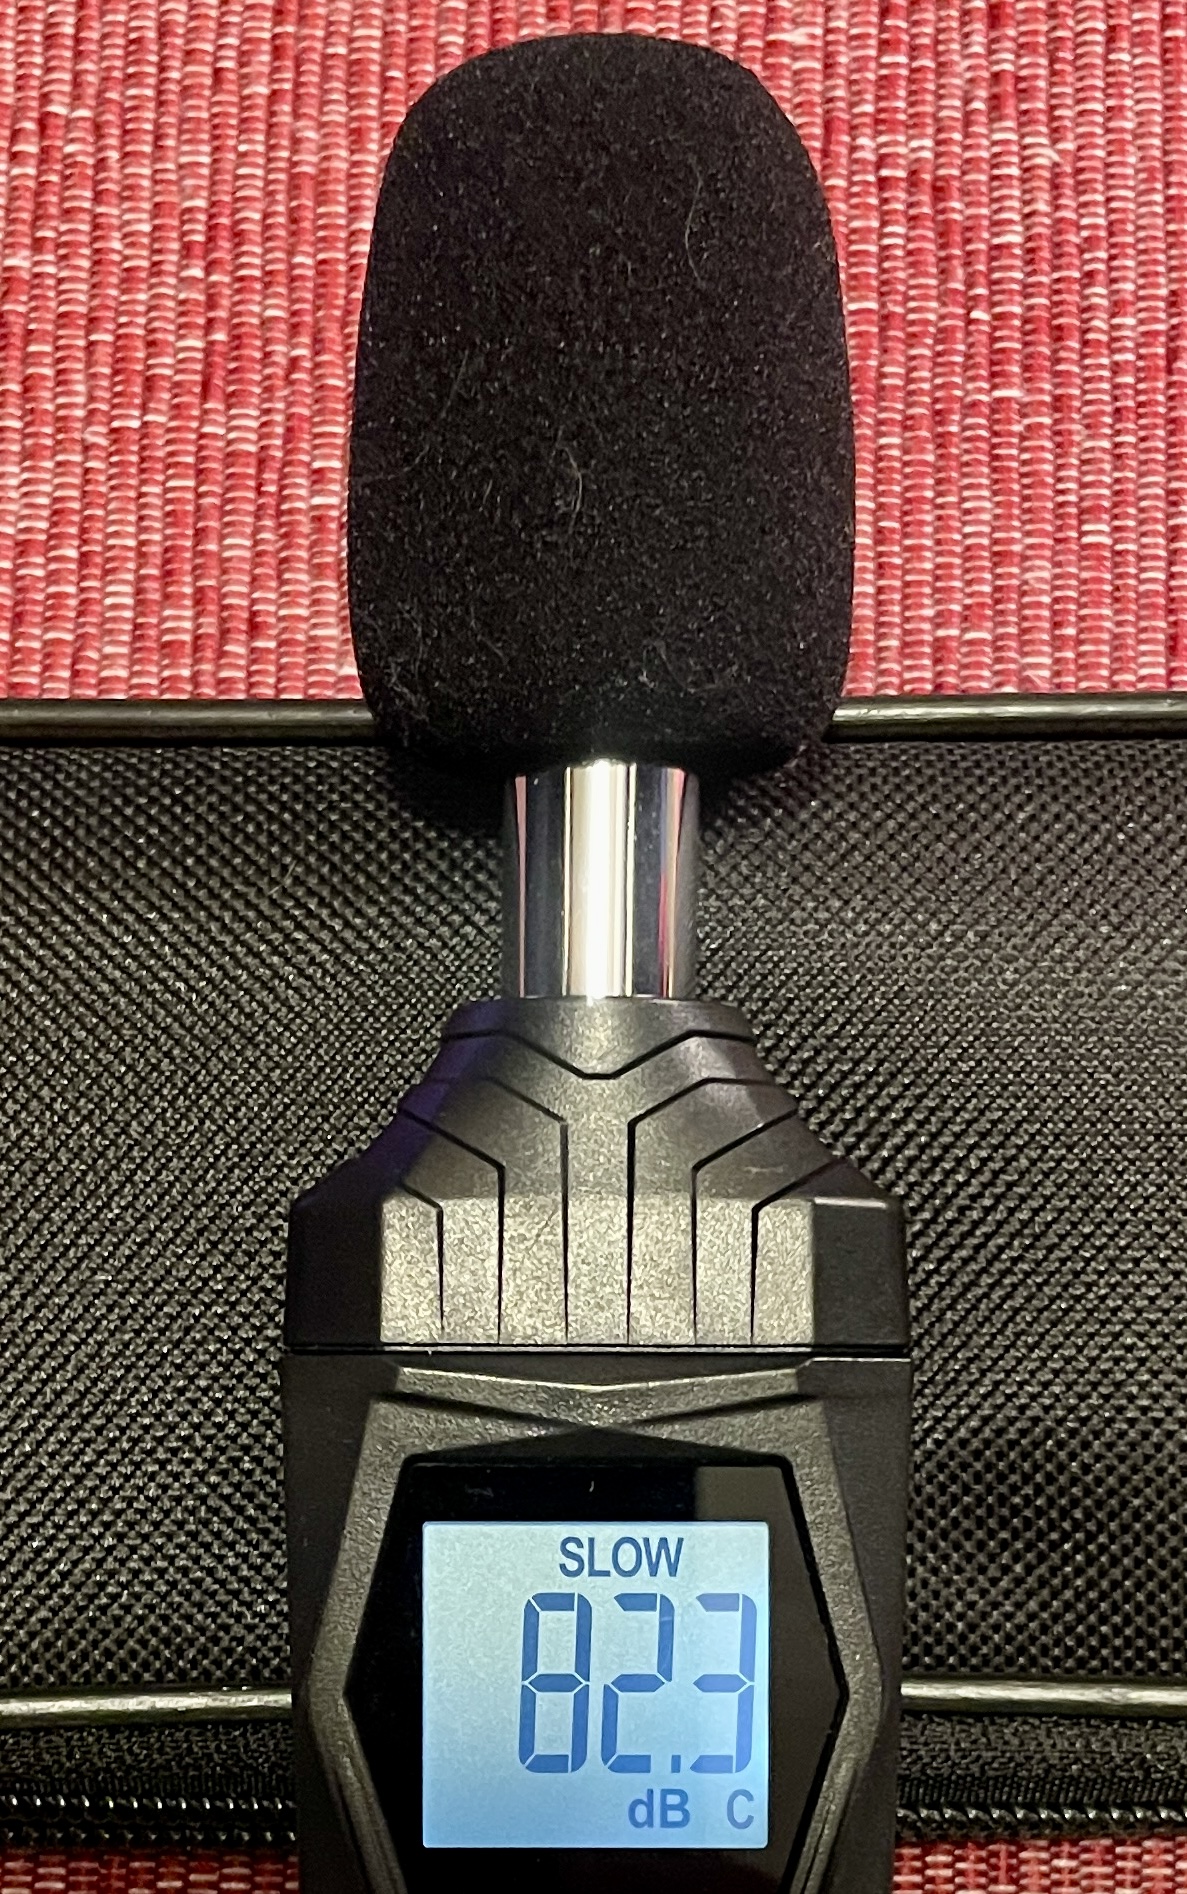
SPL meter (slow response, C weighted)
The takeaway
Every time you change your listening level, the perceived frequency balance of your mix also changes. If you don’t realize this is happening, you may find yourself working on something for a long time just to get it perfect, only to turn the volume up (or down) and find everything has suddenly changed. Does this mean that you should never check your mix at low levels, or never crank it up from time to time so you can really feel the bass? No. But, having a fixed reference listening level at which to always refer back to will help you to maintain perspective when making level and EQ decisions.
For more detailed information about how sound pressure affects our perception of frequency, check out these other articles:
What is the Fletcher Munson Curve? Using Equal Loudness Curves in Mixing and Mastering
The Importance of Monitor Gain in Audio Mastering
3. Not checking the phase relationship of acoustic drums and samples
Acoustic Drums
Taking time to properly prepare a session before mixing is crucial, not only for keeping ourselves organized, but also for identifying potential problems that, if not addressed at the beginning, can cause us headaches later on. Not least of these is phase cancellation.
Phase cancellation becomes a factor whenever we have more than one microphone, placed at varying distances, on a single instrument, and with a drum set, this is almost always the case. When drums are out of phase they lack focus and low-end, which only works against us when we try to boost the low-end with EQ. So why try to swim upstream when we can turn the stream around instead?

Waveform view of two microphones on a single kick drum, OUT of phase with each other.

Waveform view of two microphones on a single kick drum, IN phase with each other.

Waveform view of two microphones on a single snare drum, OUT of phase with each other.

Waveform view of two microphones on a single snare drum, IN phase with each other.
Let’s listen:
Samples
It is equally as important to be aware of phase with samples as it is with acoustic drums. Since most drum samples sound very good on their own, it is easy to overlook this, but when we layer multiple samples in time with our acoustic drums, or with each other, phase instantly becomes an issue.
Let’s zoom in on the waveform of three kick drum samples that I have chosen at random. I have added a red vertical red line to highlight each sample’s phase in relation to each other.
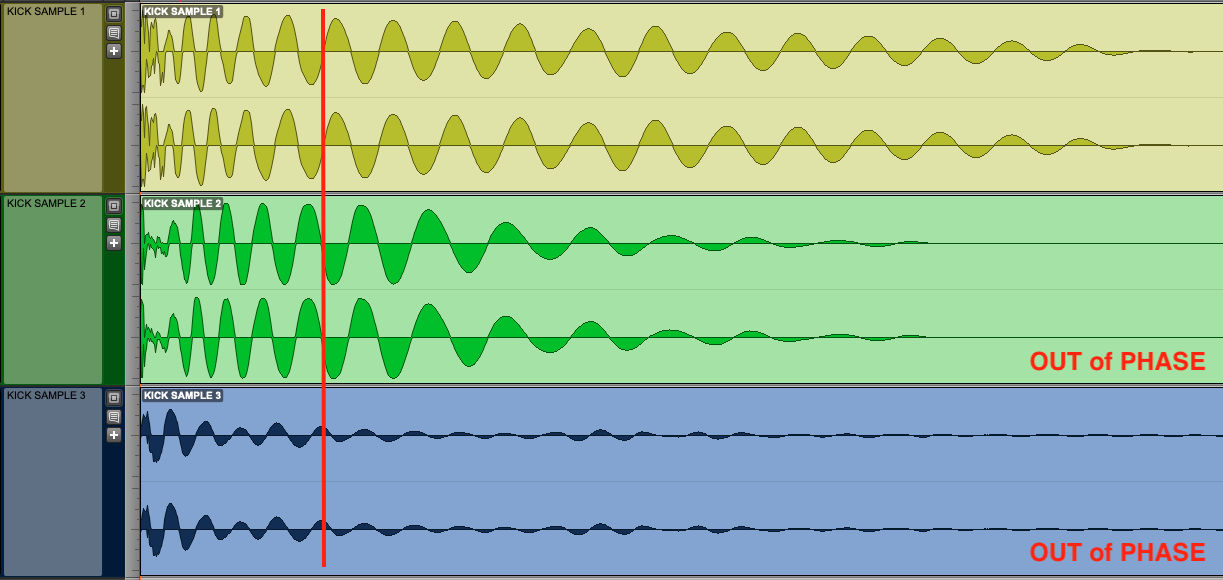
Waveform view of three kick drum samples OUT of phase.
Also, If you follow along the waveforms horizontally, in time from left to right, you will notice that they are in phase at some points, and out of phase at others. This is due to the fact that each sample does not have the same fundamental frequency, therefore they have slightly different wavelengths. For this reason we won't be able to put them perfectly in phase, however, it doesn’t mean that we can’t get them closer. The trick is to focus on the initial transient of each sample as that is where the most energy is, align the phase there, then listen and adjust if needed.
In the next image you will see that I have made the following adjustments. I left kick number 1 untouched. I inverted the phase of kick number 2, and I delayed kick number 3 by 92 samples.

Waveform view of three kick drum samples IN phase.
Let's listen:
In both the acoustic drums and the sample kick listening examples, you should notice a rather profound difference. The added focus, punch, and low-end that you experience would never be achievable with EQ alone. Phase cancellation would always be fighting against you.
4. Not starting with a static mix
When we start a new mix, it is tempting to immediately bring up the drums, solo the kick, and start adding EQ. Sound familiar? We’ve all done it, and I know many engineers that still work this way, and hey, if it works for them, who am I to judge? But, for me, I use a different approach.
I prefer to first build a static mix using only level and panning, before I reach for an equalizer or any other type of processing. This practice allows me to internalize the instrumentation and the arrangement of the song so that I clearly understand each element's role, and where it wants to live within the overall frequency balance of the mix.
Note: This also is our opportunity to establish a healthy level into my mix bus, while still maintaining enough headroom. (I usually aim for at least -8 dBFS peak). You can then re-adjust the level of your reference mix to match.
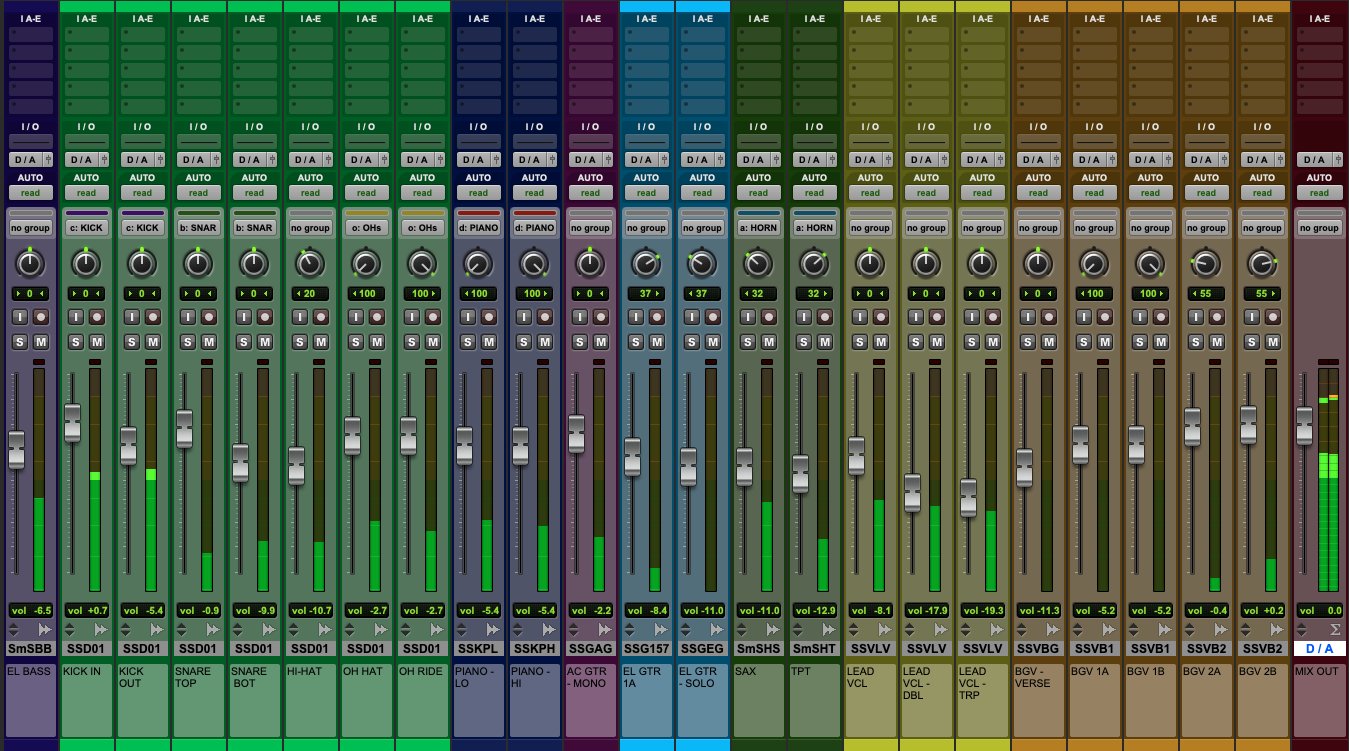
DAW mixer showing a static mix. Only levels and panning. Zero processing.
5. EQing in solo
Arguably this is one of the most common mistakes made by audio engineers across the spectrum, myself included.
Too often we solo a track when we want to make corrections, hence losing our reference as to how it fits into the bigger picture. We end up over-processing the track or overextending certain frequencies, then, when the solo’d material is placed back into context, the resulting track ends up fighting the vocal, the snare, or some other important element.
I imagine that this is nothing you haven’t heard or seen before. So if we are aware of the danger, why do we continuously find ourselves falling into this trap?
As engineers, when we hear a problem in a specific instrument, naturally, we want to hone in on it, and a great way to do that is to hit solo. Upon fixing it, we notice something else. Then, of course, the creative solutions start pummeling us… “Ooh I could add harmonic distortion to the low-mids and warm those up, that would be nice...” “…hmm, seems a bit out of hand, how about some multiband compression…” “…Hey, aren't we forgetting something?”
Yes, we are forgetting to mix!
Does this mean we should never put tracks in solo? Of course not. Instead, hit the solo button to confirm the issue, go ahead and deal with it. But then immediately put the mix back in—or at least fold in a couple of other tracks to give you some context. Otherwise, you will wind up chasing your own tail.
6. Adding a high-pass filter to every track
Just like slapping a compressor on every track simply because “you think you are supposed to,” needlessly high-passing every track can potentially suck the life out of a mix. Yes, sometimes nasty bits of thump and hum swim in the depths below 100 Hz, and for these, a cut can definitely help. However, resonances of a most pleasing, chest-pumping variety also lurk down there, and you don't want to lose some life-affirming low end just because you saw someone say to cut everything below 100 Hz in a tutorial, do you?
Indeed, strange pieces of advice often crop up around high-passing, such as "find the instrument's lowest note and high pass there." The thinking, I believe, is that within the context of the mix, there's nothing of value below that frequency. While at times this may be the case, it is not a hard and fast rule by any means.
Here is a hypothetical: Say your client paid top dollar to record their trumpet in the finest recording studio in the world. Sure, we're taught to mitigate needless room sound, but is this particular room sound—the finest in the world, mind you—needless? Could vital information denoting this amazing location lurk below the instrument's lowest note?
Let’s take the hypothetical even further: what if this trumpet player only blasted high C's for the entire song? Should we cut everything below the fundamental frequency of a high C? I would say no.
As always, context is everything, and if there’s anything I want to impress upon you, it’s that high-passing is all about context - you don’t just do it willy-nilly. So if you need to high-pass, here are two tips:
First, protect any vital resonances. You can do this by adding a parametric boost just above the cross-over frequency, so that its downwards slope raises the low-cut a bit.
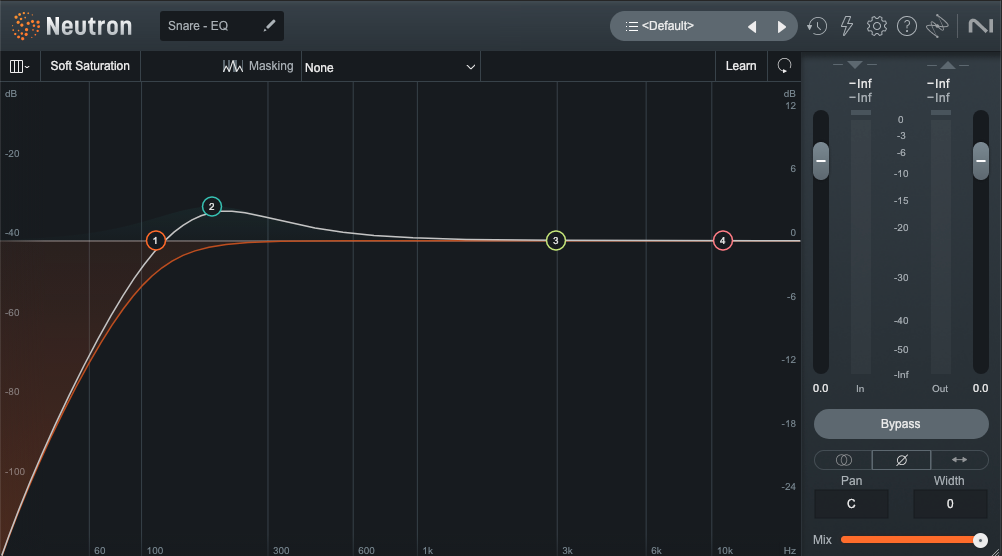
Parametric boost below the low-cut in Neutron.
Second, make sure your monitoring situation is accurate when dealing with low-end. Know the frequency range of your monitors and reference headphones, audition any low-pass filters with and without your sub (if you have a sub). Know your room and always have a reference. (Refer back to mistake #1!)
7. Adding top-end to every track
I often made this mistake when I first started mixing; I would listen to my favorite records, note their vibrancy and brilliance, and think I needed to push the top-end, or put “air” on everything, in order to get a similar result. But, before I knew it, I had invariably mixed a tin can.
The truth is, all those shelves must begin somewhere in the frequency spectrum—often lower than I’d intended. 6 kHz, 7 kHz, 8 kHz, and as a result, my mixes were overly present, overly bright, and on the verge of painful.
More often than not, You only need one or two elements to brighten a whole track. A vocal at 16 kHz here, some overheads at 10 kHz there, and maybe a slight Baxandall high shelf on an important bus—but leave the rest alone. You'll be surprised at what happens if you trust in the innate brightness of the material.
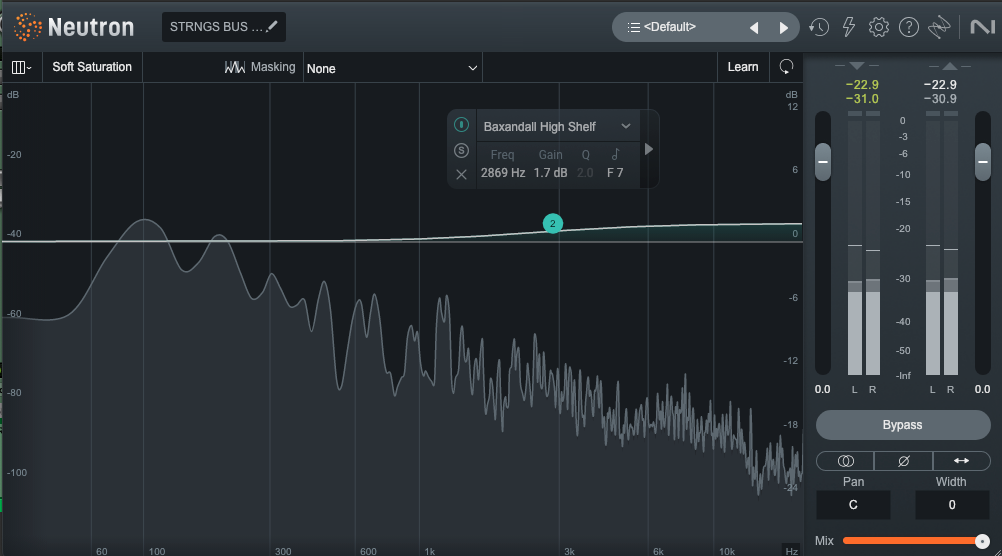
Baxandall high shelf on a string bus using Neutron EQ
8. Cutting too much
Since most instruments have energy between 200 Hz to 400 Hz, a great deal of masking occurs in this area causing a lack of clarity and low-mid build-up or “mud.” When we move up the spectrum to the range of 400 Hz to 600 Hz, things start to sound papery, or “boxy.”
For these reasons, it makes sense to want to cut here, and we often do and should, however, sometimes the temptation is to scoop these frequencies out too much, and on every track, hence putting a “smiley face” EQ on everything, so to speak. In solo or out of context, this may sound good to us, at least at first, but when we listen to everything together, what we are left with is a very hollow, very thin, and sometimes overly bright mix.
Quite often this is a bi-product of mixing in a less than ideal environment, with a lot of frequency buildup in the range of 200 to 500 Hz. This is very common, especially in small rooms, like a bedroom for example, and believe me, my home studio is no exception.
9. Not cutting enough
On the flip side, too much low-mid information can lead to a cloudy, dull, and less “radio ready” sounding mix. If you place an inarguably inferior mix next to a proven song of the same genre, you'll surely notice not only the comparable dullness of the top end, but also the extra weight around the lower-mids. If the low-mids are not divided amongst instruments well, they can take away from the precision of transients, the power of harmonic backups—be they guitars or synths—and contribute to some indistinct qualities in the vocal.
Too much low-mid, or not enough? What’s the fix!?
We could rely on the mastering engineer to address this for us, but I guarantee they would rather spend time enhancing a track than trying to fix it. So what can we do?
The answer is simple; Better monitors, appropriate room treatments, and good reference mixes. Did I say reference mixes? Just in case I missed it I’ll say it again. Reference mixes!
I realize that buying new studio monitors and investing in room treatments is not always an option, and to be honest, even some of the best studio’s I’ve worked in have some strange acoustic anomalies. The truth is, no two rooms sound alike so if I hadn’t said it before, I’ll say it again. Reference mixes!
A note about headphones
Due to their general lack of low-end, unnatural stereo image, and potential for ear-fatigue, headphones are often frowned upon for mixing. I only half agree with this. Headphones are consistent (meaning they always sound the same regardless of where you are using them), therefore having a pair that you know very well, is an additional reference that can help you check your mixes in most any environment.
For more detailed information about frequency masking check out this other article:
For more detailed information about monitoring check out these other articles:
6 Considerations for Mixing with Headphones vs Studio Monitors
Tips for Producing and Mixing with Headphones
10. Employing too many resonant EQs on a single track
Ahh, the mix engineer's analog to diminishing returns. You hear a pesky snare resonance and you cut it. Then you hear another, so you cut that too, suddenly another pops up and you cut again. Now you hear another. Then another. Soon, you've created a series of notches that sucks the life out of the snare. Does this sound familiar?
Here’s the simple fix: Stop at two notches, and let it rest for a while. If the sound still bothers you after you've moved on for ten or fifteen minutes, add another notch if you must.
11. Excessive frequency sweeping while looking for the right EQ curve
Ah, frequency sweeping! You make an EQ boost, sweep up and down the spectrum until you find the offending resonance, then make a cut.
There are two schools of thought here. Some engineers advocate avoiding the sweep altogether because it changes your perspective (they point out that for every "right" frequency you isolate, you audition hundreds of wrong ones). Some don't care, preferring the speed that sweeping affords.
There is truth in both arguments. Me? I go for a halfway approach, because my perception can absolutely be altered by excessive sweeping. But I'm not afraid of the practice, within reason—after all, we have all these aforementioned tools to keep our perspectives sharp. So I sweep at first, but when I'm in the range of what I am looking for, I stop sweeping, and do the following:
I set up the boosts or cuts as I think they should be, but do so in bypass. Then I instantiate and listen. If I’m wrong, I know right away and put it all back in bypass. I rinse and repeat until I’m on the money. It seems like a slower process, but it trains your ear to move faster the more you do it.
12. Using static EQ when dynamic EQ may be the better choice
Dynamic EQ has been around for some time, growing in popularity over the years. Although similar to multi-band compression in some ways, they are not synonymous. While multi-band compression is useful for controlling a large range of frequencies, (i.e. lows, mids, or highs), dynamic EQ is more surgical, therefore useful for compressing a smaller, more specific range of frequencies.
It's easy to see why a dynamic EQ would come in handy: without messing up other bands, you can effortlessly select a specific range of frequencies and process those to your liking. Yes, sometimes a dynamic EQ is actually preferable to a static one, and yet, sometimes engineers resolutely hold to their fixed EQ.
Here's an example of when it might be wiser to grab a dynamic EQ: say you have a build up in the vocal at that dreaded harmonic resonance point, 2 to 3 kHz. You try a fixed EQ in that range, but wind up draining the singer's luster.
Do we compromise on the cut, living with some harshness? We could—or we could switch to a dynamic EQ, which gives us more control over how the EQ starts behaving. If the singer only hits that harsh resonance during louder passages, a dynamic EQ could help tame these frequencies when the vocalist is belting while backing off during the quieter passages giving us the best of both worlds.
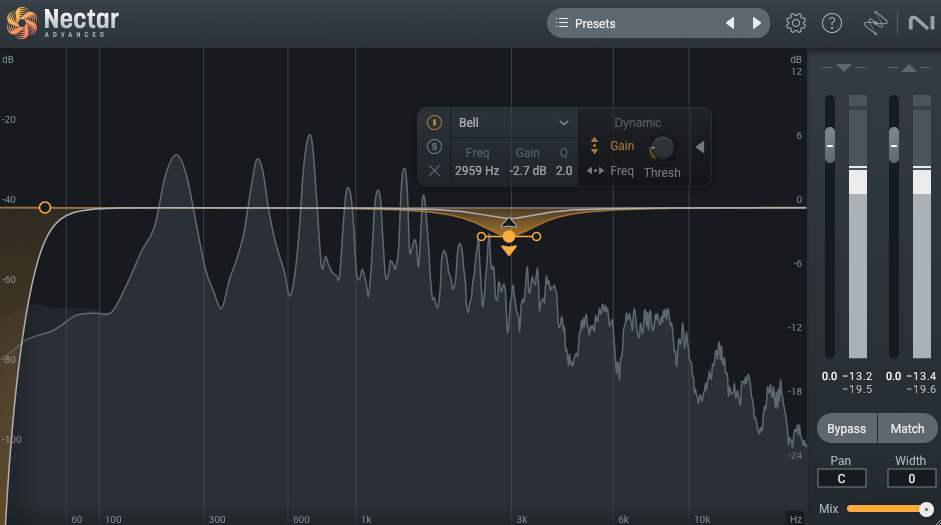
Dynamic EQ shown on a vocal at 3000 Hz using Nectar EQ.
The same approach applies to lower frequency bands like a bass with an uneven bloom in the four hundred range, or that dreaded open low E-string on a guitar.

Dynamic EQ shown on an El bass at 162 Hz using Neutron EQ.
Let’s take a look and have a listen to an example…
In the audio clip that we are about to hear, you will notice that the singer has a strong resonance at 257 Hz and 915 Hz in the 1st half of the sung phrase but not in the second half. Using a static EQ would fix the resonance, but leave the rest of the phase too thin. This is a good opportunity to use dynamic EQ instead.
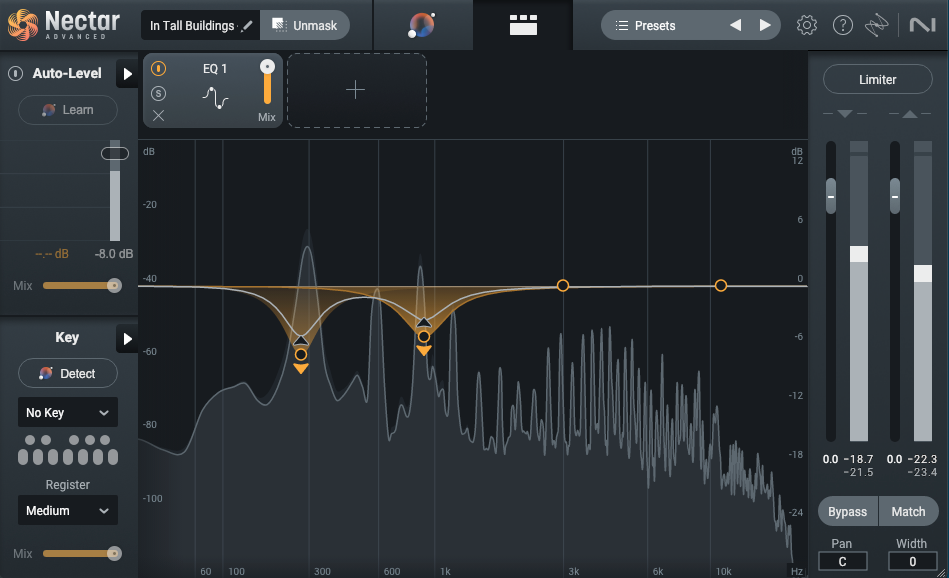
Lead vocal with dynamic EQ.
The difference I admit is subtle, so I have removed the reverb from the vocal and also turned it up a bit about the instruments.
For more detailed information about multiband comparison vs dynamic EQ, check out this other article:
Multiband Compressors vs. Dynamic EQs: Differences and Uses
13. Using dynamic EQ instead of static EQ
As dynamic EQs are pretty amazing, it is tempting to want to use them for everything, however using dynamic EQ for multiple bands on a single channel or bus, can sometimes lead to a weird, inorganic kind of multiband compression, leading to a host of other problems.
The key, as always, is to listen. If the dynamic EQ you’ve enabled has had an unnatural effect on either the overall resonance or dynamic interplay of the track, that’s an indicator it isn’t the right tool for the job.
14. Not EQing your reverb
Something that I notice a lot of begging mixers often neglect, is the use of EQ on time based effects, specifically reverb. When working with students, what I most often hear is, “Oh,... I didn’t even know that I could do that!” There is zero shame in this. When I was first learning to mix I thought you should choose a reverb based on the sound that you like, i.e. plate, room, spring, etc., and that was it, done! In retrospect it seems obvious, but at the time, I needed someone to show me.
Nothing can muddy up a mix more quickly than a long reverb, potentialy drowning your mix. A quick way to check is to simply mute the reverb return while your track is playing, and if you have not added any EQ, your mix will instantly sound cleaner.
Reverb is just as much a part of your entire mix as any individual instrument. Everything that you send to it lasts longer, hanging around and fighting with everything else in the mix. So why wouldn’t we give it just as much attention as we do the kick, or the snare, or the vocal?
Typically, reducing the low end to clean up the mud, cutting some top end to soften any exaggerated sibilance, and maybe cutting a resonance somewhere if it is needed, is common. How much and at what frequency depends on the mix, but being aware and knowing that we can do something about it is key!
Let’s listen…
For the following examples, I used a small mix, only drums, synth bass, piano and vocals.
Here is the mix dry:
Here is the mix with reverb that has not been EQ’d:
At first things may sound richer and have more depth. Unfortunately, everything also sounds quite soupy and unclear.
For this example I have added EQ to the reverb return of the lead tambourine, background vocals, and the lead vocal.

EQ of a reverb on tambourine.
HPF for bleed rumble and a High cut to soften the brightness a bit.
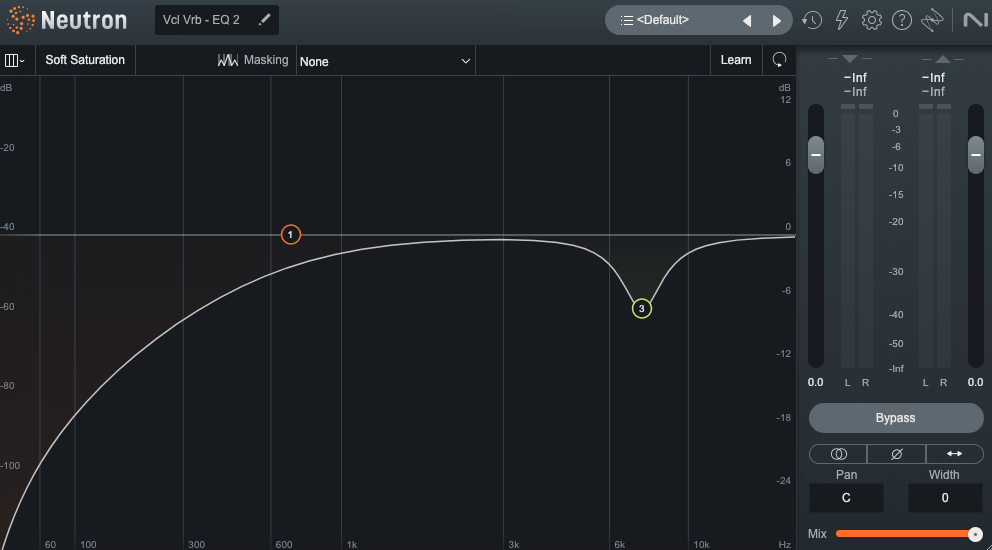
EQ of a reverb on lead vocal.
HPF for unwanted low-end and a cut at 7400 Hz where the sibilance was most prominent.
Let’s listen…
Here is the mix with reverb that HAS been EQ’d:
You should notice right away that the mix instantly sounds more clear, yet everything still has a depth and richness that it lacked when the mix was dry.
For more detailed information about mixing reverb, check out this other article:
5 Essential Steps for Mixing Reverb
15. EQing when you've lost perspective
There are multiple variables that affect our perception of sound; the condition of our environment, (i.e.room dimensions, acoustic treatments, air temperature, and humidity), our equipment, (i.e., interfaces and speakers), and what, in my opinion, is too often overlooked, our physical state. We perceive sound differently if we are tired or if we are rested, if it is early in the day, or late in the evening, 5 minutes into a mix or 55 minutes into a mix, or even if we have had too much coffee, or perhaps not enough.
When I was much younger, and very new to mixing, I once worked on a mix for 6 hours straight, from midnight until 6 o’clock in the morning. I started mixing at a nominal level, but as the night went on I found myself turning the volume up little by little. I only drank soda, I only ate chips, and I never took a break. By the end I was completely exhausted. Although, when I was done I was very happy with my mix! Until, of course, the next day. Everything sounded muffled and I had a physical pain in my ears. Cleary from listening to a snare drum hammer away for 6 hours. Later that same day, when my hearing returned to normal, my mix sounded nothing like it had the night before. Although this is an extreme example, it is an important lesson to learn!
Solutions?
First, and the most obvious, is to take frequent breaks—a fifty-minute timer with a ten-minute allotment for breaks is not a bad idea at all. Such respites, especially if submerged in silence, can return us a sense of objective reality. When you come back, take a second and check your reference mix to “recalibrate” your ears.
Second, be aware of your listening level at all times. By all means, crank it up when you want, but never for extended periods of time.
A note about ear protection: Have you ever been to a show to see your favorite band? You rock out in an arena for 2 or 3 hours having the time of your life. It’s so loud that you need to yell just to have a conversation with the person standing right next to you. Once the show is over and you are out in the parking lot, everything sounds muffled and you can’t hear very well. I think many of us can relate. For this reason I highly recommend investing in a good pair of earplugs. Not only for rock shows, but anytime you are in a potentially loud environment for any extended period of time, ie. around heavy equipment, mowing the lawn, placing mics on a drum kit while the drummer is warming up, at a fireworks show, etc.
For more detailed information about mixing reverb, check out this other article:
How to Prevent Ear Fatigue When Mixing Audio
16. Using EQ as a hammer for of a screw
Finally, sometimes EQ just isn't right for the job, often a well-executed pan move, or a level change, is all that’s needed.
Conclusion
Why sixteen EQ mistakes? Why not five or twenty? Simple, these are all the mistakes that I could think of. Even so, I am sure there are others. (Frequency masking! See? There’s another one!)
However, watching out for these sixteen mistakes will serve you well. Pay attention to these potential pitfalls, and you'll be less in danger of falling down the rabbit hole.
And one last thing, in case I forget to mention it, “Use references and take breaks!”
Want to start mixing your tracks faster and more efficiently. Get iZotope's Neutron.
